
When I started this endeavor, I thought this would be a task that surely someone has written something on. I did lots of searching and really didn’t come back with any thing so instead I stumbled through it and ended up spending most of the afternoon on it. I have a Node.js based API using Express and I’m using the passport-azure-ad package to do authentication. This scenario assumes you have authentication working with Passport using a BearerStrategy and you have successfully authenticated from some kind of client application such as a web app or SPFx. There’s plenty of examples of using Passport out there. This example is showing some age, but it works.
Configuring Power BI
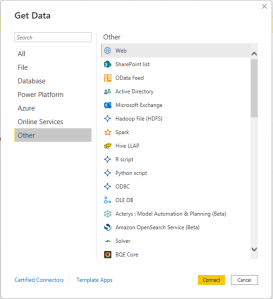
I started by trying to connect to my API in Power BI Desktop. Click the Get Data button, then select Other, followed by Web.
Now paste in the URL you want to try and prepare for failure. Let’s figure it out. The first scenario I ran into was that Power BI assumed my API was anonymous. I found this out by going and looking at my connect under File -> Options and Settings -> Data Source Settings. Remember this location as you may need to go here a few times to delete your connection to force Power BI to authenticate again. When you look at your data source, you will see that it says Anonymous. Click the Edit button and choose Organizational Account now click Sign in. Now, you’ll probably get the following error:
We are unable to connect because this credential type is not supported by this resource. Please choose another credential type.
Now if you search that error, you might come across this page which has some useful information but is in fact incorrect. Power BI pings your API without an access token and it expects to get a response in the www-authenticate header. The page linked above says you need to set a realm parameter in the response but in reality all you need is the authorization_uri. Keep reading those as we aren’t done. This link show you what the HTTP response should look like. In am using a multi-tenant app, so my response uses the common endpoint like this.
Bearer authorization_uri=https://login.microsoftonline.com/common/oauth2/authorize
Setting the Response Header with Express – Take 1
My first inclination was to create an unauthorized route which passport will redirect you to. There I would set the www-authenticate header and all will be good. Here’s an example of me registering my route to my controller.
app.get(`/tasks`,
    passport.authenticate("oauth-bearer", { session: false, failureRedirect: "/unathorized" }),
   taskController.getTasks
);
Now, I just create a simple method to handle my unauthorized route and it would send my www-authenticate header if the authorization (token) value was not present. Also make sure to send a 401 response as Power BI expects that.
app.get('/unathorized', (req, res) => {
    if (!req?.headers?.authorization)
        res.header("WWW-Authenticate", "Bearer authorization_uri=https://login.microsoftonline.com/common/oauth2/authorize");
    res.status(401).send("Unauthorized");
});
I test it out with PostMan and I confirmed my header was present. Perfect. I try it in Power BI and it still doesn’t work. This time when I sign in, a Pop up shows up quickly and closes it and I notice it says I am signed out. After some debugging locally, I noticed that when Power BI Desktop called my API, it never made it to the redirect page. Passport implements the unauthorized page using a new route so that happens as a 302 and two separate requests. Power BI doesn’t like that. Time for a new approach.
Setting the Response Header with Express – Take 2
Now that we understand that Power BI doesn’t like our redirect. I opted to create a simple middleware function for Express.
const powerBIHeaders = (req: Request, res: Response, next: NextFunction) => {
    if (!req?.headers?.authorization)
        res.header("WWW-Authenticate", "Bearer authorization_uri=https://login.microsoftonline.com/common/oauth2/authorize");
    next();
}

app.use(powerBIHeaders);
This got me closer I thought but I was still not there. I kept getting the popup but it wouldn’t let me login.
Read the docs yet again
Thinking back to my rudimentary knowledge of Microsoft Identity, I wondered how it knew which Client Id to use during the login process. There’s no where you can specify it manually. After reading the Authentication with a data source article again, I noticed that it looks for an App Registration whose Application ID URL matches that of your API’s URL. Now things are starting to make since. Going back to my Application Registration in AAD on the Expose an API blade, I hadn’t changed the default value and it was still something to the effect of api://guid as shown below.
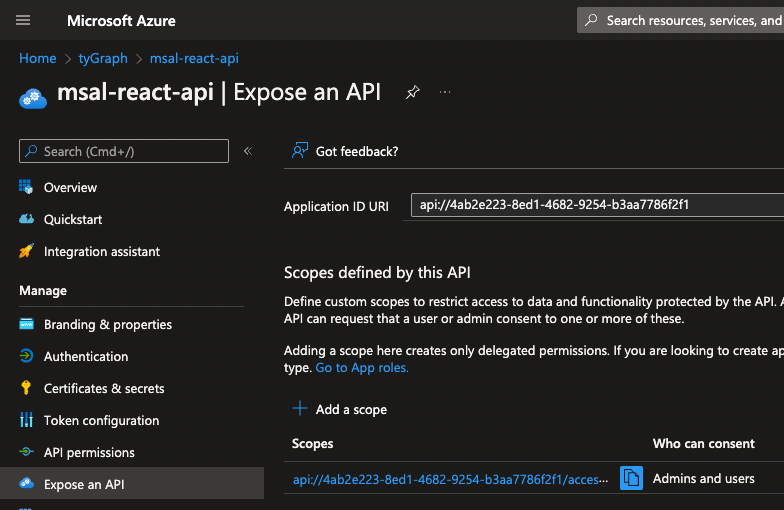
That must be it. I need to change that to https URL to my published API. The downside of this is that it makes it difficult to test your API locally from Power BI Desktop, but I think you can work around that if you really need to. Finally, the docs say to add Client IDs for Power Query, Power BI, and Power Apps / Power Automate so that they have permissions to call the API. Those IDs are listed on that article as well.
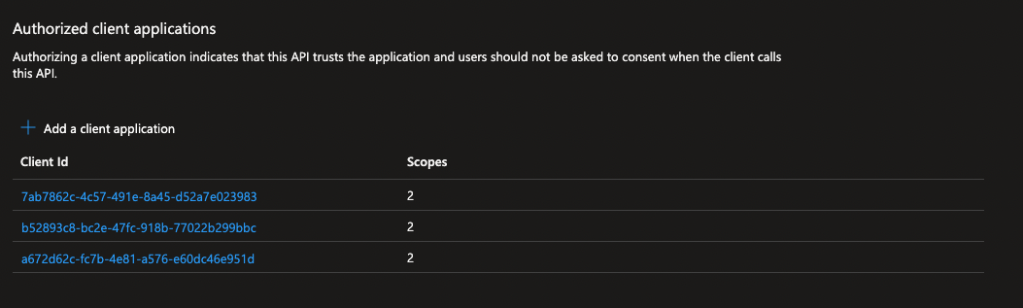
- a672d62c-fc7b-4e81-a576-e60dc46e951d
- b52893c8-bc2e-47fc-918b-77022b299bbc
- 7ab7862c-4c57-491e-8a45-d52a7e023983
I seem to remember seeing it only supported user_impersonation or access_as_user scopes. Add them in the Authorized client application section of the Expose an API blade.
Connect with Power BI
At this point, I also closed Power BI Desktop and updated it. That’s probably not necessary but if you are still having trouble, give it a try. Go through the process to connect to your API using the Web Data source and it should work. It will prompt you for which account to log into. Provide it and then you should see your data available in the model.
