It’s not secret, Copilot agents are going to be big in 2025. As they are already starting to proliferate in organizations, many are starting to ask: “How many agents are out there?”, “Which ones are being used and by whom?”. Let’s look at how you can answer the first question with SharePoint agents.
While you can find Copilot Studio agents in Power Platform, SharePoint agents exist elsewhere. In reality, the definition for SharePoint agents is simple a file with an extension of .agent. We can take our years old search skills and find a list of your agents with a simple query. Go to your search page and simply type in the following:
FileType:agent
You can take it a step further if you want to see everything created since the start of the month.
FileType:agent Write>=2025-04-01
This will give you a list of all agents that you have access to. To see everything in the tenant, you might need to use an account with more permissions or you could go to Purview and create an eDiscovery case.
This will at least give you an idea of what’s out there. Knowing what the agents are doing and who is using them will be a bit more involved and we can explore that in the future.
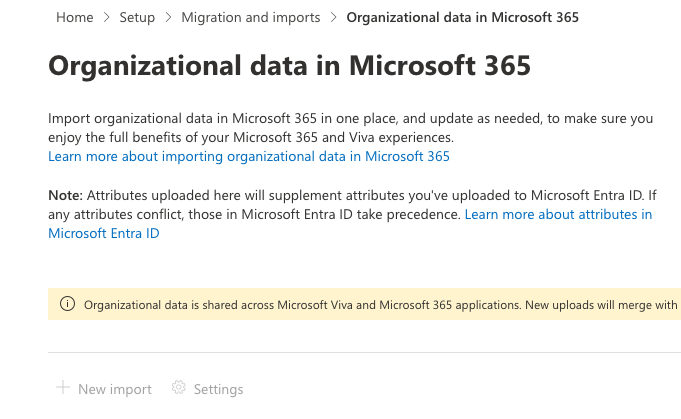
By now, you might have heard that you can import your own organizational data in Microsoft 365. Specifically we are talking about to augment the data in your user’s Entra ID profiles with data that you export from your systems such as HRIS. With the Microsoft 365 Community Conference coming next week, I was looking to test this feature out for use in my Viva Amplify session. I went through all of the steps, but I got stuck. The “New import” button was disabled no matter what I did.
I decided to reach out on Twitter (I really struggle to call it X) and finally Naomi Moneypenny reached out and told me you had to ask support to enable it for you. If you’re looking to use this feature, that’s the process. I’ve opened a support ticket and will post back on my experience.
It should also be noted that if Entra ID already has a value in one of the user profile property (i.e.: Department), the organizational data import won’t overwrite any existing values. That means you can use this to populate empty values but not correct values that are incorect.
If you are going to be at the Microsoft 365 Community Conference next week, I hope to see you there!
Are you ready for the most exciting event of the year? Microsoft Build is back with a bang, and you don’t want to miss it! Here are five reasons why you should attend Microsoft Build this year:
Learn from the experts. Microsoft Build is the ultimate place to learn from the best and brightest in the industry. You’ll get to hear from Microsoft leaders, engineers, and innovators who will share their insights, tips, and tricks on how to build amazing apps and solutions with Microsoft technologies. Whether you’re interested in cloud, AI, data, gaming, or anything in between, there’s something for everyone at Microsoft Build.
Connect with the community. Microsoft Build is not just a conference, it’s a celebration of developers. You’ll get to meet and network with thousands of other developers who share your passion and curiosity for technology. You’ll also get to join fun and interactive sessions, workshops, and hackathons where you can collaborate, learn, and create with your peers.
Experience the latest innovations. Microsoft Build is where you’ll get to see and try the latest and greatest products and features from Microsoft and its partners. You’ll get to explore new tools, frameworks, and platforms that will help you take your skills and projects to the next level. You’ll also get to witness some amazing demos and announcements that will blow your mind.
Shape the future. Microsoft Build is not just about what Microsoft has to offer, it’s also about what you have to say. You’ll get to share your feedback, ideas, and questions with the people who make Microsoft products and services. You’ll also get to influence the direction and roadmap of Microsoft technologies by participating in surveys, polls, and discussions.
Have fun! Microsoft Build is not all work and no play. You’ll also get to enjoy some entertainment, games, and surprises that will make you smile and laugh. You’ll also get to celebrate your achievements and accomplishments with your fellow developers and Microsoft teams.
So what are you waiting for? Register now for Microsoft Build 2023, happening on May 10-12. You can attend online or in person at Seattle, Washington. Either way, you’ll have an amazing time and learn a lot. Don’t miss this opportunity to be part of the most awesome developer event of the year!
As a TypeScript developer, you’re likely familiar with the importance of having the right tools to make your job easier and more efficient. GitHub Copilot is one such tool that can help you streamline your development process and enhance your day-to-day life. In this blog post, we’ll explore the top 5 reasons why GitHub Copilot can be an invaluable addition to your toolkit as a TypeScript developer, however it’s worth mentioning that there has been some controversy surrounding the tool and its privacy concerns.
It’s important to note that Microsoft, the company behind GitHub, has been assuring customers that they have implemented strict privacy measures to protect user data. They claim that all data is securely stored and that the tool is designed to only access the information it needs to perform its intended functions. However, it’s important for users to carefully review and understand the privacy policy and terms of service before using the tool.
Improved code navigation:
One of the biggest benefits of GitHub Copilot is its ability to improve code navigation. With its powerful search capabilities, you can easily find specific files or functions within your codebase, making it simpler to understand and work with. This can be especially useful for larger projects or projects with many contributors. For example, if you’re working on a large TypeScript project and need to find all references to a specific function, Copilot can quickly locate them for you.
Enhanced code completion:
Another great feature of GitHub Copilot is its enhanced code completion capabilities. As you type, Copilot can provide suggestions for code completion, which can save you time and reduce the likelihood of syntax errors. For example, if you’re writing a TypeScript function and forget the syntax for a specific method, Copilot can provide the correct syntax as you type. Admittedly VS Code and Visual Studio can do this as well. Copilot will surprise you as it seems to understand your intentions when writing code.
Automatic refactoring:
GitHub Copilot also includes a feature for automatic refactoring, which can save you time and reduce the likelihood of introducing bugs. For example, if you need to rename a variable throughout your project, Copilot can do this for you automatically, ensuring that all references are updated. This can be a huge time saver when working on a large project. VS Code supports this feature as well, but I haven’t dived too deep into the specific capabilities of what ChatGPT can do.
In-editor documentation:
Another great feature of GitHub Copilot is its in-editor documentation. This allows you to easily look up documentation for specific methods and functions, making it easier to understand the purpose and usage of different parts of your codebase. This can be especially useful for TypeScript developers who are working with complex libraries or frameworks. What I like about this is that it usually suggests some snippets about how to use a particular function and often suggests relevant lines of code after it while still being in the context of the code you are writing.
Collaboration tools:
Finally, GitHub Copilot also offers a variety of collaboration tools, such as the ability to share code snippets and request feedback. This can be especially useful for TypeScript developers who are working on a team or contributing to an open-source project. For example, if you’re working on a TypeScript project with other developers, you can use Copilot to share specific code snippets and request feedback on specific portions of the codebase, making the collaboration process more efficient.
In conclusion, GitHub Copilot is an incredibly powerful tool that can enhance your day-to-day life as a TypeScript developer in many ways. With features like improved code navigation, enhanced code completion, automatic refactoring, in-editor documentation, and collaboration tools, Copilot can help you write better code faster and more efficiently. However, it’s important to be aware of the controversy and privacy concerns surrounding the tool and to carefully review the privacy policy and terms of service before using it.
With SPFx 1.15.2, a new feature snuck in that allows you to enable service principal registration when you are approving the permissions of the app. If you have ever had your SPFx solution talk to an AAD secured API, you know that not configuring the App Registration in the customer’s tenant can cause problems. Historically, you had to create a URL or some way for the user to sign in separately in the browser to route the user through the consent process for the App Registration.
However, with SPFx 1.15.2, Microsoft has streamlined this process. In your package-solution.json file, there are two new properties appId and replyUrl that you can add to each permission you request in webApiPermissionRequests that allows you to specify the id of the App Registration and a URL that the user is redirected to when the registration is complete.
Note that the replyUrl must be listed in the Redirect URIs section of the Authentication section of your App Registration. If you don’t have any platforms registered here, add a platform and choose Web. You can then specify the URL.
Build your SPFx package and add it to the App Catalog. To test this, you will need to remove any existing API permissions that were approved on the tenant along with the App Registration in AAD. If you are trying this on a new demo tenant like I did. I noticed I got a few errors during the process and I had to wait a few minutes after the App Catalog was created. If it fails the first time, remove the package and start the process over again.
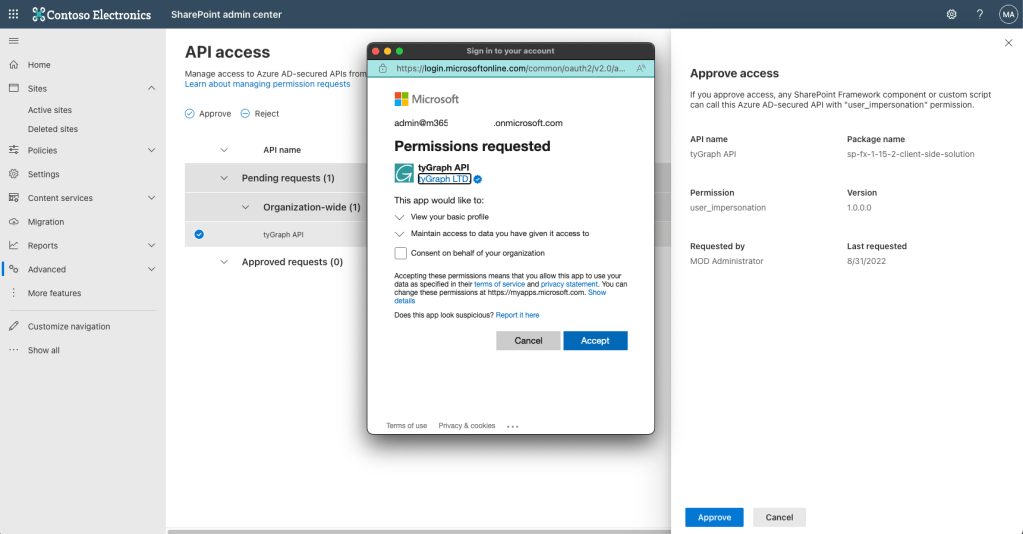
After you add it to the modern App Catalog, click the Go to API access page. Select your API and click Approve. You will then see the consent request. Accept the permissions it requests and you will be redirected to your replyUrl. The permission should now be approved in Azure Active Directory.
Approve the permissions.
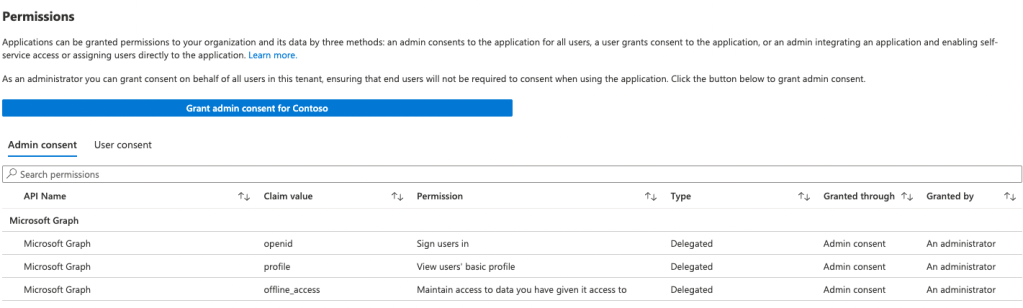
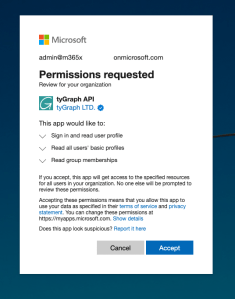
You’ll notice that only basic permissions have been requested. My API actually requires additional permissions, but they don’t show up in the list when I look at the Enterprise Application permissions tab.
Only basic permissions.
If I click on Grant admin consent button, I can then approve those additional permissions requests.
Granting additional permissions.
When thinking about this, I came to the conclusion that the scope parameter in webApiPermissionRequests represents the scope that you are granting the SPFx service principal. However, your consent flow needs another set of scopes that you are granting to it. For example, I want my API to have access to GroupMember.Read.All but I don’t want the SPFx principal to have it.
While this new capability is a huge step forward, it doesn’t eliminate the manual consent flow that’s still required. However, it does make the initial registration a lot easier. I’m excited to see where this can go.
When I started this endeavor, I thought this would be a task that surely someone has written something on. I did lots of searching and really didn’t come back with any thing so instead I stumbled through it and ended up spending most of the afternoon on it. I have a Node.js based API using Express and I’m using the passport-azure-ad package to do authentication. This scenario assumes you have authentication working with Passport using a BearerStrategy and you have successfully authenticated from some kind of client application such as a web app or SPFx. There’s plenty of examples of using Passport out there. This example is showing some age, but it works.
Configuring Power BI
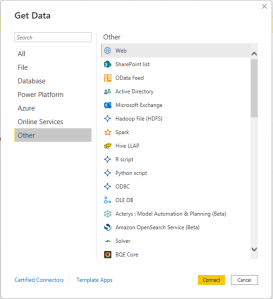
I started by trying to connect to my API in Power BI Desktop. Click the Get Data button, then select Other, followed by Web.
Power BI Get Data
Now paste in the URL you want to try and prepare for failure. Let’s figure it out. The first scenario I ran into was that Power BI assumed my API was anonymous. I found this out by going and looking at my connect under File -> Options and Settings -> Data Source Settings. Remember this location as you may need to go here a few times to delete your connection to force Power BI to authenticate again. When you look at your data source, you will see that it says Anonymous. Click the Edit button and choose Organizational Account now click Sign in. Now, you’ll probably get the following error:
We are unable to connect because this credential type is not supported by this resource. Please choose another credential type.
Now if you search that error, you might come across this page which has some useful information but is in fact incorrect. Power BI pings your API without an access token and it expects to get a response in the www-authenticate header. The page linked above says you need to set a realm parameter in the response but in reality all you need is the authorization_uri. Keep reading those as we aren’t done. This link show you what the HTTP response should look like. In am using a multi-tenant app, so my response uses the common endpoint like this.
My first inclination was to create an unauthorized route which passport will redirect you to. There I would set the www-authenticate header and all will be good. Here’s an example of me registering my route to my controller.
Now, I just create a simple method to handle my unauthorized route and it would send my www-authenticate header if the authorization (token) value was not present. Also make sure to send a 401 response as Power BI expects that.
I test it out with PostMan and I confirmed my header was present. Perfect. I try it in Power BI and it still doesn’t work. This time when I sign in, a Pop up shows up quickly and closes it and I notice it says I am signed out. After some debugging locally, I noticed that when Power BI Desktop called my API, it never made it to the redirect page. Passport implements the unauthorized page using a new route so that happens as a 302 and two separate requests. Power BI doesn’t like that. Time for a new approach.
Setting the Response Header with Express – Take 2
Now that we understand that Power BI doesn’t like our redirect. I opted to create a simple middleware function for Express.
This got me closer I thought but I was still not there. I kept getting the popup but it wouldn’t let me login.
Read the docs yet again
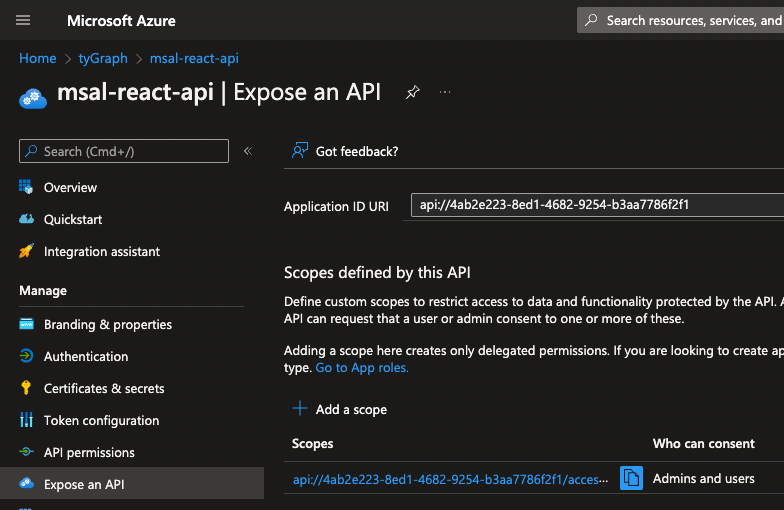
Thinking back to my rudimentary knowledge of Microsoft Identity, I wondered how it knew which Client Id to use during the login process. There’s no where you can specify it manually. After reading the Authentication with a data source article again, I noticed that it looks for an App Registration whose Application ID URL matches that of your API’s URL. Now things are starting to make since. Going back to my Application Registration in AAD on the Expose an API blade, I hadn’t changed the default value and it was still something to the effect of api://guid as shown below.
Change your Application ID URI to match your API URL using HTTP
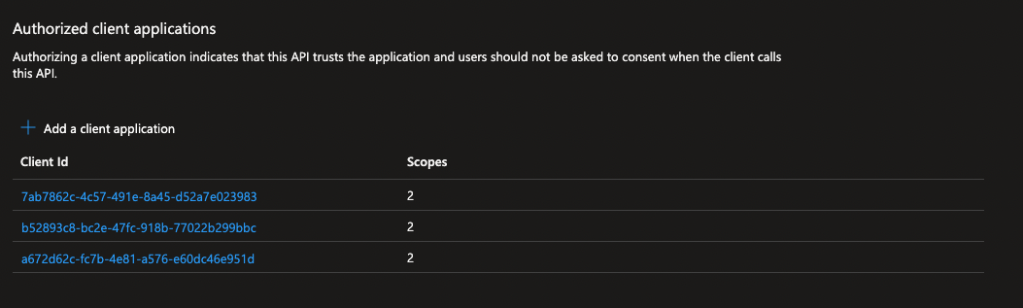
That must be it. I need to change that to https URL to my published API. The downside of this is that it makes it difficult to test your API locally from Power BI Desktop, but I think you can work around that if you really need to. Finally, the docs say to add Client IDs for Power Query, Power BI, and Power Apps / Power Automate so that they have permissions to call the API. Those IDs are listed on that article as well.
a672d62c-fc7b-4e81-a576-e60dc46e951d
b52893c8-bc2e-47fc-918b-77022b299bbc
7ab7862c-4c57-491e-8a45-d52a7e023983
I seem to remember seeing it only supported user_impersonation or access_as_user scopes. Add them in the Authorized client application section of the Expose an API blade.
Add the IDs as authorized client applications
Connect with Power BI
At this point, I also closed Power BI Desktop and updated it. That’s probably not necessary but if you are still having trouble, give it a try. Go through the process to connect to your API using the Web Data source and it should work. It will prompt you for which account to log into. Provide it and then you should see your data available in the model.
With the transition to ESLint with SPFx 1.15, the migration has been challenging to say the least. While new ESLint rules have found some legitimate issues in my code, they have required me to touch almost every file in my projects. Recently, when I finished all of my changes and had everything building successfully locally, I went to push my code through my Azure DevOps pipeline. I was surprised to find the following error when it executed the gulp bundle task.
Error - [lint] Unexpected STDERR output from ESLint:
Oops! Something went wrong! :(
ESLint: 8.7.0
Error: Failed to load plugin '@typescript-eslint/eslint-plugin' declared in '.eslintrc.js » @microsoft/eslint-config-spfx/lib/profiles/react » @rushstack/eslint-config/profile/web-app': Cannot find module 'typescript'
Require stack:
- /home/vsts/work/1/s/tyGraphPagesWebParts/node_modules/@typescript-eslint/eslint-plugin/dist/util/astUtils.js
- /home/vsts/work/1/s/tyGraphPagesWebParts/node_modules/@typescript-eslint/eslint-plugin/dist/util/index.js
- /home/vsts/work/1/s/tyGraphPagesWebParts/node_modules/@typescript-eslint/eslint-plugin/dist/rules/adjacent-overload-signatures.js
- /home/vsts/work/1/s/tyGraphPagesWebParts/node_modules/@typescript-eslint/eslint-plugin/dist/rules/index.js
- /home/vsts/work/1/s/tyGraphPagesWebParts/node_modules/@typescript-eslint/eslint-plugin/dist/index.js
- /home/vsts/work/1/s/tyGraphPagesWebParts/node_modules/@eslint/eslintrc/dist/eslintrc.cjs
    at Function.Module._resolveFilename (internal/modules/cjs/loader.js:902:15)
    at Function.Module._load (internal/modules/cjs/loader.js:746:27)
    at Module.require (internal/modules/cjs/loader.js:974:19)
    at require (/home/vsts/work/1/s/tyGraphPagesWebParts/node_modules/v8-compile-cache/v8-compile-cache.js:159:20)
    at Object.<anonymous> (/home/vsts/work/1/s/tyGraphPagesWebParts/node_modules/@typescript-eslint/eslint-plugin/dist/util/astUtils.js:27:25)
    at Module._compile (/home/vsts/work/1/s/tyGraphPagesWebParts/node_modules/v8-compile-cache/v8-compile-cache.js:192:30)
    at Object.Module._extensions..js (internal/modules/cjs/loader.js:1114:10)
    at Module.load (internal/modules/cjs/loader.js:950:32)
    at Function.Module._load (internal/modules/cjs/loader.js:790:12)
    at Module.require (internal/modules/cjs/loader.js:974:19)
I did a quick search on the Internet and didn’t find anything specific to SPFx just specific issues around Typescript in general. I didn’t encounter this error on the first project I upgraded but for some reason it’s here. I first tried to reproduce it locally. My DevOps environment uses a Linux build agent whereas I build locally on my Mac. I cleared my node_modules folder, deleted package-lock.json, and then ran npm install again. I still couldn’t produce it locally. The next difference I knew of were that my node versions weren’t exactly the same. Locally, I was on v14.18.1 and the build agent was using v14.20.0. I thought about making the switch to v16 on both but I haven’t pulled the trigger yet.
Reading the error message it was complaining about the typescript module not being present. SPFx projects typically don’t include it directly as a devDependency, but I tried including it anyway. I sifted through node_modules to find the project that was failing and I found the following TypeScript devDependency.
typescript": "~4.5.2"
I added it to my SPFx project and pushed it into Azure DevOps and sure enough it worked. I don’t know if this is the correct solution for this problem, but I thought I would share it as a work-around in case you run into the same.
With the release of PnP JS 3.0.0, you’ll need to tweak a bit of code throughout your project. One particular case that has caused me issues in the migration is cases where you opened a Web or Site directly using it’s constructor such as the following:
const web = Web(myWebUrl);
const site = Site(mySiteUrl);
This syntax is no longer valid in PnP JS 3.0.0, however it won’t cause a build error. When your code executes a promise doesn’t get returned and your try / catch block won’t catch it. This leaves you trying to figure out why the rest of your code mysteriously stopped executing. I’ve already ran into this a couple of times in my migration effort.
This is not hard to fix with PnP JS 3.0.0 but the syntax is quite a bit different. First, get the imports you need:
import { SPFI, spfi, SPFx } from "@pnp/sp";
import { AssignFrom } from "@pnp/core";
To get a Site or Web object for another site, you’ll need to get a new SPFI object first. There are a few ways to do this but here is the one I went with. This assumes that you already established an SPFI object earlier for the current site and assigned it to this.sp.
With the latest release of MacBook Pros, I know a lot of SPFx developers are considering an upgrade. My previous MacBook Pro was showing its age, so I thought now was a good time. My new shiny MacBook Pro arrived last night and one of the first things I tried to do is get node.js and the SPFx build tools installed. I ran into a few hiccups and here is how I got around them.
Installing Node.js
There’s no shortage of ways to install node.js. Since SPFx has specific requirements though I went to the web site and found the previous releases page and typed in 14 as that is what is currently supported. Node 17 has a combined X64 / ARM install package but we can’t use that yet with SPFx.
Installing SPFx
I followed the usual SPFx Installation instructions by executing the following.
npm install gulp-cli yo @microsoft/generator-sharepoint --global
This install gulp, yo, and then the SharePoint generator for yo. I had no issue installing gulp and yo, but the generator was where the issue started. EACCES permission denied errors.
It doesn’t surprise me it’s an issue with node-gyp / node-sass. I’m pretty sure those packages have some native code in them, but I don’t know for sure. They have definitely caused me issues in the past. You might try to run the command again with sudo. Don’t do that, it won’t work. Before, I bought the M1, I did some research on how Node.js worked on it and I stumbled upon this blog post. This gave a few commands to try.
First, you can see what architecture node is running by running:
$ node -p process.arch
arm64
Ok, so it’s running on arm64. That’s probably the issue. Now we need to switch to the x86_64 architecture, so run:
$ arch -x86_64 zsh
That will open a new zsh using the x64 architecture. You can validate that by running, the process.arch command again. Now, try to install @microsoft/generator-sharepoint again and it should work.
Some of this is a bit confusing because arch and node call the environments different things. For example, arch calls it x86_64 and then you run arch again and it says i386 all while node says x64. Confusing right? The good thing is you shouldn’t have to worry about the architecture for most SPFx development tasks. I think the only time you will need to worry about it is when you run the generator again.
Comparing Performance
I was curious about the performance of SPFx build times between my old 2016 MacBook Pro and the new 2021 M1 Max MacBook Pro, so I recorded a quick video. In initial tests, gulp serve was about 1 second faster consistently on the M1 Max. However, bundle time varied with either computer coming in faster. Some of this may be due to the emulation occurring. I’ll continue to try things out and see how they do.
Comparison of 2016 MacBook Pro to 2021 MacBook Pro M1 Max
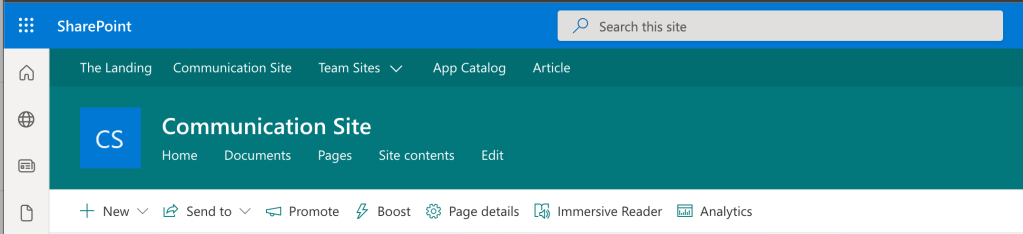
One of the features coming with Viva Connections is Boost. Boost allows you to prioritize content that shows up in the Feed for Viva Connections that you see in the web part or in the Teams mobile app. As Microsoft’s support article mentions, this feature is pretty new and more is coming allowing boosted news posts to show up in the News Web part, SharePoint app bar, and the automatic news digest.
Enabling Boost
To use Boost, you’ll need to be posting news from a SharePoint Home Site or Organizational News site. After configuring your site as either, it will take a few minutes for the Boost capability so show up. Once it does, you’ll see a new Boost button on your toolbar of an article. If you just created your news page, you may need to refresh the page after publishing for the Boost button to become visible.
New Boost button on news posts
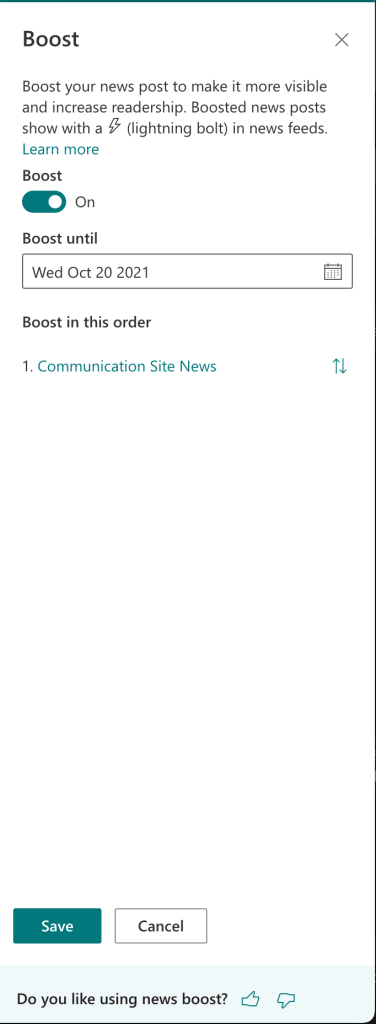
Click the Boost button and then toggle it on. Select a date that you want the Boost to expire. Finally if you have multiple Boosted items you can change the order. Click Save and you are done.
Configure your Boost date and order
Viewing your Boosted News
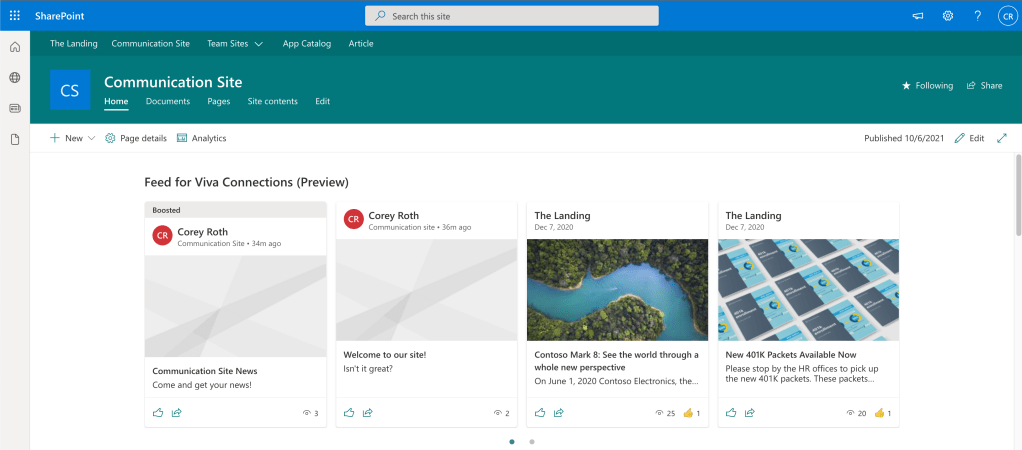
Not all ways to view boosted content are available yet, but you may have the new Feed for Viva Connections (Preview) web part already if you are in targeted release. Edit a Page and look for the web part using that name to add it. It might take a minute, but your new boosted News content will show up in the feed with the word “Boosted’ appearing above it.
Boosted News appears first.
How does it work?
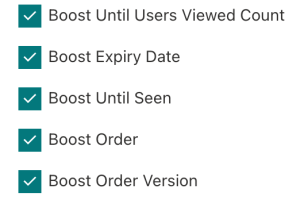
As a developer, the next thing you might wonder is how it works? Like a lot of new SharePoint Page features, they are really just controlled by list columns. When you boost your first news article on a site, five new columns will be added to your Site Pages library.
New site columns for Boost
In my experience so far only Boost Expiry Date, Boost Order, and Boost Order Version are used at this time. You can read into what you will with the other columns that aren’t used yet. I have no idea.
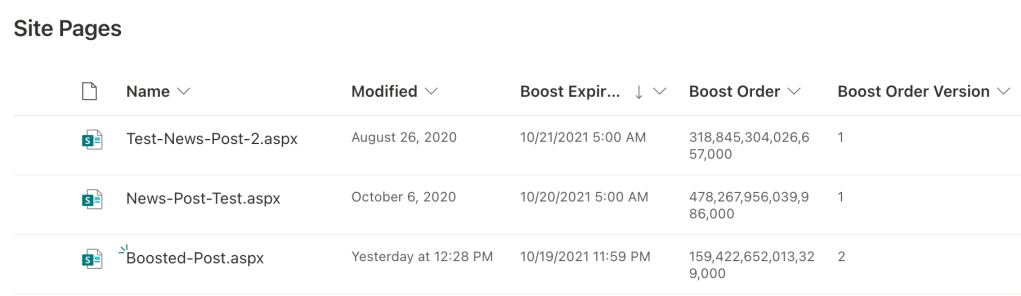
When you add those columns to your view, it looks like this.
Boost site columns
The Boost Expiry Date column will contain the date you selected. The Boost Order column contains a rather large number that is generated to order the boosted items. The Boost Order Version column will increment if you change the boost order multiple times. The internal columns names for the first two columns are _BoostExpiry or _BoostOrder respectively.