Sometimes this should be obvious and they just aren’t. I use the Panel component in Fluent UI React / Office Fabric from time to time. I’ve always struggled to work with styles there coming out of my web part’s module.scss file. That’s because they simply aren’t being applied.
Let’s look at this simple example web part:
import * as React from "react";
import { override } from "@microsoft/decorators";
import styles from './MyWebPart.module.scss';
import { Panel, PanelType } from 'office-ui-fabric-react/lib/Panel';


export default class ReportPanel extends React.Component<IMyWebPartProps, {
    showPanel: boolean
}> {

    constructor(props: IMyWebPartProps) {
        super(props);

        this.setState({
            showPanel: true
        });
    }


    @override
    public render(): React.ReactElement<{}> {
        return (
            <React.Fragment>
                <div className={styles.myWebPart}>
                    <Panel isOpen={this.state.showPanel}  onDismiss={() => { this.setState({ showPanel: false }); }} headerText={'My Panel Header'}>
                            <p className={styles.panelBody}>
                                Some text
                            </p>
                            <p className={styles.title}>
                                Page Analytics
                            </p>
                    </Panel>
                </div>
            </React.Fragment>);
    }
}
Note we have two styles in the body of the panel named panelBody and title. Here’s what our module.scss looks like:
We would expect that our panelBody and title styles would be applied normally. That’s not he case though. Think of the panel as a whole new surface. That means you need to wrap your panel contents in a top-level div element first. You can use the same top level style as your web part, but you could probably create a new one if you wanted as well. Here’s the updated code snippet:
import * as React from "react";
import { override } from "@microsoft/decorators";
import styles from './MyWebPart.module.scss';
import { Panel, PanelType } from 'office-ui-fabric-react/lib/Panel';


export default class ReportPanel extends React.Component<IMyWebPartProps, {
    showPanel: boolean
}> {

    constructor(props: IMyWebPartProps) {
        super(props);

        this.setState({
            showPanel: true
        });
    }


    @override
    public render(): React.ReactElement<{}> {
        return (
            <React.Fragment>
                <div className={styles.myWebPart}>
                    <Panel isOpen={this.state.showPanel} isBlocking={false} type={PanelType.smallFixedFar} onDismiss={() => { this.setState({ showPanel: false }); }} headerText={'My Panel Header'}>
                        <div className={styles.myWebPart}>
                            <p className={styles.panelBody}>
                                Some text
                            </p>
                            <p className={styles.title}>
                                Page Analytics
                            </p>
                        </div>
                    </Panel>
                </div>
            </React.Fragment>);
    }
}
I suspected something like this was always the cause. Finally I found some validation in it. This issue was opened a few years ago. It was quickly closed because the Fluent teams doesn’t seem to use SPFx much even though SPFx developers are some of the largest users of Fluent. I suspect this also applies to other surface like Modal.
I’ve been testing Beta 13 of SPFx and wanted to share these tips.
Welcome SPFx beta versions
Upgrades to SPFx are usually painless, but sometimes (like in version 1.12.0), there are issues. The SPFx team now releases beta versions of each SPFx release giving us an opportunity to try our code with it before upgrading. As of writing, we are now on Beta 13. You may be wondering why it started with Beta 13. That simply means there were beta versions that they developed internally before making any of the versions public. As we see future beta versions of this release, don’t be surprised if it skips a few numbers as well.
Consider using nvm to use a different node version for beta
The yeoman generator install globally in node. This means if you need to switch between release and beta versions, it will be an issue. Pick a random version of node 14 to install with nvm and use that for your beta install. This will keep your release version in tact.
Create a new branch / clone to a new folder
While source control tools like git manage the code, our node_modules folder is not in source control. That means if you branch for your new beta and upgrade your node_modules, they will be the wrong version if you switch back to your release branch. If you need to switch around between release and beta versions this will quickly become time consuming. Create a new local folder and clone your repo into it. Now create a new branch. This lets you have separate node_modules folder allowing you to easily switch between release and beta versions.
Upgrade the dependencies in package.json
You can use the CLI for Microsoft 365, to help you with the upgrade commands for your package. However, you might be upgrading faster than the team has had a chance to update the tool. You may need to use a beta version of the CLI to get the latest updates for the beta version too. This usually works, but in the last version I used (v3.12.0-beta.e4850a1), it left out the devDependencies section. That was easily enough resolved though.
If you don’t want to use CLI, the other option is to use the generator to create a new SPFx project using the new version. You can then compare your package.json files to figure out what to update.
For external dependencies, watch out for use of the “^” sign in versions. When you run npm install, any dependency that published an update will get updated. While this may not be an issue, it might if there are breaking changes. I’ve had more than one case, where I am spending time troubleshooting changes in unrelated dependencies during an SPFx upgrade. Get rid of those carrots (^) before you run npm install.
Remove node_modules and package-lock.json
If you created a new clone of your repo, you won’t have to worry about using node_modules because you don’t have one yet. However, if you are upgrading in place, you should delete your node_modules folder now. If you don’t you will more than likely run into TS2345 errors in regards to HttpClientConfiguration. Don’t forget to remove package-lock.json as well, as Walkdek reminded me today.
Remove the local workbench
The local workbench is now gone. Specific to SPFx 1.13.0, make sure you remove the following line from devDependencies of your package-json file, otherwise npm install will fail.
"@microsoft/sp-webpart-workbench": "1.12.1",
You will also need to remove the reference to this in your serve.json file. Update the initialPage parameter to an online URL and remove the api section.
Introducing .npmignore
SPFx 1.13.0 introduces a .npmignore file to the project. While not a new concept, it new to the scaffolded code from yeoman for SPFx. This file simply tells npm which files not to include when your build a package. It contains files such as gulpfile.js, config, release, src, and temp. Use the CLI for Microsoft 365 or create a new project to see what you need to put in it.
Summary
While this post describes the process with SPFx 1.13.0, many of these tips will be useful when you perform future upgrades as well.
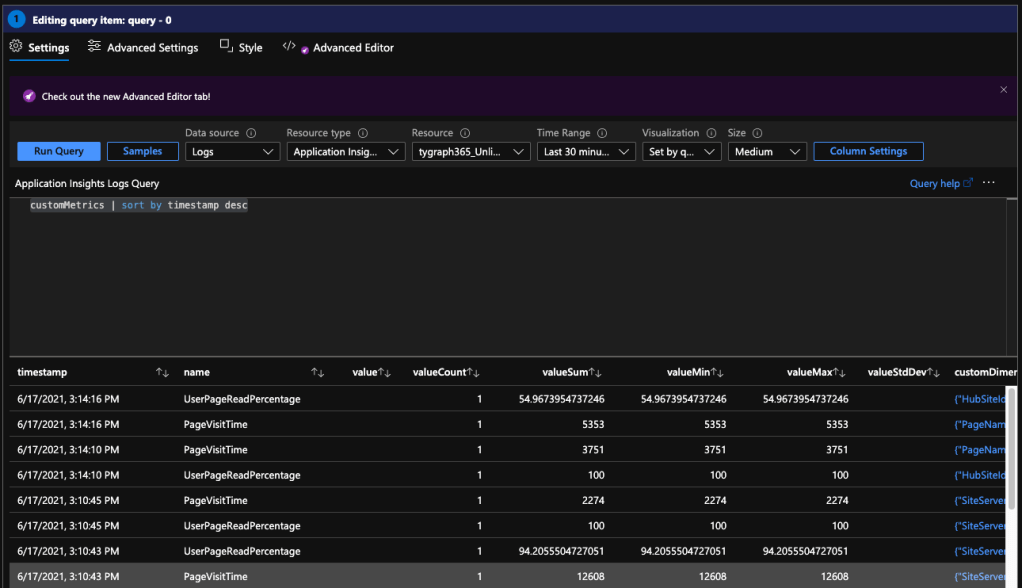
That’s a mouthful! Microsoft announced this year that all legacy Application Insights instances must be upgraded to use a Log Analytics Workspace. For the most part this is a good thing and provides you new features. The upgrade is rather simple and it’s supposed to be seamless. However, I have found a case in the customMetrics table where the value column is no longer populated. If you are relying on this column in your queries, that could be an issue.
Take a look at the example below where I ran the following table a few minutes after upgrading the Log Analytics Workspace.
customMetrics | sort by timestamp desc
You’ll see shortly after 3:10 pm, the value column no longer has a value. This occurs with Application Insights JavaScript SDK version 2.6.2 but I don’t know if it’s an SDK issue or not.
Value column is no longer populated.
To work around this, I have shifted to using the valueSum column which seems to have the same value as all of the other value columns. The documentation mentions that the field has been removed when using Log Analytics to query, but apparently it also affects Application Insights as well.
Once you have purchases one or more Viva Topics licenses, you need to complete a number of steps to have it analyze your content and suggest topics. While the setup process is relatively quick, it may take up to two weeks before you start seeing suggested topics. You heard that right, two weeks. That means if you have purchases this and are eager to get started, you should complete setup right away.
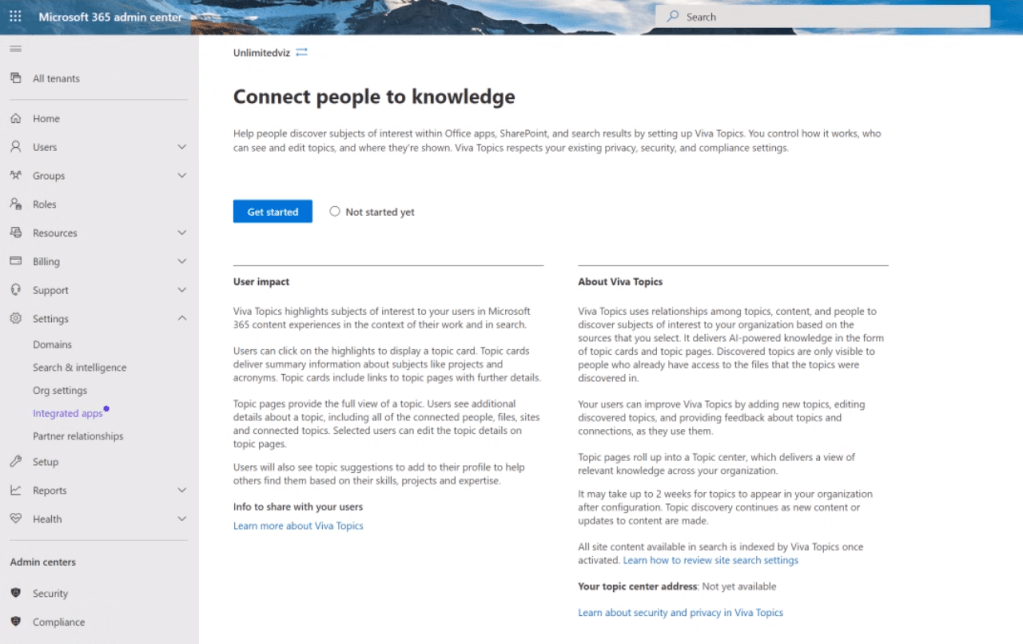
You start in your tenant admin center. Go to Settings -> Org Settings and look for Topic Experiences. You’ll see a screen that prompts you to get started. This is where you will come back later to administer Viva Topics if necessary.
Topic Experience in Admin Center
Now, you will see a screen explaining how Viva Topics works. Click Get started to begin configuration.
First you configure the Topic discovery step. You’ll need to configure your topic sources as well as any topics you want to exclude. For the best results, Microsoft recommends using all sites. However, for some organizations, you may want to exclude certain sensitive sites such as those related to executive leadership or mergers & acquisitions. You can also exclude topics in this manner as well, if you have certain topics that you don’t want to expose to everyone.
Topic discovery.
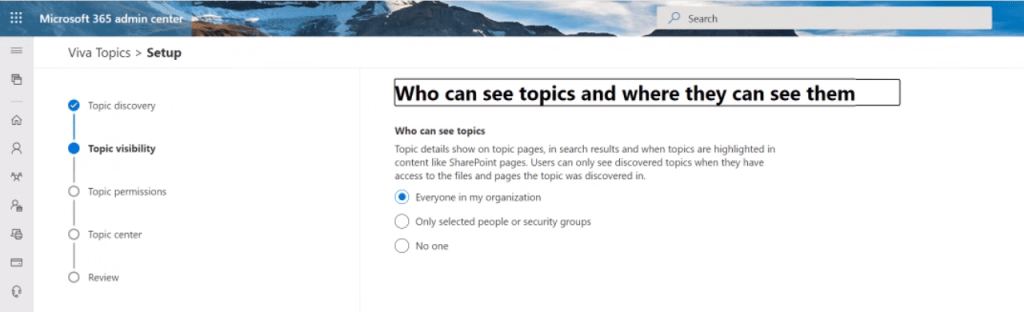
Next, you’ll configure Topic visibility. This controls who can see topics in topic pages, news articles, or search. If you need to include only certain users, you can do that here.
Topic visibility.
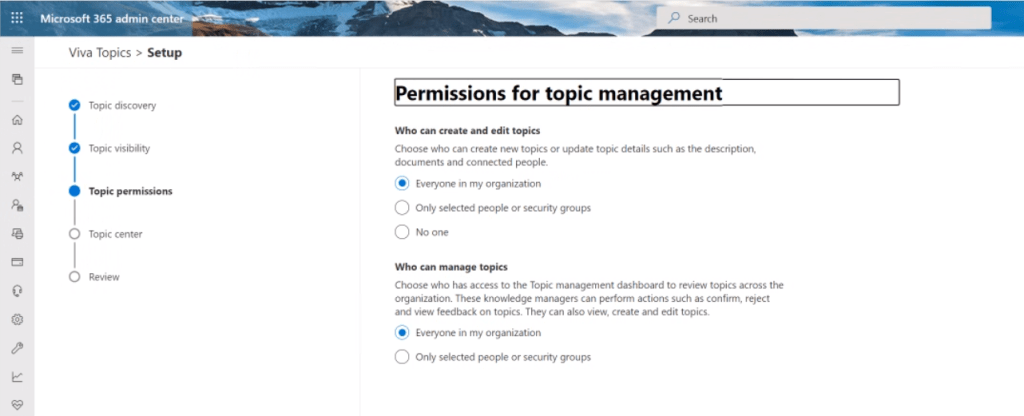
Next, you can define who can create / edit topics as well as manage them. In general, Viva goes with an open permission model to help foster knowledge sharing in an organization. That means anyone can create, modify, and curate topics. If you need to lock this down, this is the place to start. I will say though that the topic pages provide great visibility on who has curated content for topics pages.
Topic permissions.
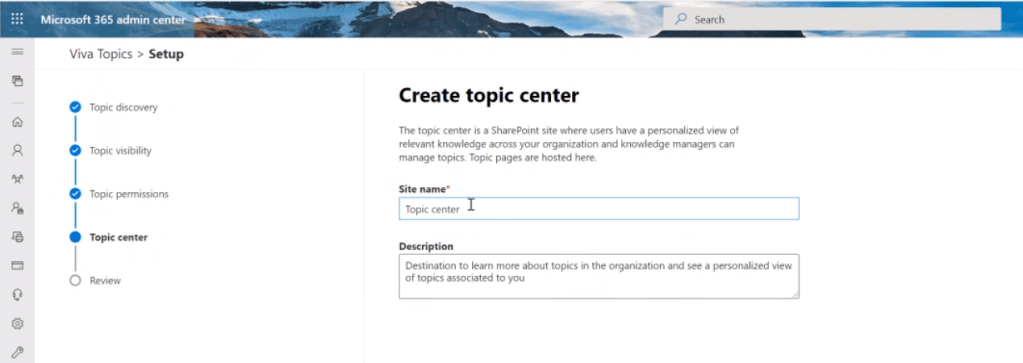
Finally, you need to configure a name and URL for your topic center site. The topic center site hosts all of the Viva topic pages. You’ll use this site to manage your topics and curate them.
Create a Topic center site.
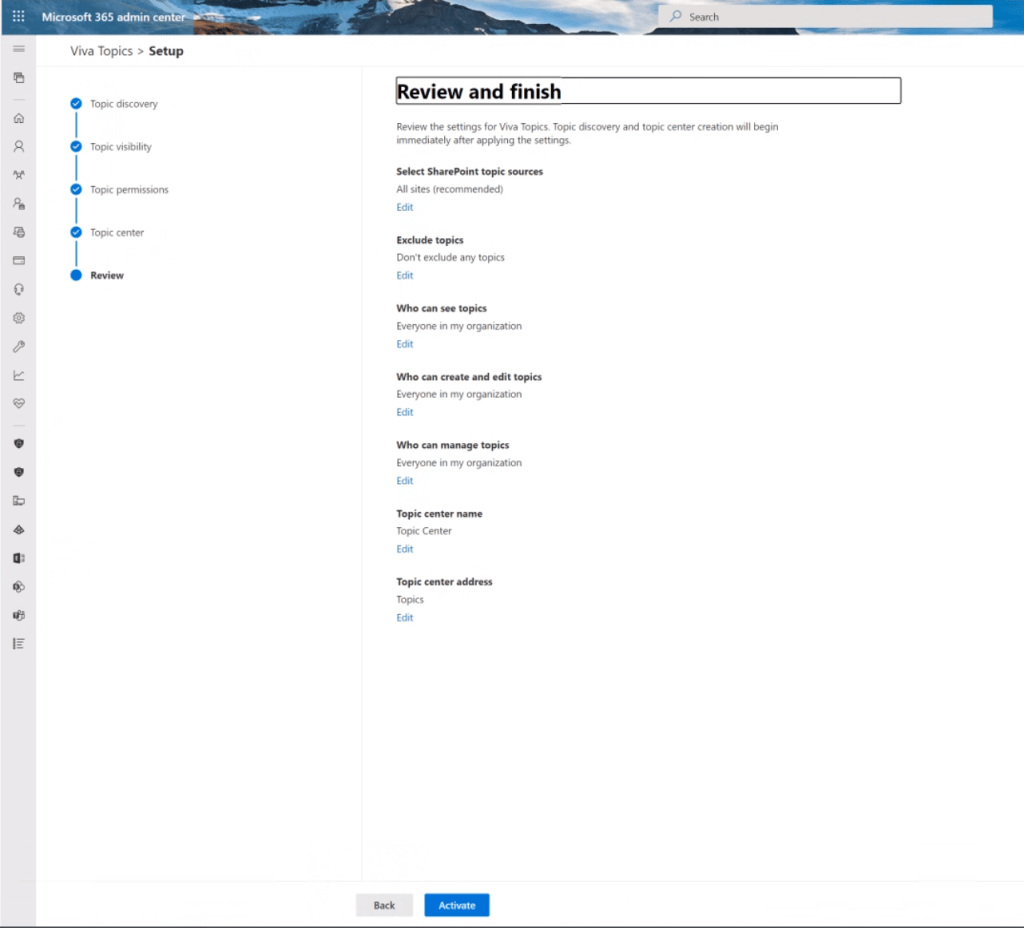
On the last step, you’ll get a summary page with all of your settings. Click the Activate button to begin.
Click Activate to begin.
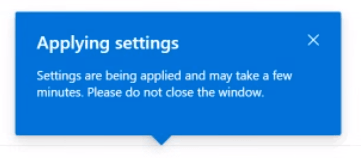
When you click Activate, you’ll see this notification. Notice, it says, “please do not close the window”. That’s surprising to me, but I would probably do as it says.
Do not close the window.
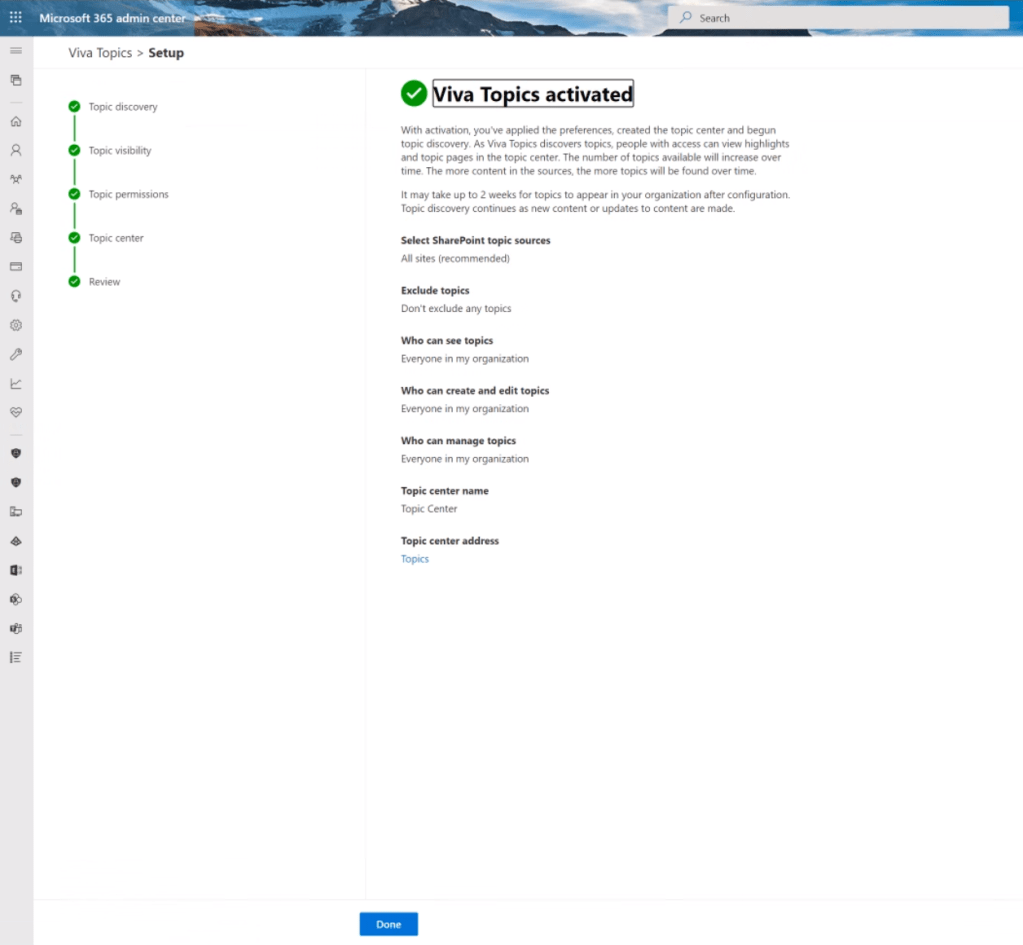
It will take a few minutes and then you’ll finally see the activation screen. Here’s where it says you’ll need to wait up to two weeks.
Viva Topics activated.
Now if you are ambitious, you might think about clicking on that link to the Topic center site. You can do that, but you won’t see much. In my experience, you’ll see nothing more than a blank screen.
Newly provisioned Topic Center site.
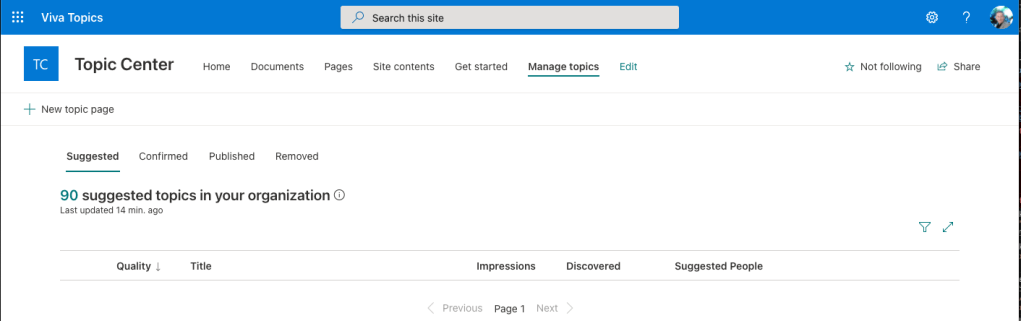
We started this instance on a Friday. Checking on it on the following Monday, the Manage Topics link has appeared. This is where you curate and publish topics. It even says it has discovered 90 potential topics in my organization. However, it doesn’t show me anything yet. That means you need to keep waiting.
Topics discovered but not ready yet.
You’re about to embark on an exciting experience with Viva Topics, but you need to be patient. Soon you will have suggested topics and maybe even learn a few new things about your organization.
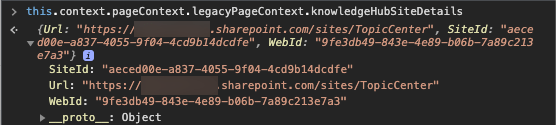
Viva Topics is fresh right now and some of you might have already started looking at extensibility. One thing that is useful to know is to know where the Topic Center site is after you’ve created it. It turns out you can find this value pretty easily from any page in your tenant.
If you look at your context object from a Web Part or Application Customizer, you can find what you are looking for in the object below:
There you will find the SiteId, Url, and WebId. That should be useful if you are trying to get a reference to the site with PnPJS and then do things like create pages or add web parts.
If you haven’t explored the object this.context.pageContext.legacyPageContext before, you can find a wealth of information in there. Try it out today.
If you use a CDN for your SPFx 1.12 projects, you might have noticed that when you build your SPFx package and try to deploy it to Azure no files are getting copied. You might see something similar when you try to run gulp deploy-azure-storage even though it worked fine in SPFx 1.11.
Build target: DEBUG
[16:23:27] Using gulpfile ~/Projects/SPFx/SPFx1.12WebPart/gulpfile.js
[16:23:27] Starting 'deploy-azure-storage'...
[16:23:27] Starting gulp
[16:23:27] Starting subtask 'configure-sp-build-rig'...
[16:23:27] Finished subtask 'configure-sp-build-rig' after 3.06 ms
[16:23:27] Starting subtask 'deploy-azure-storage'...
[16:23:27] [deploy-azure-storage] Uploading files '**/*.*' from directory './temp/deploy/' to Azure
[16:23:27] [deploy-azure-storage] Created container: azurehosted-webpart
[16:23:27] [deploy-azure-storage] Uploading 0 files to Azure...
[16:23:27] [deploy-azure-storage] Upload complete!
[16:23:27] [deploy-azure-storage] Access your files at: https://spfxcdntest.blob.core.windows.net/azurehosted-webpart
[16:23:27] Finished subtask 'deploy-azure-storage' after 364 ms
This appears to be an issue in the build chain where the files from release/assets are not being copied to the folder temp/deploy. You can work around this easily enough by making sure the temp/deploy folder exists and that it’s empty. Now after you run gulp build –prod. You simply need to copy the files from release/assets into temp/deploy. Now run gulp deploy-azure-storage and your files will be deployed to Azure.
If you have an Azure DevOps build pipeline that is affected by the issue, you can add a CopyFiles task before your deploy command.
Viva Connections is almost here. Microsoft has released some preliminary documentation which describes the steps to activate it once it becomes generally available. Reading the documentation, you will see that using Viva Connections is a completely opt-in experience and requires specific actions by a global administrator. According to published documentation, the PowerShell script will be available on March 31st, 2021. However, there are a number of steps you can do to get ready.
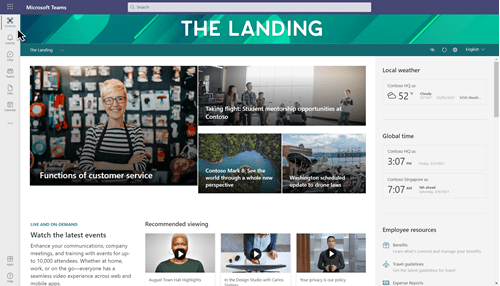
What will Viva Connections look like?
Viva Connections brings your SharePoint Home Site to Microsoft Teams as a first-class experience. This will allow you to experience your Intranet from an easy to find icon in the Teams left rail navigation. This means it will be a lot easier to navigate and find content from your Intranet in Teams. Many of you might have pinned your Intranet site in a Teams channel, but this is really taking it to the next level. You’ll be able to find your Intranet in Teams regardless of what channel you are in.
Viva Connections
Set up a SharePoint home site
SharePoint home sites have been around for years now, but I don’t think a lot of people ever used them. It was hard to understand what they actually did. Now, at a minimum, they give you a “Home” icon in the SharePoint mobile app. While you don’t have to use a home site in Viva Connections, it’s recommended as it serves are your landing experience. You’ll typically set this to your Intranet’s home page which in many orgs is the root URL of the SharePoint tenant.
Enable global navigation
Microsoft recommends you have global navigation enabled. The support article is a bit confusing with this one since it then goes on to to say it’s recommended. I think you are going to want it though. Many organizations have been using Hub Site navigation for this purpose though and you may need to rethink some of that. I currently don’t see global navigation available on any of my tenants yet, but I am guessing we should see it soon.
Enabling Viva Connections after March 31st
Viva Connections is effectively a Teams app package that you build and sideload onto you Tenant. Since Viva Connection uses the underlying foundation of a Teams app, you will need to provide a number of parameters. The PowerShell script (available on March 31st) will prompt you for these parameters to build that custom package. It’s best if you get together the values for these now. Of the parameters you need to provide, the Name of the package is especially important because this is how it will show up in the Teams app bar. You may want to put some thought into the short description and long description fields as well. However, I am not sure that they will be visible to the user anywhere unless they saw Viva Connections in the Teams app store.
Get your icons ready!
This one could slow you down so I recommend gathering these now. You will need to provide an icon that is 192×192 and 32×32 (in monochrome). That last part is important since Teams icons only use a single color in the left rail navigation so that they can support high contract and dark modes. Get these together now, so that you are ready to go when the script becomes available.
Upload the package and make the app available
After you have gathered everything together, you can upload the package to the Teams admin center. Microsoft recommends you pin the app by default so that all users can discover it. However, if you want to roll it out to a subset of users you can do this by using policies. In reality, I don’t think it will be a huge adoption hurdle as users will likely just view it as another entry point to get to their SharePoint Intranet.
Will my existing SharePoint customizations work in Viva Connections?
While I haven’t seen anything specific to this around SPFx based customizations, my guess is yes. I suspect your web parts and application customizers should work without change since they work today when pinning a SharePoint site to a tab. The only way to know for sure is to try it out when Viva Connections reaches general availability.
Be sure to read the step by step guide from Microsoft to be sure you are ready to go with Viva Connections.
You built this beautiful new web part and it looks great in SharePoint. You click the Sync to Teams button to try it out there only to find that your icons are missing. You think it’s your issue because maybe your styles are wrong. It’s not. I tried all sorts of things, but it turns out it was a reported issue. It turns out Microsoft Teams doesn’t initialize the icons for you when you are in a Microsoft Teams context.
Luckily it’s easy to fix. In your web part’s class, you’ll need to add the following import.
import { initializeIcons } from 'office-ui-fabric-react';
If you’ve already made the transition to Fluent UI, you’ll replace office-ui-fabric-react with @fluentui/react.
Now make a call to initializeIcons in your onInit method. I added a check to see if the context for the web part was in Microsoft Teams first so that it won’t call it unnecessarily when hosted in SharePoint.
 if (this.context.sdks.microsoftTeams)
        initializeIcons();
That’s it. Once you do that, your icons will return and look great inside your SPFx web part in Microsoft Teams.
Automating SPFx builds and deployment to your environments will save you tons of time after you get it built. I wrote the post How to: Setup CI / CD in Azure DevOps to walk you through step-by-step how to get it working. While this post is largely still valid, there are better ways to do things now in regards to PowerShell with the release of PnP.PowerShell based off of PowerShell 7. I’ve updated the code in the solution to reflect those changes and this post walks you through the differences.
Updating your Pipeline
The pipeline builds your SPFx solution and you configure it using a YAML file. I’ve updated the YAML file to use an Ubuntu build agent and to consolidate CopyFile commands. This leads to faster build times. Your new azure-pipelines.yml file will look something like this:
The CopyFiles command copies the package, script, and pfx file we’ll use for authentication in PowerShell.
Updating the release
The release uses PowerShell to deploy our package to the App Catalog. These updates include the transition to the PnP.PowerShell library and the use of certificate based authentication. With the updates to the PnP.PowerShell library, certification authentication is much simpler now. Props to the PnP team for simplifying this.
Authenticating in PnP.PowerShell for the first time
If you have never used the PnP.PowerShell for PowerShell 7, you’ll need to register it as an Azure Active Directory application first. This one-time activity is required whether you are using Azure DevOps or just running scripts locally on your computer. You’ll need to have permissions in Azure Active Directory to complete this task. Assuming you have installed PnP.PowerShell already, run the following command.
Register-PnPManagementShellAccess
It will prompt you to go to the Microsoft Device Login page and then consent to permissions. Continue with the consent, but you can always adjust the permissions later in Azure Active Directory if needed.
Next you will need to register another new app in Azure Active Directory for your Azure DevOps release script. Run the following PowerShell command which you can also find in RegisterPnPAzureADApp.ps1. Update the tenant name to match yours specifying its “.onmicrosoft.com” address. You may update the ApplicationName parameter as desired.
This will prompt you to do another device login. You’ll then wait 60 seconds and open the URL it provides you to do a consent flow.
Consent to the permissions. The application that PowerShell creates has enough permissions to install the app package in the App Catalog. However, you may want to adjust these permissions to suit your needs. For example, you probably don’t need groups or user profiles access.
You will be redirected to this page after consenting to the permissions.
When this finishes, it will generate a pfx file and a cer file. Add the pfx file to the root of your SPFx project. You will need this to authenticate in the PowerShell script. You can read more about authentication with PnP PowerShell and why these steps are required now.
Note: anyone with access to your pfx file and client id, can authenticate to Office 365 using the permissions you consented to. Keep the file secure and consider who has access to it. Adjust your permissions to the app registration in Azure Active Directory as needed.
Updating the release script
I updated the PowerShell script to use the new PnP.PowerShell package as well as use the certificate for authentication. Here’s what the script looks like.
The script relies on a number of variables that we’ll need to configure. With the exception of password, in the script they are prefixed with env but you’ll leave that part out when you configure them in Azure DevOps.
testSiteUrl – URL of the site collection for deployment (our test site in this case)
productionSiteUrl – URL of our production site
dropPath – The path where the artifact was dropped (refer to the source path when you added the artifact to the release i.e.: _AzureDevOps-CI)
packageName – name of your .sppkg file (i.e.: azure-dev-ops.sppkg)
tenant – the tenant name with a .onmicrosoft.com address
clientId – the Application Id of the Azure Active Directory application we just created
certificateFileName – the name of the certificate that Register-PnPAzureADApp created
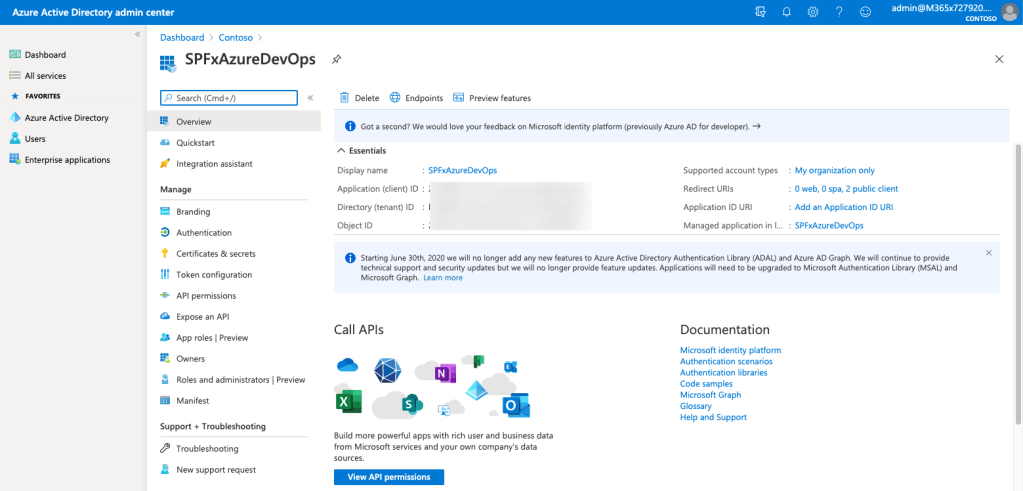
To get the ClientId / Application Id, you will need to open Azure Active Directory, go to App Registrations, and find the application you created. In this case, mine was named SPFxAzureDevOps.
You will need the value of Application (client) ID.
Updating the Release
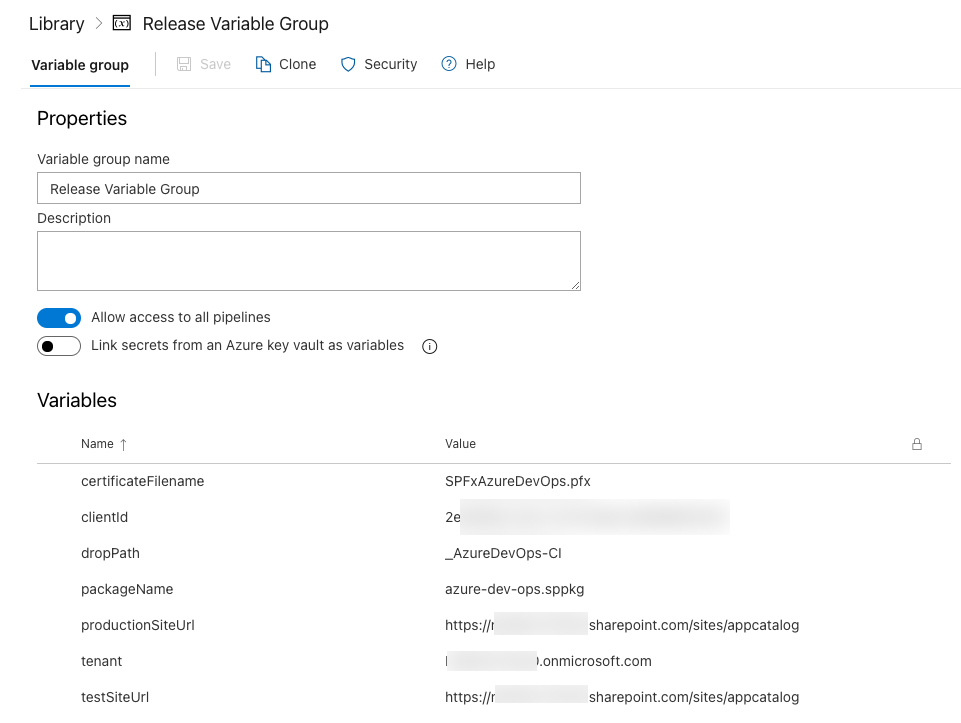
We’ll need to update the variables in our Release Variable Groupin the Library section under Pipelines in Azure DevOps.
If you have old variables like username or password, remove them.
Create a new variable named clientId and specify the Application Id you captured earlier. Create a new variable named certificateFilename and specify the name of the certificate that was produced when you ran the PowerShell command. In my case, mine is called SPFxAzureDevOps.pfx. Finally, add a variable named tenant with the value of your .onmicrosoft.com name for your tenant.
Testing your changes
Kick off a new build by committing a change and pushing it to Azure DevOps. If all goes well, your build will complete and your release will deploy the package to your SharePoint app catalog. Your release will show that the file is deployed to the App Catalog.
PowerShell script output from Azure DevOps release
Refer to the original post if you need more details on validation. I’ll be creating a new version of that post to include all of these steps here soon.
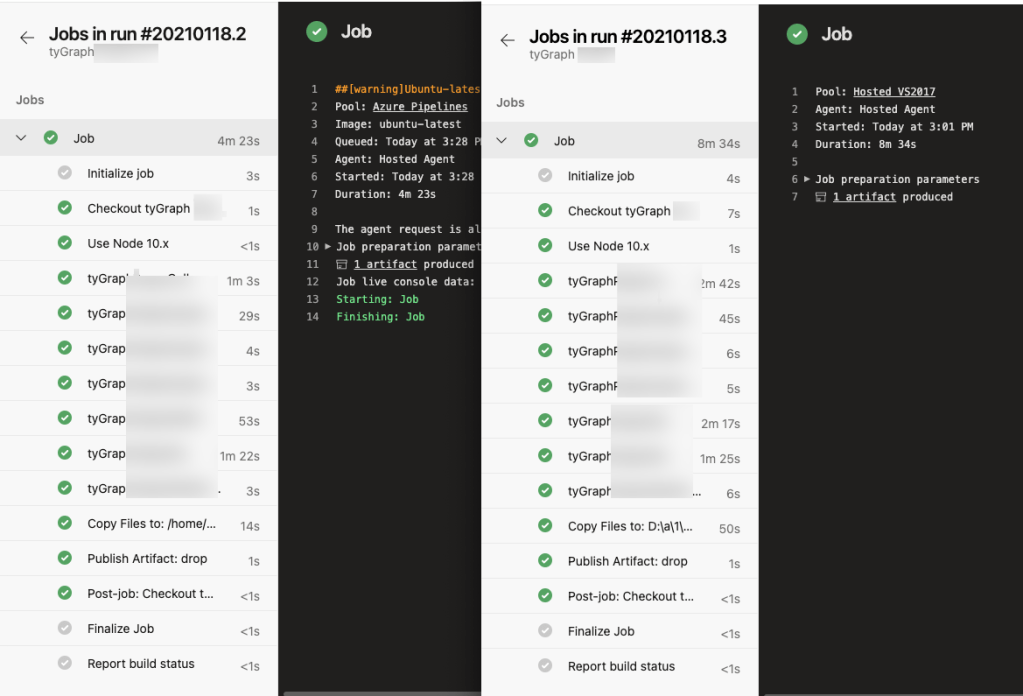
If you have taken the time to set up SPFx builds (CI / CD) in Azure DevOps pipelines, you should take a look at which agent pool you are using. I had always heard that Ubuntu was significantly faster and the rumors are in fact true. I found that Ubuntu cut my build times in half. Take a look at the screenshot below.
In my example, build times went from 8m 34s to 4m 23s. That’s a lot faster. If that still seems a bit high, we build two SPFx projects with this job.
Switching your hosted agent pool
If you have configured your pipeline using a YAML file, you can change to a Ubuntu agent pool pretty easily. Just change the vmImage parameter to ‘ubuntu-latest’. If you don’t have a pool or vmImage line in your YAML file, you may have a queue line instead. Remove it and replace with the following snippet:
pool:
  vmImage: 'ubuntu-latest'
You can view all of the options available for hosted agent pools at this link. If you are doing automated build with Azure DevOps, have you already made this change? If you do make the change, try it out and let me know if you get a performance gain.