
Automating SPFx builds and deployment to your environments will save you tons of time after you get it built. I wrote the post How to: Setup CI / CD in Azure DevOps to walk you through step-by-step how to get it working. While this post is largely still valid, there are better ways to do things now in regards to PowerShell with the release of PnP.PowerShell based off of PowerShell 7. I’ve updated the code in the solution to reflect those changes and this post walks you through the differences.
Updating your Pipeline
The pipeline builds your SPFx solution and you configure it using a YAML file. I’ve updated the YAML file to use an Ubuntu build agent and to consolidate CopyFile commands. This leads to faster build times. Your new azure-pipelines.yml file will look something like this:
resources:
- repo: self

trigger:
- master

pool:
  vmImage: 'ubuntu-latest'

steps:
#install node 8.x
- task: NodeTool@0
  displayName: 'Use Node 10.x'
  inputs:
    versionSpec: 10.x
    checkLatest: true

#install nodejs modules with npm
- task: Npm@1
  displayName: 'npm install'
  inputs:
    workingDir: '$(Build.SourcesDirectory)'
    verbose: false

#start unit tests
- task: Gulp@0
  displayName: 'gulp test'
  inputs:
    gulpFile: '$(Build.SourcesDirectory)/gulpfile.js'
    targets: test
    publishJUnitResults: true
    testResultsFiles: '**/test-*.xml'

#publish test results
- task: PublishCodeCoverageResults@1
  displayName: 'Publish Code Coverage Results $(Build.SourcesDirectory)/temp/coverage/cobertura/cobertura.xml'
  inputs:
    codeCoverageTool: Cobertura
    summaryFileLocation: '$(Build.SourcesDirectory)/temp/coverage/cobertura/cobertura.xml'
    reportDirectory: '$(Build.SourcesDirectory)/temp/coverage/cobertura'

#bundle code with gulp
- task: Gulp@0
  displayName: 'gulp bundle'
  inputs:
    gulpFile: '$(Build.SourcesDirectory)/gulpfile.js'
    targets: bundle
    arguments: '--ship'
  continueOnError: true

#package solution with gulp
- task: Gulp@0
  displayName: 'gulp package-solution'
  inputs:
    gulpFile: '$(Build.SourcesDirectory)/gulpfile.js'
    targets: 'package-solution'
    arguments: '--ship'

#copy deploysment script to artifact repository
- task: CopyFiles@2
  displayName: 'Copy Files to: $(build.artifactstagingdirectory)/drop'
  inputs:
    Contents: |
      sharepoint/solution/*.sppkg
      *.ps1
      *.pfx
    TargetFolder: '$(build.artifactstagingdirectory)/drop'

#publish artifacts
- task: PublishBuildArtifacts@1
  displayName: 'Publish Artifact:  drop'
  inputs:
    PathtoPublish: '$(build.artifactstagingdirectory)/drop'
The CopyFiles command copies the package, script, and pfx file we’ll use for authentication in PowerShell.
Updating the release
The release uses PowerShell to deploy our package to the App Catalog. These updates include the transition to the PnP.PowerShell library and the use of certificate based authentication. With the updates to the PnP.PowerShell library, certification authentication is much simpler now. Props to the PnP team for simplifying this.
Authenticating in PnP.PowerShell for the first time
If you have never used the PnP.PowerShell for PowerShell 7, you’ll need to register it as an Azure Active Directory application first. This one-time activity is required whether you are using Azure DevOps or just running scripts locally on your computer. You’ll need to have permissions in Azure Active Directory to complete this task. Assuming you have installed PnP.PowerShell already, run the following command.
Register-PnPManagementShellAccess
It will prompt you to go to the Microsoft Device Login page and then consent to permissions. Continue with the consent, but you can always adjust the permissions later in Azure Active Directory if needed.

Next you will need to register another new app in Azure Active Directory for your Azure DevOps release script. Run the following PowerShell command which you can also find in RegisterPnPAzureADApp.ps1. Update the tenant name to match yours specifying its “.onmicrosoft.com” address. You may update the ApplicationName parameter as desired.
Register-PnPAzureADApp -ApplicationName SPFxAzureDevOps -Tenant mytenant.onmicrosoft.com -OutPath . -DeviceLogin
This will prompt you to do another device login. You’ll then wait 60 seconds and open the URL it provides you to do a consent flow.

Consent to the permissions. The application that PowerShell creates has enough permissions to install the app package in the App Catalog. However, you may want to adjust these permissions to suit your needs. For example, you probably don’t need groups or user profiles access.

When this finishes, it will generate a pfx file and a cer file. Add the pfx file to the root of your SPFx project. You will need this to authenticate in the PowerShell script. You can read more about authentication with PnP PowerShell and why these steps are required now.
Note: anyone with access to your pfx file and client id, can authenticate to Office 365 using the permissions you consented to. Keep the file secure and consider who has access to it. Adjust your permissions to the app registration in Azure Active Directory as needed.
Updating the release script
I updated the PowerShell script to use the new PnP.PowerShell package as well as use the certificate for authentication. Here’s what the script looks like.
Install-Module -Name "PnP.PowerShell" -AllowPrerelease -Force

if ($env:environment -eq "production") {
    $siteUrl = $env:productionSiteUrl
}
else {
    $siteUrl = $env:testSiteUrl
}

Write-Host "SiteUrl - " $siteUrl

$certificatePath = "./" + $env:dropPath + "/drop/" + $env:certificateFilename
Connect-PnPOnline -url $siteUrl -clientId $env:clientId -Tenant $env:tenant -CertificatePath $certificatePath

$packagePath =  "./" + $env:dropPath + "/drop/" + $env:packageName
Add-PnPApp $packagePath -Scope Site -Overwrite -Publish
The script relies on a number of variables that we’ll need to configure. With the exception of password, in the script they are prefixed with env but you’ll leave that part out when you configure them in Azure DevOps.
- testSiteUrl – URL of the site collection for deployment (our test site in this case)
- productionSiteUrl – URL of our production site
- dropPath – The path where the artifact was dropped (refer to the source path when you added the artifact to the release i.e.: _AzureDevOps-CI)
- packageName – name of your .sppkg file (i.e.: azure-dev-ops.sppkg)
- tenant – the tenant name with a .onmicrosoft.com address
- clientId – the Application Id of the Azure Active Directory application we just created
- certificateFileName – the name of the certificate that Register-PnPAzureADApp created
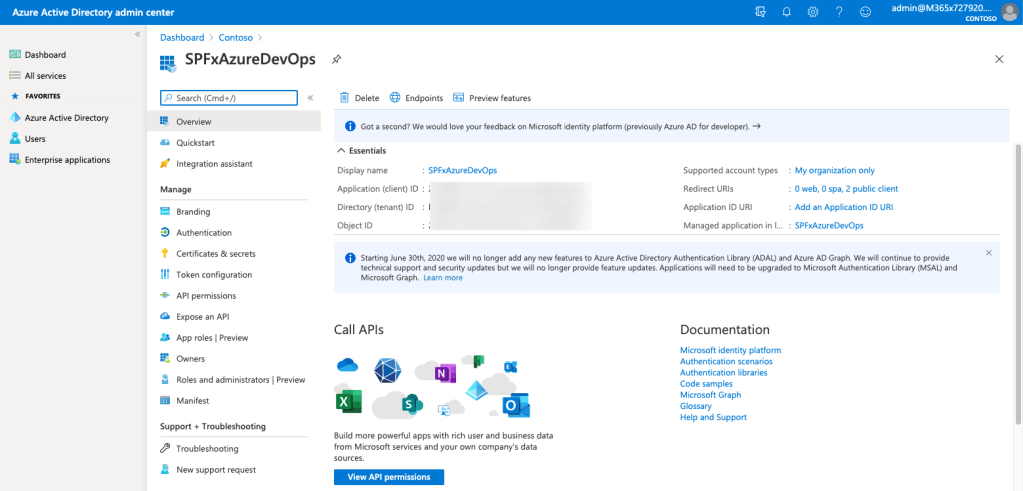
To get the ClientId / Application Id, you will need to open Azure Active Directory, go to App Registrations, and find the application you created. In this case, mine was named SPFxAzureDevOps.
Updating the Release
We’ll need to update the variables in our Release Variable Group in the Library section under Pipelines in Azure DevOps.
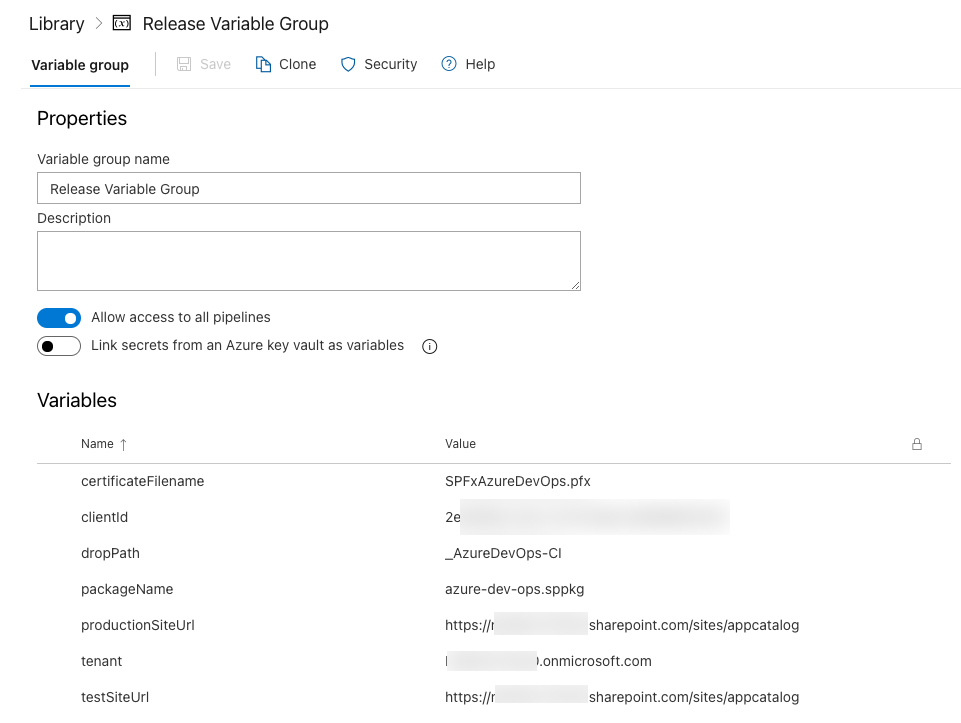
Create a new variable named clientId and specify the Application Id you captured earlier. Create a new variable named certificateFilename and specify the name of the certificate that was produced when you ran the PowerShell command. In my case, mine is called SPFxAzureDevOps.pfx. Finally, add a variable named tenant with the value of your .onmicrosoft.com name for your tenant.
Testing your changes
Kick off a new build by committing a change and pushing it to Azure DevOps. If all goes well, your build will complete and your release will deploy the package to your SharePoint app catalog. Your release will show that the file is deployed to the App Catalog.

Refer to the original post if you need more details on validation. I’ll be creating a new version of that post to include all of these steps here soon.
View the code on GitHub.
