Updated: January 20th, 2020 – Refer to this post to use the latest version of PowerShell and certificate authentication. This post will be updated in the future to include those updates.
Updated:May 28th, 2019 to use SPFx 1.8 and node.js v10
Updated: May 8th, 2019 to include use of SecureString
There are a lot of posts out there on how to set up CI / CD with SPFx projects and Azure DevOps. The problem is Azure adds functions and makes changes to the interface all of the time, so things quickly can become out of date. When I was looking how to configure this recently, I found that I had to combine a number of pieces from the official documentation plus blog posts to really piece it all together.
When setting up CI / CD, there are two pieces to it. Think of Continuous Integration (CI) as performing the build and producing your SharePoint solution package file. Basically, you are just automating the process you would do manually to produce a package. Think of Continuous Delivery (CD) as the process of adding your solution package to the App Catalog.
Setting up Continuous Integration (CI)
Let’s start with setting up Continuous Integration (CI) with Azure DevOps. You can do this in two ways: manual configuration or using a YAML file. Manual configuration is good if you want to understand the steps of how to set up the agent to build your SharePoint project. The YAML file is an Infrastructure as Code approach to creating the tasks for the build step. You need to know the syntax for the YAML but luckily, the PnP SPFx Generator creates a YAML file that you can use with any project. Either way the process effectively creates the following tasks to build your project:
- Get Sources from source control
- Specify that you will Use Node 10.x
- Run npm install
- Optionally run unit tests
- Run gulp bundle –ship
- Run gulp package-solution –ship
- Copy your output files to a staging directory
- Publish the Pipeline Artifact so that your CD release process can deploy it
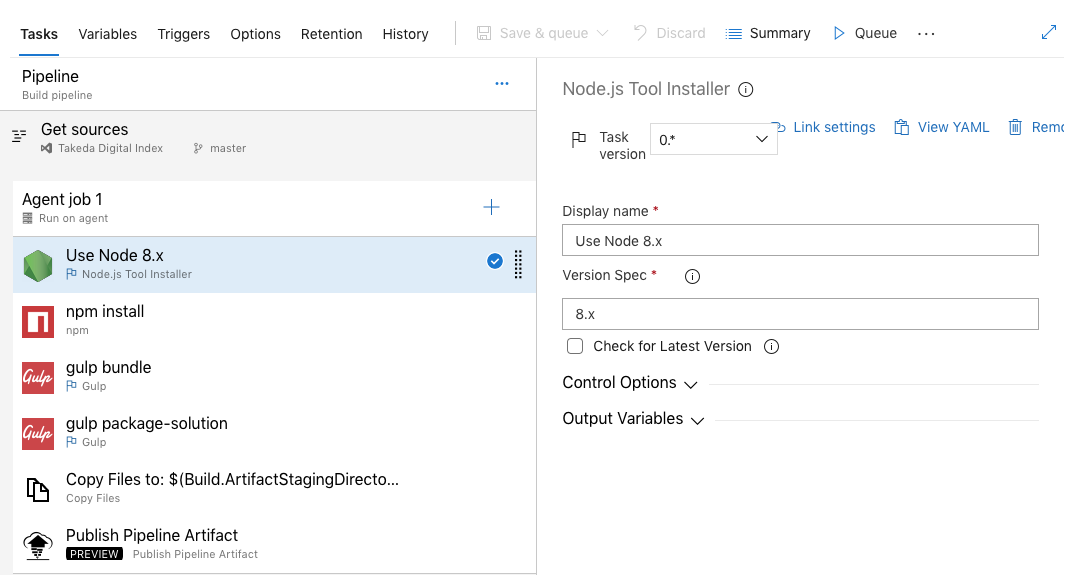
I’m not going to go through the manual configuration because this is where the screenshots get quickly out of date and it’s rather tedious. I will show you a screenshot of what it looks like.
Instead we’ll use what the PnP SPFx Generator provides us. When you start a new project or add a web part or application customizer to an existing project, the last option it gives you is whether you would like to add Azure DevOps integration. Select that option and it will produce the YAML file along with all of the other project assets.

The only issue with this is that you really can’t select this option on an existing project unless you are adding a new web part or extension to it. The YAML file is the same for every project though so you can just as easily grab it from the GitHub repository for this blog post. Download this file and put it in the root of your project. Let’s take a look at what that file looks like.
resources:
- repo: self
trigger:
- master
- develop
queue:
  name: Hosted VS2017
  demands:
  - npm
  - node.js

steps:
#install node 8.x
- task: NodeTool@0
  displayName: 'Use Node 10.x'
  inputs:
    versionSpec: 10.x
    checkLatest: true

#install nodejs modules with npm
- task: Npm@1
  displayName: 'npm install'
  inputs:
    workingDir: '$(Build.SourcesDirectory)'
    verbose: false

#start unit tests
- task: Gulp@0
  displayName: 'gulp test'
  inputs:
    gulpFile: '$(Build.SourcesDirectory)/gulpfile.js'
    targets: test
    publishJUnitResults: true
    testResultsFiles: '**/test-*.xml'
#publish test results
- task: PublishCodeCoverageResults@1
  displayName: 'Publish Code Coverage Results $(Build.SourcesDirectory)/temp/coverage/cobertura/cobertura.xml'
  inputs:
    codeCoverageTool: Cobertura
    summaryFileLocation: '$(Build.SourcesDirectory)/temp/coverage/cobertura/cobertura.xml'
    reportDirectory: '$(Build.SourcesDirectory)/temp/coverage/cobertura'

#bundle code with gulp
- task: Gulp@0
  displayName: 'gulp bundle'
  inputs:
    gulpFile: '$(Build.SourcesDirectory)/gulpfile.js'
    targets: bundle
    arguments: '--ship'
  continueOnError: true

#package solution with gulp
- task: Gulp@0
  displayName: 'gulp package-solution'
  inputs:
    gulpFile: '$(Build.SourcesDirectory)/gulpfile.js'
    targets: 'package-solution'
    arguments: '--ship'

#copy files to artifact repository
- task: CopyFiles@2
  displayName: 'Copy Files to: $(build.artifactstagingdirectory)/drop'
  inputs:
    Contents: '**\*.sppkg'
    TargetFolder: '$(build.artifactstagingdirectory)/drop'

#copy deploysment script to artifact repository
- task: CopyFiles@2
  displayName: 'Copy Files to: $(build.artifactstagingdirectory)/drop'
  inputs:
    Contents: '**\DeployPackage.ps1'
    TargetFolder: '$(build.artifactstagingdirectory)/drop'

#publish artifacts
- task: PublishBuildArtifacts@1
  displayName: 'Publish Artifact:  drop'
  inputs:
    PathtoPublish: '$(build.artifactstagingdirectory)/drop'
What you see above is a task that corresponds to what I listed above in the list. This includes tasks for running npm install, gulp, and copying the files to where they need to be. Let’s highlight the last two tasks. CopyFiles takes the package output from the sharepoint/solution folder and copies it to a folder called drop inside a special folder for the build at the variable $(build.artifactstagingdirectory). It also copies our deployment PowerShell script that we will use in the release piepline. The PublishBuildArtifacts task makes it available to the Continuous Delivery Release pipeline later.
Configure your pipeline
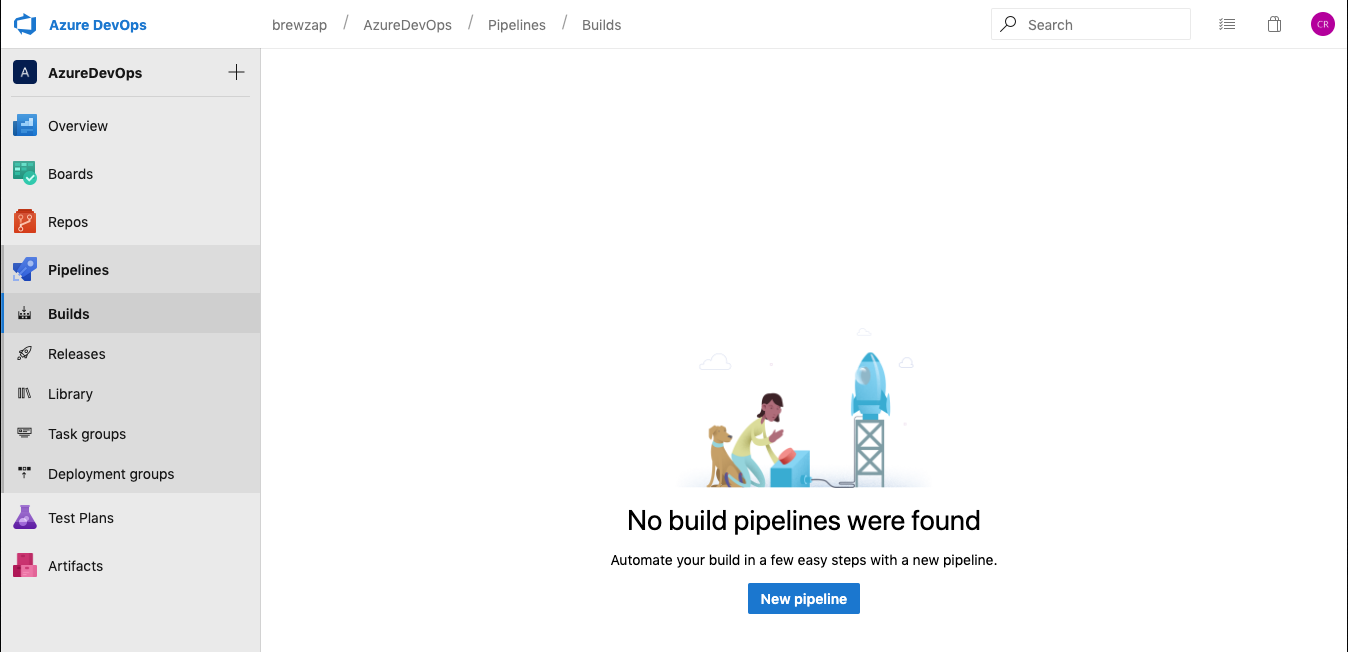
Now you have this file but what do you do with it? Now, we configure Azure DevOps to use the file and create our build. Login to Azure DevOps and select your project. Technically, your source code can be in any other source control provider, but for this example we’ll have a copy of our source code here. Now expand Pipelines and click on Builds. Click on the New pipeline button.
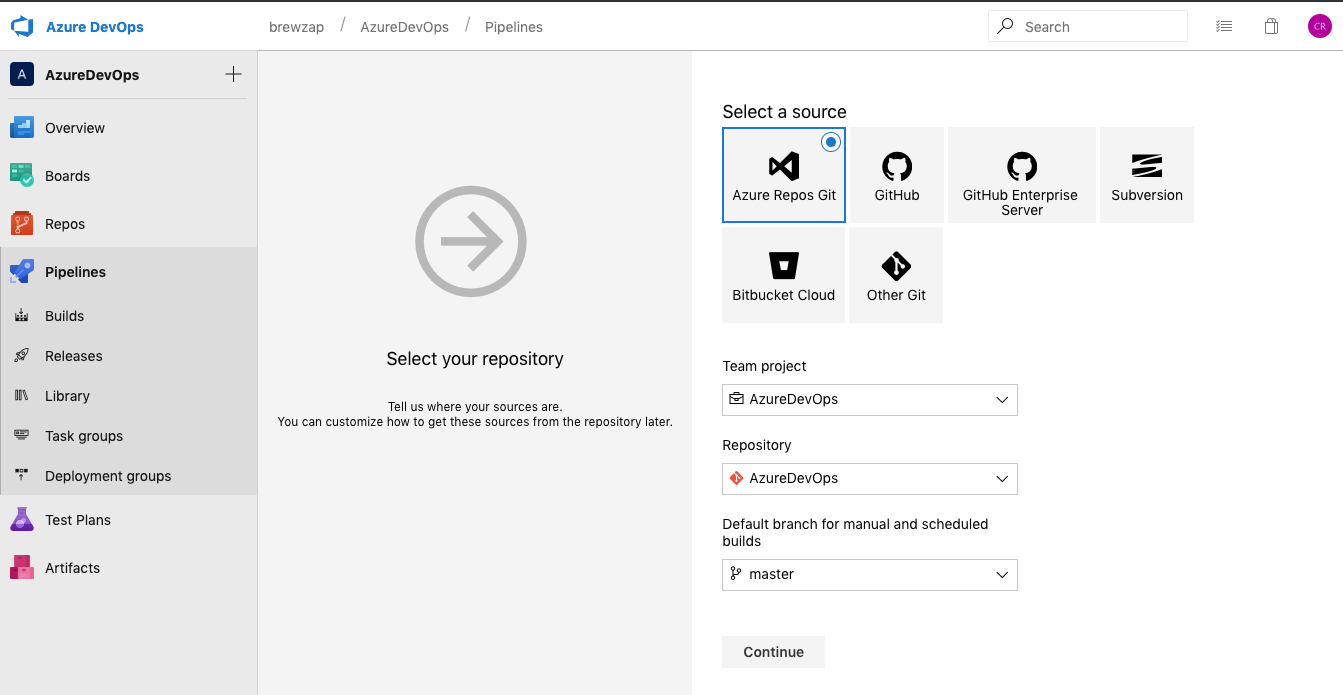
Now select the source repo type. This is where you can use other source control providers if you want. I will use Azure Repos Git and use the default settings for Team Project and Repository. You may want to configure the Default branch setting. In our case, anything that goes into master will be deployed. If you use a different branching structure for release, you can specify it here.
Now we need to start with a template. If you were doing manual configuration, you would start with an empty job. However, since we have a YAML file, we will choose Configuration as code / YAML.
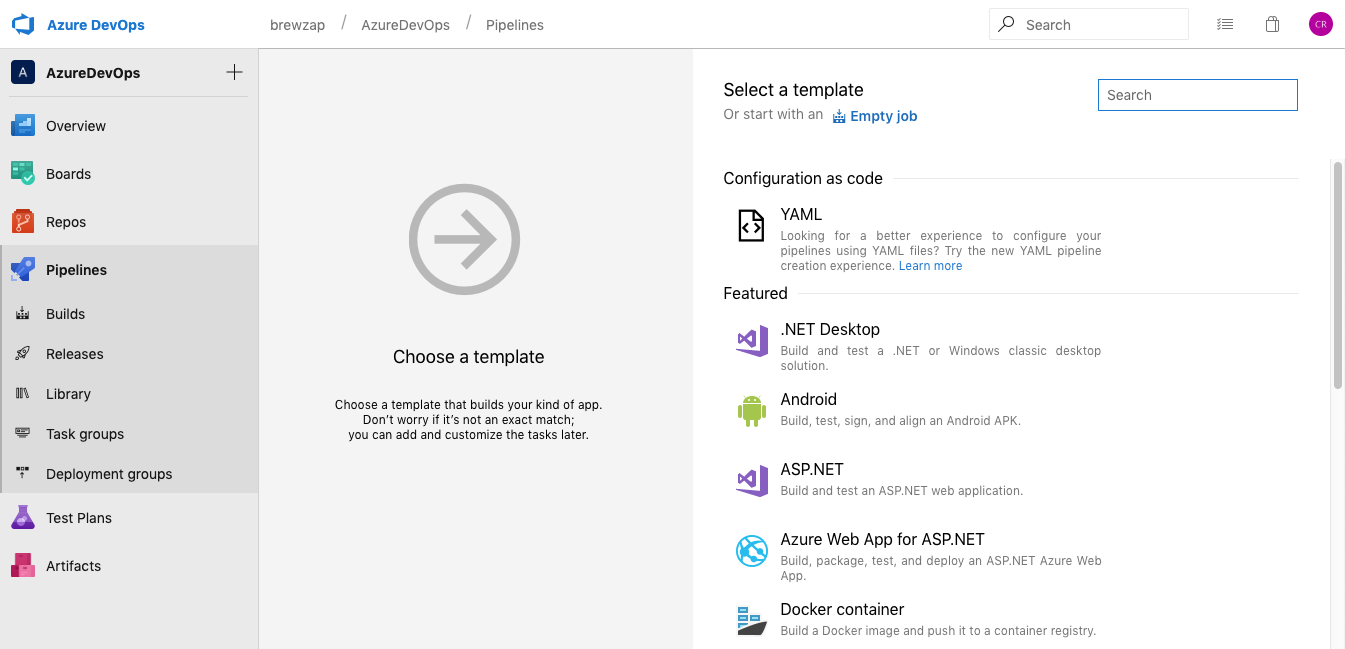
The YAML experience is in the process of changing, so when it asks you if you want the new experience, click Apply.

Now we can start configuring our pipeline. You can optionally change the name of your pipeline here.

You can also select what type of Agent pool to use. I was unsuccessful the last time I tried with Ubuntu, but you may have better luck. This YAML file sets the default to Hosted VS2017. However, I also use Hosted macOS as well. Some have reported having faster build times with Ubuntu.

Now you need to specify the path to your YAML file. This is the path in source control though not a local path. To select it, you will need to have pushed a copy of your code to the remote master.

Once you select your YAML file path, we are done with the Pipeline. Click Save & queue to test it. On the dialog, just click Save & queue again to get your first build started. You’ll see a note that the build has started and you can click on the link to view the details.

Now you will see the progress of the current build. Some tasks will take a while such as npm install. It usually takes a minute or two just for that task.

After a while longer, the build will finish. If you don’t have any unit tests defined, you will get warnings from gulp test. You can actually remove these steps from your YAML file if you don’t intend to use test. I think we all intend to use test, but in reality, a lot of us don’t get the opportunity to write them.

If you click on the Artifacts menu and then click drop, you can actually navigate and see the folder structure that your package is in. This is important for when we set up the release.

Setting up Continuous Delivery (CD)
Now that we have a successful build, we need to get it to our app catalog. You have two options for that PowerShell or the Office 365 CLI. I tend to use PowerShell because I often work with site collection app catalogs and I am not a global administrator in those environments. Now we will set up our release pipeline. Click on the Releases link in the navigation and then click on New pipeline.

Now choose Empty job to start our new release pipeline.

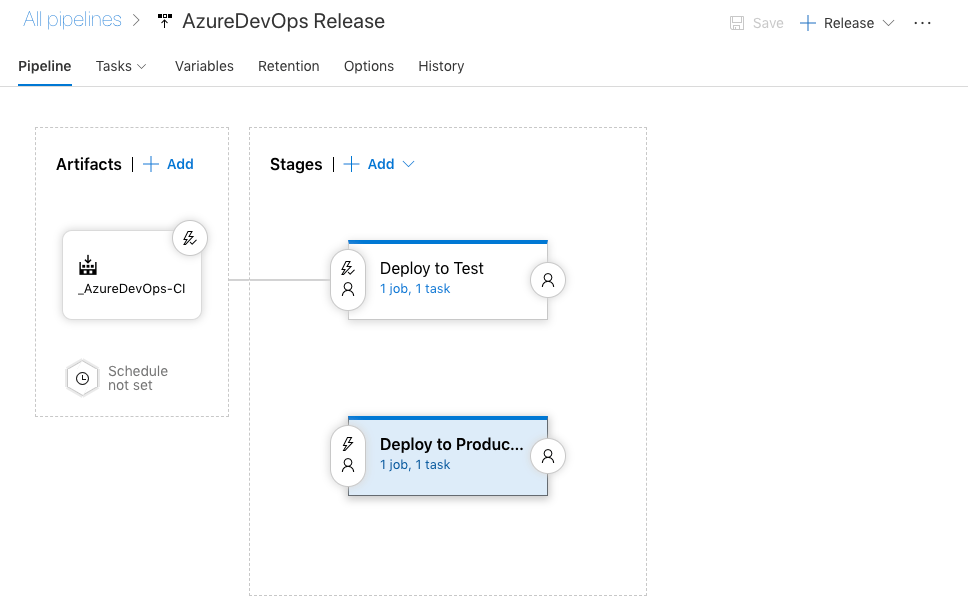
Now you are configuring a deployment stage. Usually you’ll create one or more of these for each of your environments. In my case, I rename my stage to Deploy to Test. Then click the close button on the stage.

Now, click on Add an artifact. This takes the output from our build pipeline and connects it to our release.

Now we will configure our artifact.

The Project field should default to the current project. You will need to choose your Source (build pipeline) next. There should only be one option to choose from. Leave the Default version as is. Lastly, the Source alias is important. It defaults to an awkward path with an underscore. You can change it if you like, just make sure you take note of it because you will need it in your PowerShell script. Your drop folder will end up being placed in here.
When you have completed your artifact, go to the Tasks menu, and select the name of your Stage (i.e.: Deploy to Test). Here is where we will configure our PowerShell script to deploy our package to Office 365. The most complex piece of the script is authentication. What choice you make here depends on what level of access you have. If you have access to AAD, or you get a GA to take care of you, creating a self-signed certificate is probably the most secure choice. However, you may not have the permissions to do that so you may opt to specify a set of credentials in a library. Also keep in mind that if two-factor authentication is enabled, specifying credentials isn’t an option. You’ll need to look at the certificate approach above.

Now we need to configure our PowerShell task.
Let’s take a look at our PowerShell script. It does three things. It installs the PnP Powershell module; Connects to SharePoint Online; and then installs the solution package.
Update 1/20/2021 – refer to this post to get the updates PowerShell script to use certificate authentication.
param ([Parameter()]$password)

Install-PackageProvider -Name NuGet -Force -Scope "CurrentUser"
Install-Module SharePointPnPPowerShellOnline -Scope "CurrentUser" -Verbose -Force

if ($env:environment -eq "production") {
    $siteUrl = $env:productionSiteUrl
}
else {
    $siteUrl = $env:testSiteUrl
}

Write-Host "SiteUrl - " $siteUrl

$sp = $password | ConvertTo-SecureString -AsPlainText -Force
$plainCred = New-Object system.management.automation.pscredential -ArgumentList $env:username, $sp

Connect-PnPOnline -Url $siteUrl -Credentials $plainCred

$packagePath =  "./" + $env:dropPath + "/drop/sharepoint/solution/" + $env:packageName
Add-PnPApp $packagePath -Scope Site -Overwrite -Publish
The script relies on a number of variables that we’ll need to configure. With the exception of password, in the script they are prefixed with env but you’ll leave that part out when you configure them in Azure DevOps.
- username – Office 365 username
- password – Office 365 password
- testSiteUrl – URL of the site collection for deployment (our test site in this case)
- productionSiteUrl – URL of our production site
- dropPath – The path where the artifact was dropped (refer to the source path when you added the artifact to the release i.e.: _AzureDevOps-CI)
- packageName – name of your .sppkg file (i.e.: azure-dev-ops.sppkg)
We need to configure these variables in a library so that we can put the password in a secret variable. Click on the Library button in the navigation. Then click on New Variable Group.

You can specify the name of the variable group at the top. In this case, I named mine Release Variable Group. Then we are going to add variables for each variable of our PowerShell script.
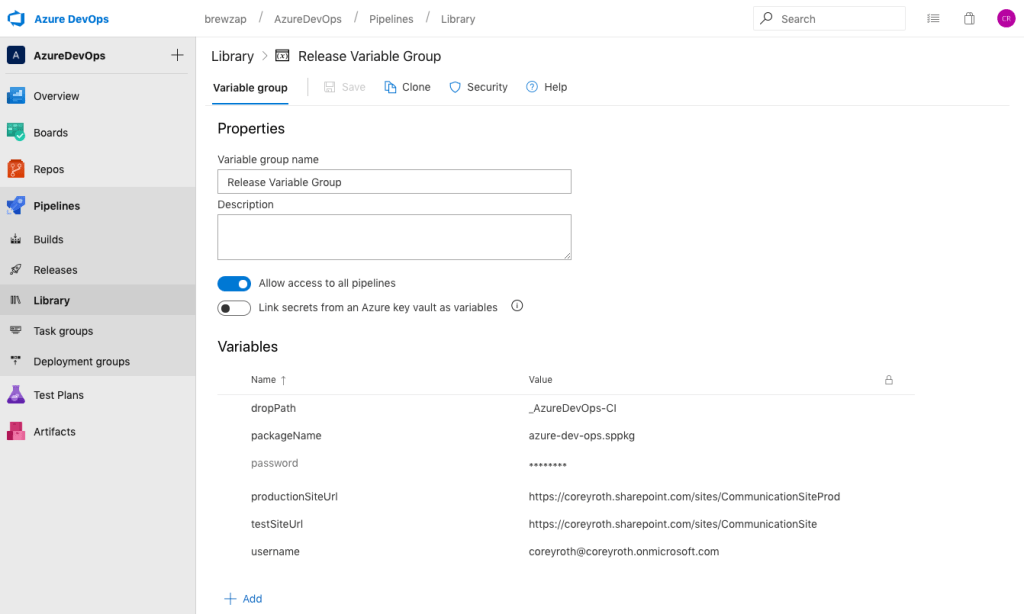
After creating your password variable, click the lock icon to convert it to a secret variable. Be sure and save your changes when you are done.

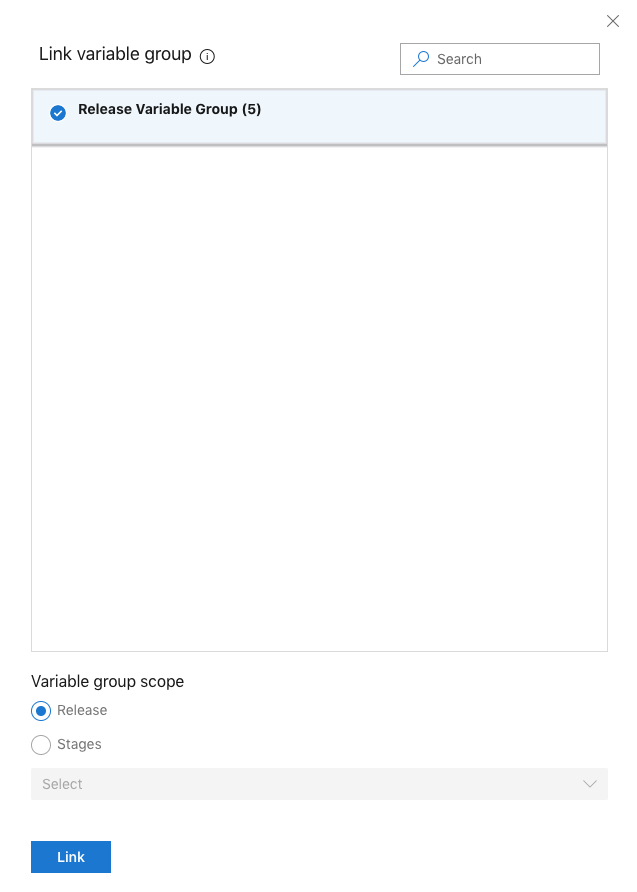
Now go back to your release pipeline and edit it. Click on the Variables link and then choose Variable groups. Now click on Link variable group.

Select the name of your new variable group. Set scope to Release and click Link. This lets your Release Pipeline use the variables you created in your library.
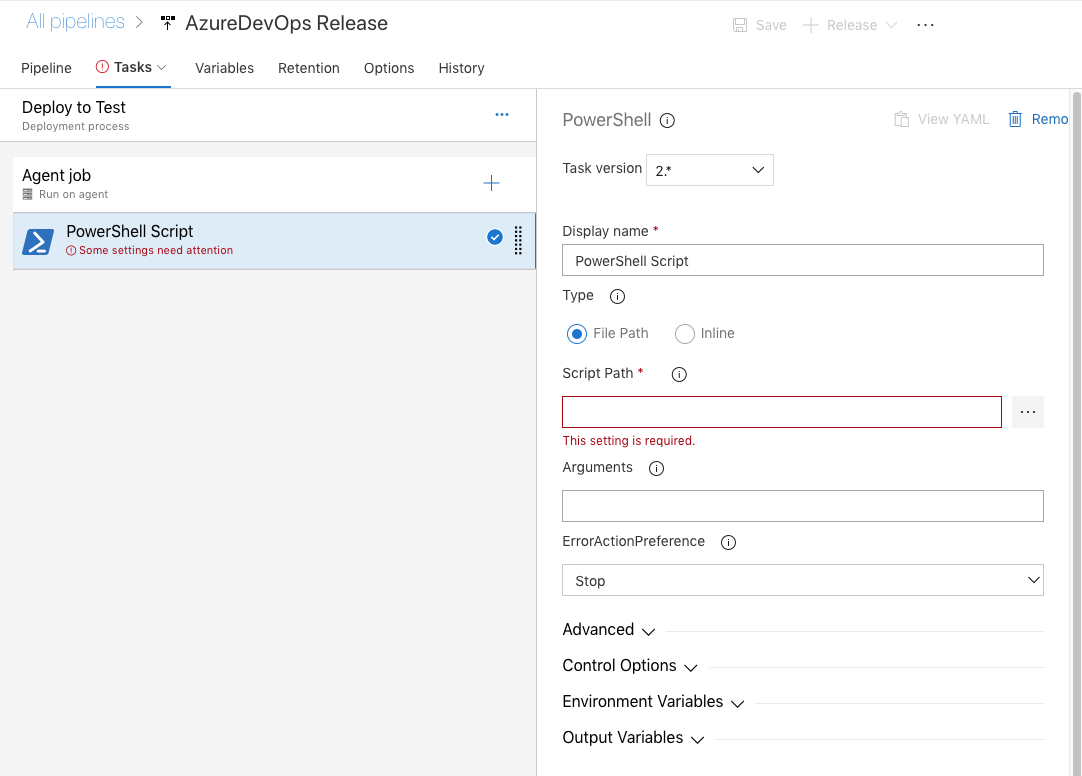
Configuring the PowerShell Task
Back to configuring our PowerShell task. For Type specify File Path. We have to get this file from the published artifacts. That’s why we added a Copy Files task to our YAML for it.
Specify the Script Path by clicking the … icon and choosing the file in your drop folder.

Since we are using a secret variable for the password, we have to pass that as an argument to the script. That’s the only way to pass secret variables in. You do this by adding an argument specifying the name of the parameter and then the name of the variable be sure to include it in quotes like below.
-password "$(password)"
It will look like this in the Arguments field of the PowerShell task.

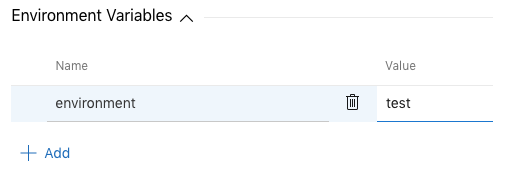
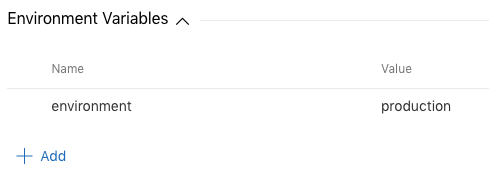
Now you need to configure a variable which controls whether we are deploying to test or production. We’ll add this in the Environment Variables section of the PowerShell task. Create a new variable named environment and give it a value of test.
That’s the only task we need to configure. Now, click on the Save button. Now click on the Release button and select Create Release. Choose the Stage we just created and you’ll see the list of artifacts. This will only work if you had a successful build earlier.

Just like before, you’ll get a notification that a release has started. Click on the link.

Since this is a manually triggered release, we’ll have to click the Deploy button to make the deployment happen. Normally this would execute automatically when the release is automatically triggered when we enable Continuous Deployment. We’ll cover that in the end.

When you click on the stage, you’ll see a progress indicator.
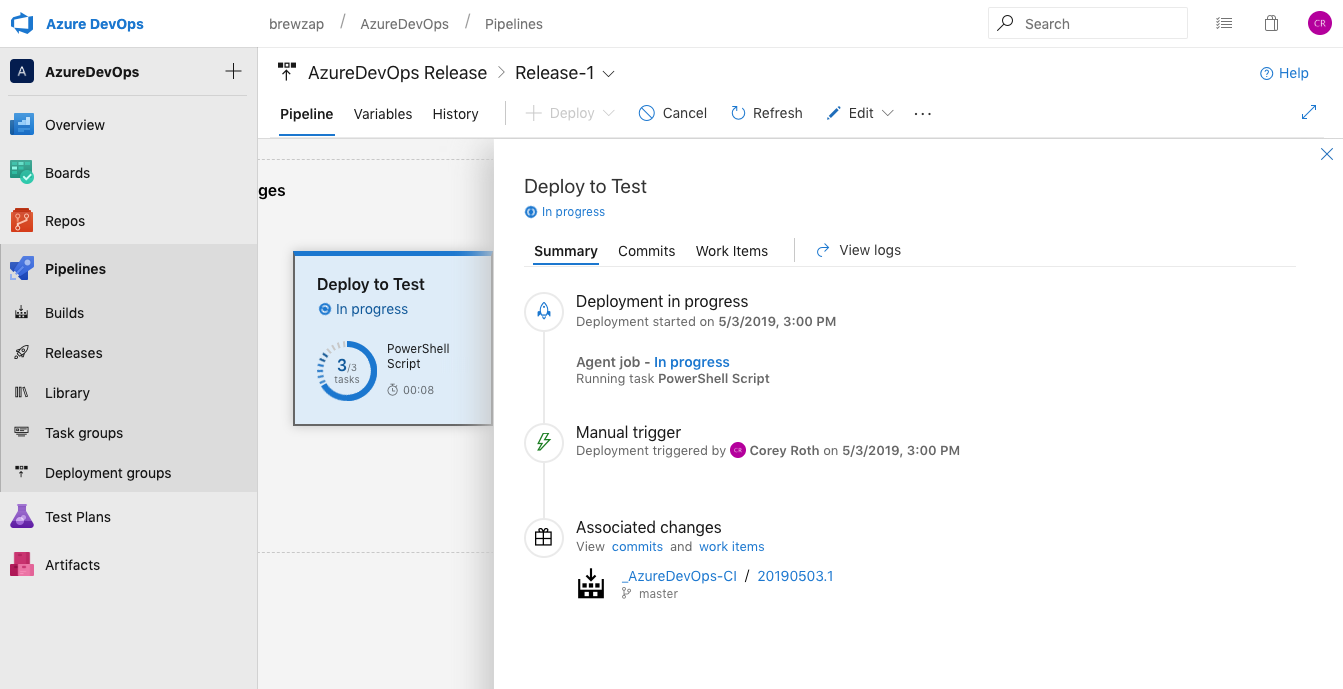
Here we can see the job running in progress.

If all goes well, you won’t get any errors in your script. Here is the output from mine after deployment.
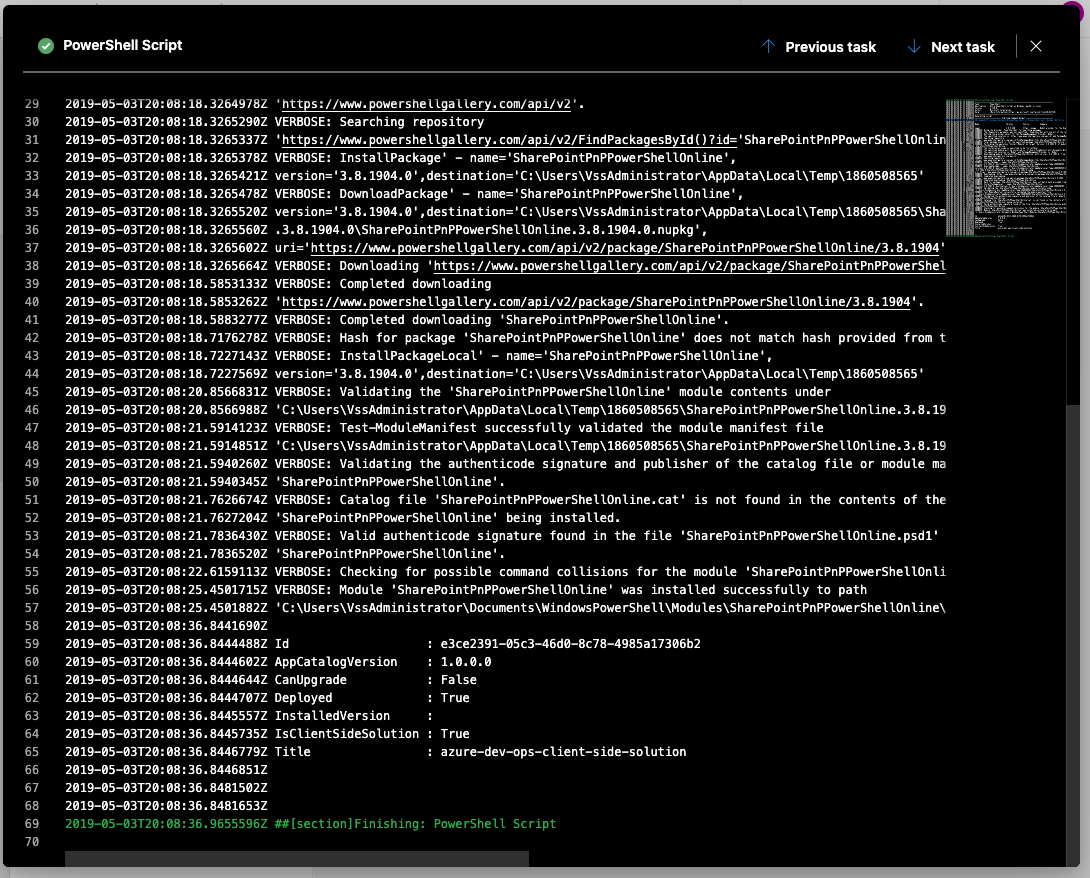
Here is the rest of the status of the agent job.

Looking in my App Catalog, I can now see that the solution package was deployed.

Now that you have a working release pipeline, the next step is to turn on Continuous Deployment. To do that, go to the Pipeline page. You may need to close the instance of your release you just ran. Click the lighting bolt icon wand it will highlight Continuous Deployment Trigger. Click on that.
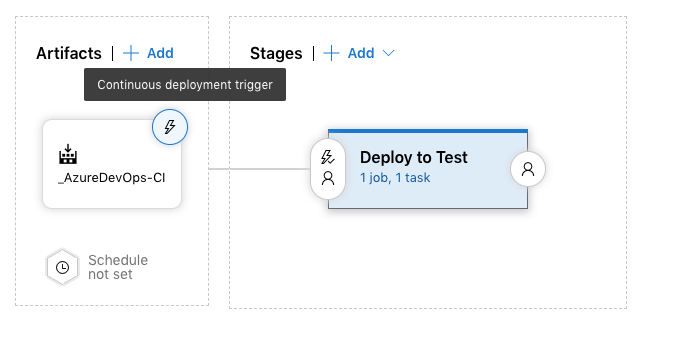
Now toggle the Continuous deployment trigger to Enabled. You may optionally add branch filters.
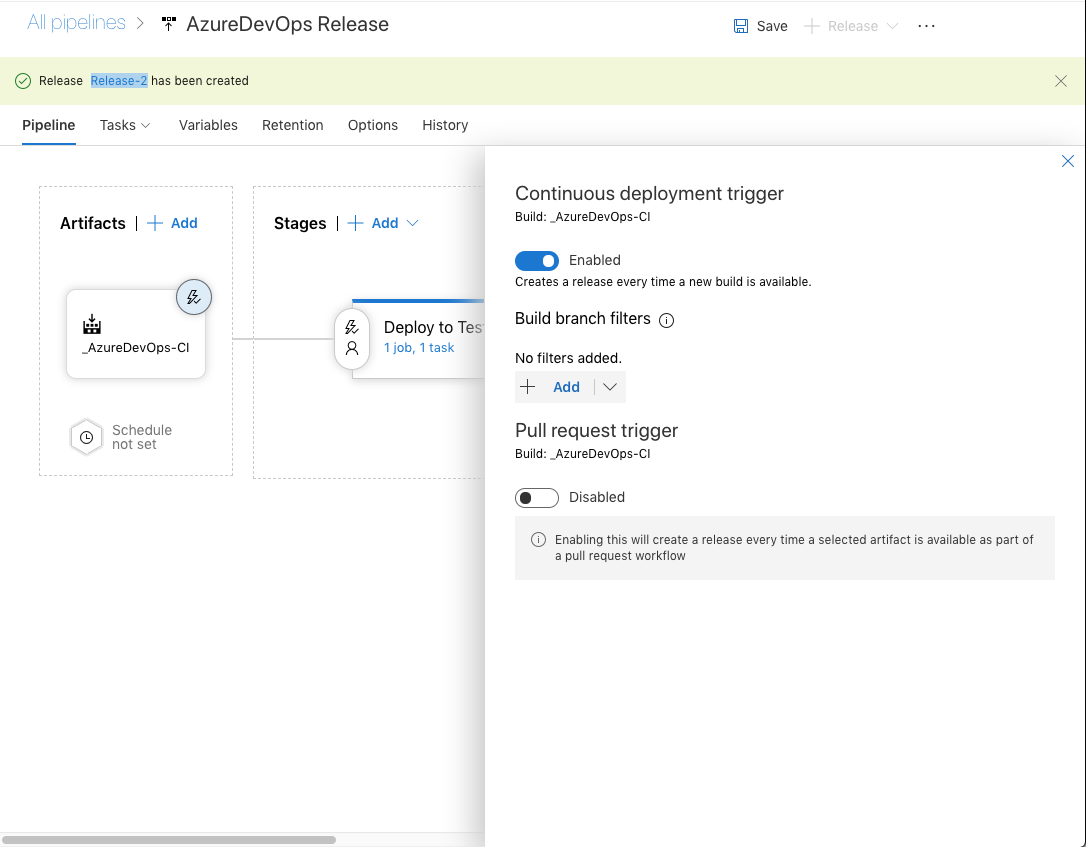
That’s it. You’re now ready to go with Continuous Deployment! Be sure you save when you are done. You can optionally add approvals and other steps that you would like along the way.
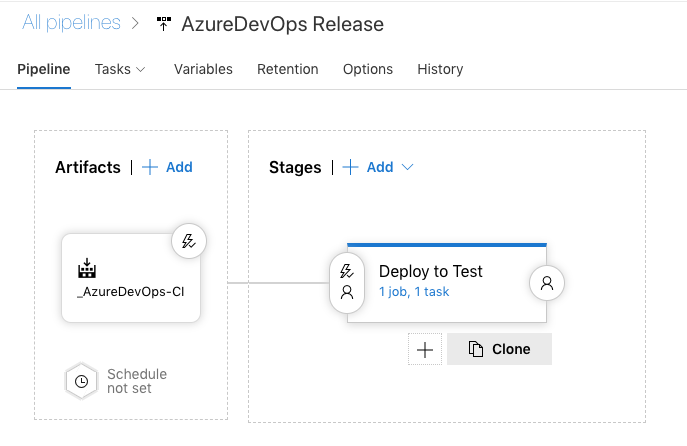
Setting up a production stage
You might want to set up another stage for another environment like production. This can be manually triggered but eventually you could tie it to testing criteria and approval if you wanted. However over your Stage and select Clone.
I like to start with manual triggering for production. To do that, edit the pre-deployment condition.

Now select Manual only.

Here is what my pipeline looks like it is done.

The last step is to set our production environment variable. Click on Tasks -> Deploy to Production and then PowerShell Script. Change the environment variable named environment to a value of production. My PowerShell script has the value as lower case so you’ll need to match that.
Conclusion
This was a lot of steps and screenshots but hopefully it’s not too bad. The PnP SPFx Generator definitely saves a lot of steps with the build. Now you can experiment with the release and see what works for you.
You can also check out my GitHub repository for all of the code I used today.

Really greate and comprehensive post. And thanks for the pingback.
I also have posted a short variant a while ago how to configure the PS task to use modern authentication when for instance legacy authentication is disabled as you mention
https://mmsharepoint.wordpress.com/2019/01/18/deploy-spfx-app-package-to-sharepoint-from-azure-devops-with-modern-authentication/
LikeLiked by 1 person