
If there is anything that is hard to work with in SharePoint, it’s lookup columns. While it’s so easy and simple to create them through the SharePoint user interface (well the classic interface), they are incredibly complex to provision programmatically. I remember struggles behind provisioning lookup columns going back as far as 2007 if not earlier. What’s worse is SharePoint will let you screw up hard when you do it wrong.
There’s a reason, you don’t find a lot of blog posts on the topic.
Lookup columns are hard. Projected fields are even worse.
That’s why PnP PowerShell doesn’t support them using simple parameters. That’s why, you still can’t create them in Modern.
That’s not to say there’s nothing out there on the topic, but I think this topic still deserves some attention since it’s still something people want to do.
Learning from SharePoint
There are two ways to create lookup columns with PnP Powershell. The first is with the CSOM context and the second is declaratively through XML. While I have been successful provisioning a lookup column with the CSOM context, I have utterly failed to figure out how to get the projected fields to work. Projected fields are those extra fields that you can select from your lookup list that will get included in the new list if you don’t remember. This post will show you how to create the lookup fields and projected fields using the CAML XML. It’s not really my preferred approach but it works. It’s easy to mess up though.
What’s the best way to determine the XML you need? Create your columns first in SharePoint using the user interface. Then use PnP PowerShell to get the schema. You’ll need to make a few tweaks to the schema but it’s a good start.
We’l start by taking a look at our target lookup list. In my case, I am using the Product List on the Marketing site of the Office 365 demo content.
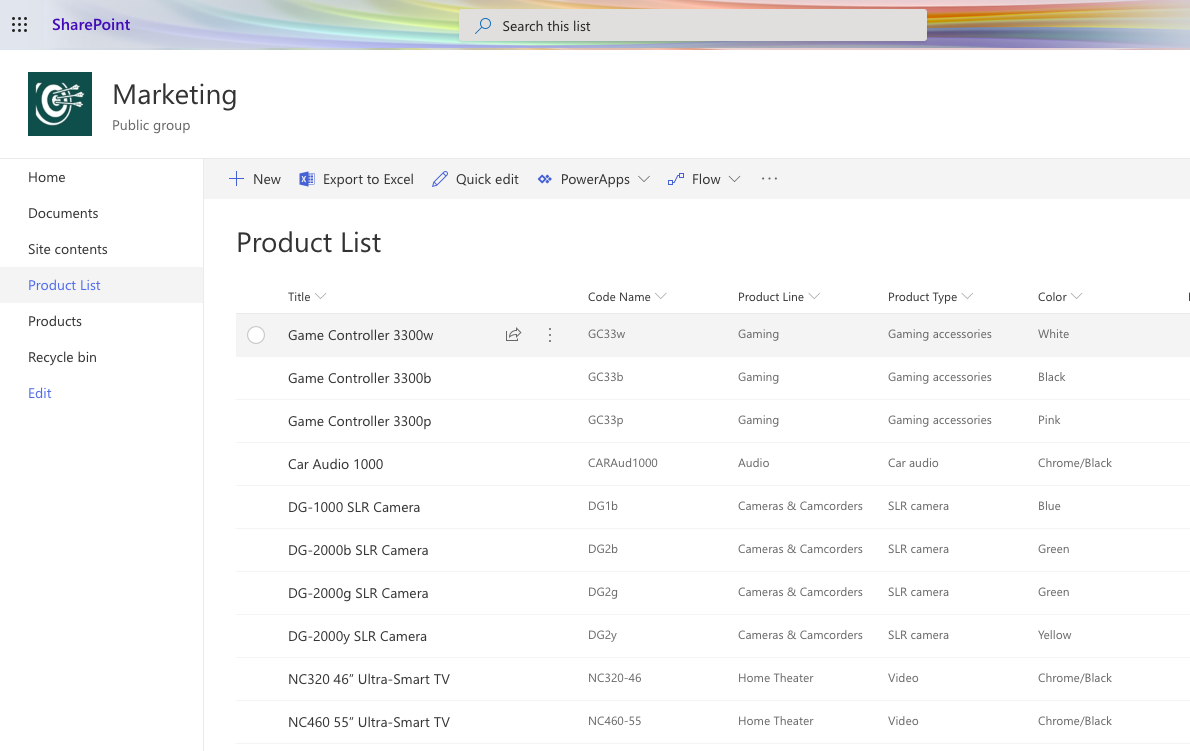
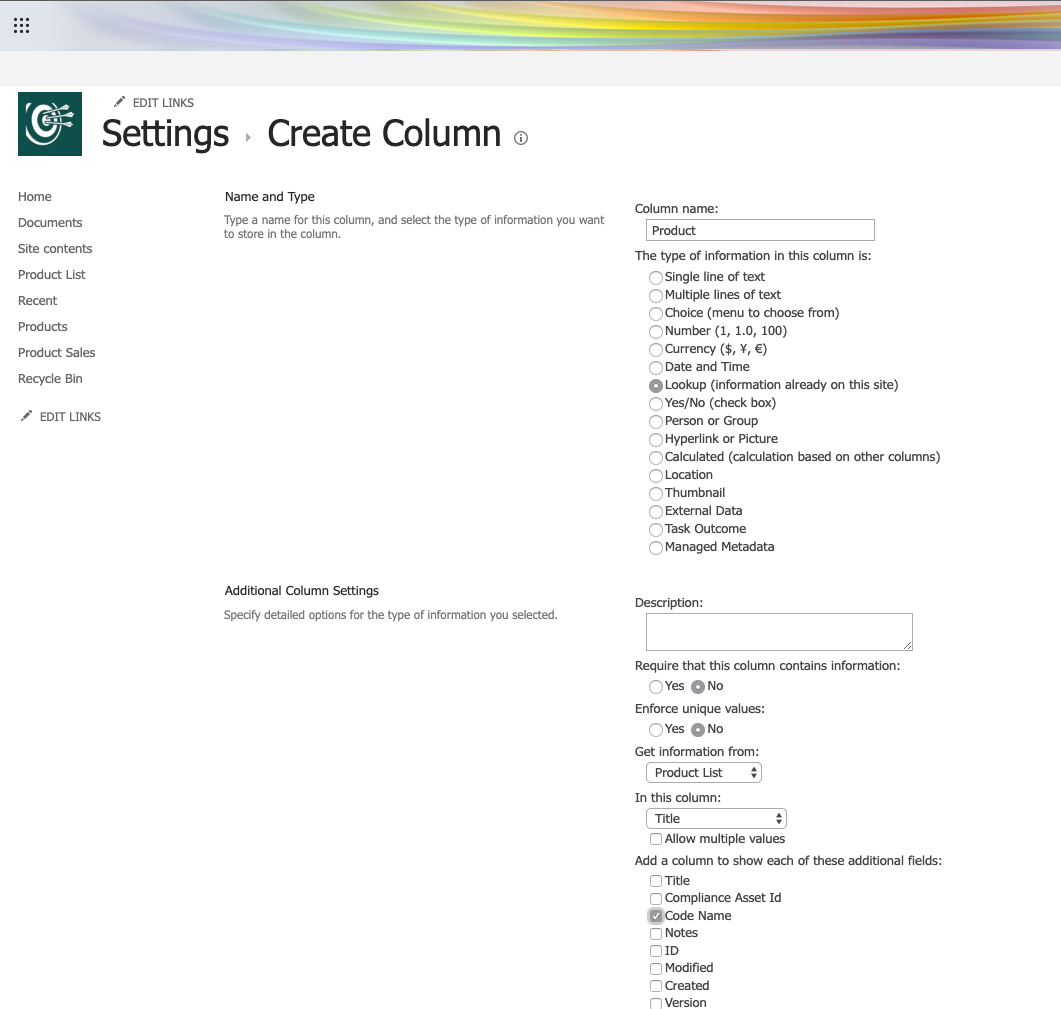
I’ve created a new list called Product Sales which will have a lookup column to my Product List. In that lookup column, we’ll also include the Code Name field as a projected column. This is what it looks like in the classic Create Column screen.
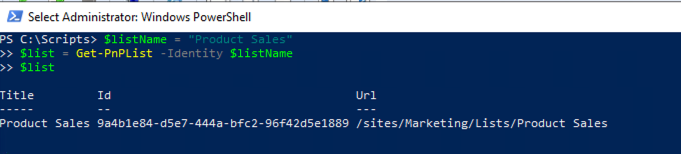
Now, we will examine the columns we created using PnP PowerShell. Start by connecting to your site in PowerShell. Now we’ll issue the following commands to get a reference to our list. We’ll need the Id of this list later to create our columns.
$listName = "Product Sales"
$list = Get-PnPList -Identity $listName
$list
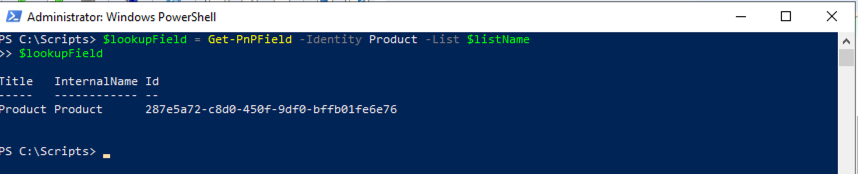
Now we use Get-PnPField to get a reference to the field. If you were working with a Site Column instead of a List Column, you would omit the List parameter.
$lookupField = Get-PnPField -Identity Product -List $listName
$lookupField
Take a look at the schema now by using $lookupField.SchemaXml.

Now let’s dissect the SchemaXml and identify the parts we care about.
<Field Type="Lookup" DisplayName="Product" Required="FALSE" EnforceUniqueValues="FALSE" List="{51f7d434-237e-49ce-94e3-afaf66289b86}" ShowField="Title" UnlimitedLengthInDocumentLibrary="FALSE" RelationshipDeleteBehavior="None" ID="{287e5a72-c8d0-450f-9df0-bffb01fe6e76}" SourceID="{9a4b1e84-d5e7-444a-bfc2-96f42d5e1889}" StaticName="Product" Name="Product" ColName="int1" RowOrdinal="0" />
Some of the attributes we will keep when we create our own lookup column, others we need to remove. Let’s go through the attributes:
- Type – value of Lookup
- DisplayName – this is how the field is displayed to the user (spaces are ok)
- Required – whether the field is required or not
- EnforceUniqueValues – self explanatory
- List – contains the ID of the lookup list. We’ll have to retrieve that later instead of hard coding it.
- ShowField – the primary field of the lookup list to display. This was the value in the dropdown when we first created it (defaults to Title)
- UnlimitedLengthInDocumentLibrary – I honestly don’t know what this one does so I usually omit it
- RelationshipDeleteBehavior – this is the cascade delete setting when you create the column.
- ID – unique id of the lookup field. We’ll have to create a new Guid for this
- SourceId – not needed when creating the new column. Don’t include or you’ll have issues.
- StaticName – refers to the field in the database. Omit it because the Name field is sufficient. You can cause yourself a lot of trouble with this column so avoid it.
- Name – internal name of the column. Spaces and special characters must be encoded.
- ColName – refers to the actual table column in the database. Omit this as well or you’ll really cause yourself problems.
- RowOrdinal – omit
Get the schema for the Projected Field
Now that we know the meanings behind some of the attributes, we can now take a look at our projected field with a title of Product:Code Name. However, the internal name is encoded, so it might be easier to look up the encoding by getting all of the fields in the list with Get-PnPField.

That reveals our InternalName as Product_x003a_Code_x0020_Name. Issue the following commands to get the SchemaXml.
$projectedField = Get-PnPField Product_x003a_Code_x0020_Name -list $listName
$projectedField.SchemaXml

Now let’s look at the differences in the SchemaXml for the projected field.
<Field Type="Lookup" DisplayName="Product:Code Name" List="{51f7d434-237e-49ce-94e3-afaf66289b86}" WebId="879fcaf0-bec7-4cb6-912d-3208c2fd392d" ShowField="Code_x0020_Name" FieldRef="287e5a72-c8d0-450f-9df0-bffb01fe6e76" ReadOnly="TRUE" UnlimitedLengthInDocumentLibrary="FALSE" ID="{1f4699fd-1b86-42f9-a6c6-3cfecd3f287d}" SourceID="{9a4b1e84-d5e7-444a-bfc2-96f42d5e1889}" StaticName="Product_x003a_Code_x0020_Name" Name="Product_x003a_Code_x0020_Name" Version="1" />
You’ll notice this is also a Lookup field. However, there are some slight differences:
- List – This is the ID of the lookup list like before
- WebId – This is the ID of the current site. We can actually leave it out.
- FieldRef – This is the ID of the selectable Lookup column we just looked at. That’s how it creates the link.
- ShowField – The name of the field in the lookup field to project (must be encoded)
- ReadOnly – Must be set to true since you can’t edit the projected fields.
Creating the Lookup Field with PowerShell
With that, we now have all the data we need to create our own lookup field. The first step is to assemble our CAML XML string to create the field. It’s a bit messy because we have to splice some values in, but it’s not too bad. Start by getting a reference to our lookup list (Product List in our case). We’ll need this to get the List Id. We’re going to create this column in a new list called Product Inventory.
$lookupListName = "Product List"
$targetListName = "Product Inventory"
$lookupList = Get-PnPList -Identity $lookupListName
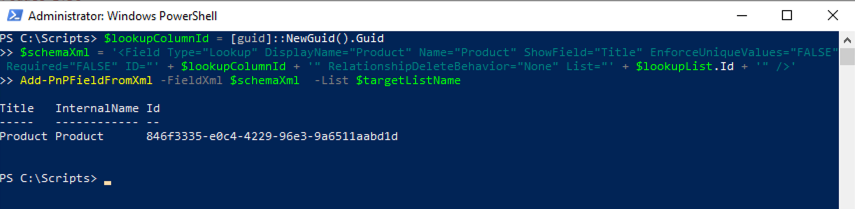
Now we need to generate a Guid for our new lookup column. I am doing it the old school way because it’s easy to get the Guid as a string that way.
$lookupColumnId = [guid]::NewGuid().Guid
Next, we’ll assemble our CAML XML string specifying a few key values including DisplayName, Name, and Title. We copied those values over from the SchemaXml from earlier. For the ID, we use the value of the new GUID we just created. Finally, I need to provided the Id of the lookup list in the List attribute. All of the other values that we saw in SchemaXml we have omitted.
$schemaXml = '<Field Type="Lookup" DisplayName="Product" Name="Product" ShowField="Title" EnforceUniqueValues="FALSE" Required="FALSE" ID="' + $lookupColumnId + '" RelationshipDeleteBehavior="None" List="' + $lookupList.Id + '" />'
To create the field we use Add-PnPFieldFromXml.
Add-PnPFieldFromXml -FieldXml $schemaXml -List $targetListName
If all goes well, you’ll see that your new field was created.
Creating the Projected Field with PowerShell
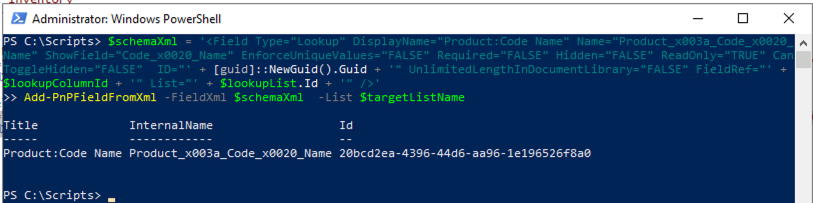
Once we have the lookup field, we can start adding projected fields. Each Projected Field is in fact a single field you create in a similar manner so you can add as many fields as you want from the other list (assuming the type is supported). We’ll create another schemaXml variable and this time we’ll add the ShowField value pointing to the InternalName of the projected field. Make sure it’s encoded. We also have to set the FieldRef id to the id of the lookup column we just created. Then we use the same PnP Powershell command.
$schemaXml = '<Field Type="Lookup" DisplayName="Product:Code Name" Name="Product_x003a_Code_x0020_Name" ShowField="Code_x0020_Name" EnforceUniqueValues="FALSE" Required="FALSE" Hidden="FALSE" ReadOnly="TRUE" CanToggleHidden="FALSE"  ID="' + [guid]::NewGuid().Guid + '" UnlimitedLengthInDocumentLibrary="FALSE" FieldRef="' + $lookupColumnId + '" List="' + $lookupList.Id + '" />'
Add-PnPFieldFromXml -FieldXml $schemaXml  -List $targetListName
Validating your Lookup and Projected Fields
I’ll warn you now, SharePoint won’t tell you if you messed up. You’ll just try to add a new item and chaos ensues. Some possible behaviors you might experience include, the drop downs not showing your items, the projected fields showing up as editable fields, or other unknown errors. After creating a lookup column you should validate in two ways.
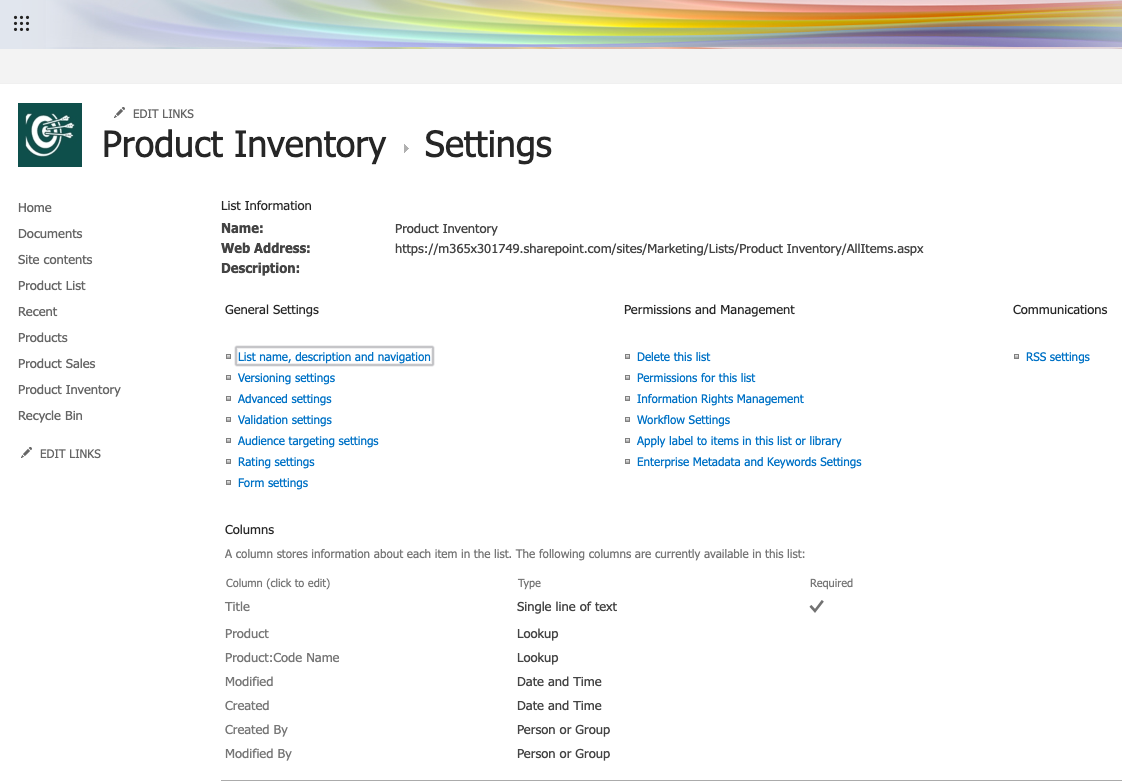
Validate the Lookup Column in List Settings
First, take a look at your columns on the classic List Settings page. You should see both your lookup column and the projected field.
Now, click on the Lookup Column. Make sure the list name is correct where it says Get information from. Next, make sure it has the right column where it says In this column. Finally, make sure your projected field is checked in the list below. If the projected field isn’t checked, you messed something up. Go back and check your SchemaXml string and verify it has the right IDs in it.
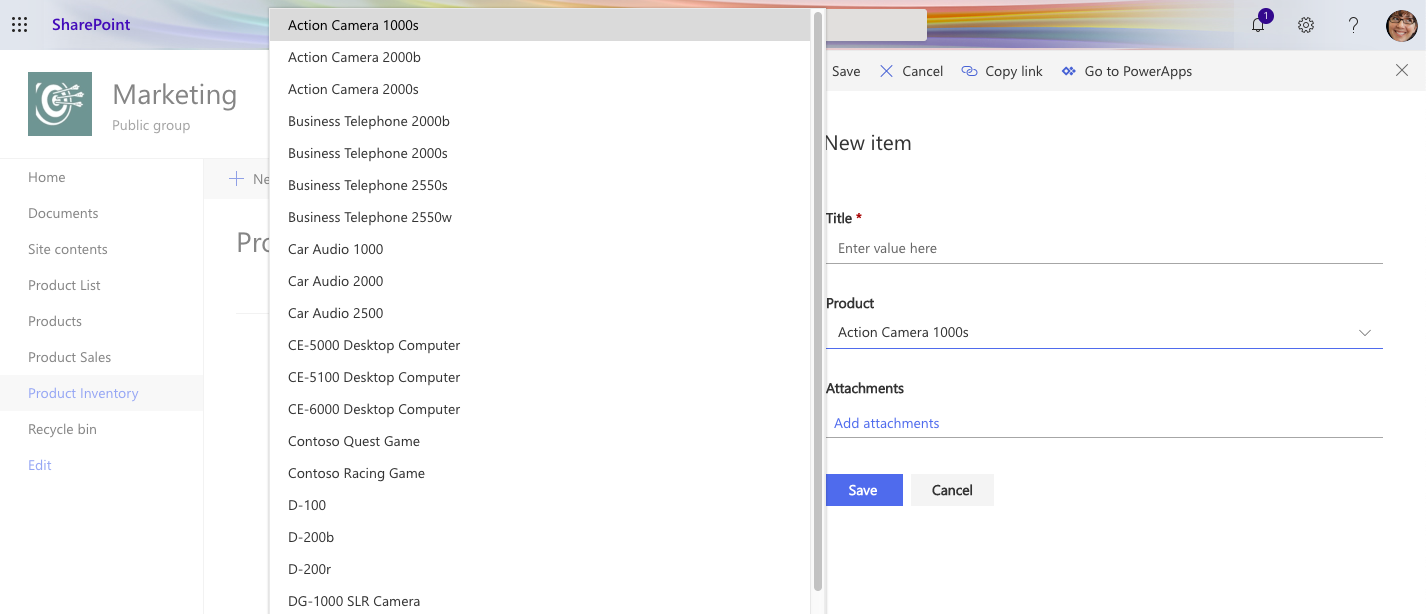
Validate you can add a list item
Add a new list item and make sure that your lookup column is present. Select one of the values and add the item and make sure the item saves.
Now, look at the view and verify that the projected column has data in it.

Summary
Lookup columns take a little bit of work to deploy with PnP PowerShell, but once you’ve done it a few times, it’s pretty easy to create them quickly.
You can find my scripts in GitHub.

thanks for this. It was very useful and you made it easy for us. This method will add directly in list. Can you give us direction by adding lookup column at site level and adding this column to content type
LikeLike