If you are a SharePoint Framework developer, you know that you never know what type of data you are going to get back from the SharePoint API. On one page, you can find a deeply nested value in the context object and the next, you get undefined somewhere in the chain. Take a look at the example below which gets a user’s Azure Active Directory id.
let addUserId: string = this.context.pageContext.aadInfo.userId._guid;
To get that guid value, any number of things could go wrong if context, pageContext, aadInfo, or userId happened to be undefined. If any of those have a value of undefined, it will throw an exception. Technically, that should never happen in this example, but you never know. In classic TypeScript, you might rewrite the statement like this to check for undefined.
This works but it’s quite the mess. There is a path around this though. You can fix this with a relatively new feature in JavaScript / TypeScript called optional chaining. Optional chaining allows you to specify a ? mark after each property. If anything has a value of undefined in the chain, it simply shortcuts and returns undefined instead of an exception. Here’s what the new code looks like.
let aadUserId: string = this.context?.pageContext?.aadInfo?.userId?._guid;
Isn’t that so much cleaner? Almost life changing.
Optional chaining has been around in TypeScript since version 3.7. That’s great but the current version of SPFx at the time of writing is 1.11 and it uses TypeScript 3.3. You might think this would be an issue, but you can refer to this post from Andrew Connell to upgrade your version. In my experience, I ran into issues with TypeScript 3.8 and 3.9. However, TypeScript 3.7 works well with SPFx and I have been using it in a number of projects.
If you have been plagued by undefined values in your code, check out optional chaining. You can read more in the Mozilla documentation.
Through the use of image renditions, Modern SharePoint pages actually do a pretty good job of rendering an image without much manual adjustment. I have had many people ask me what size to make an image and more often than not, it’s the aspect ratio that means more than anything. Microsoft has updated their guidance on creating images for banners and the hero web part and I recommend the read.
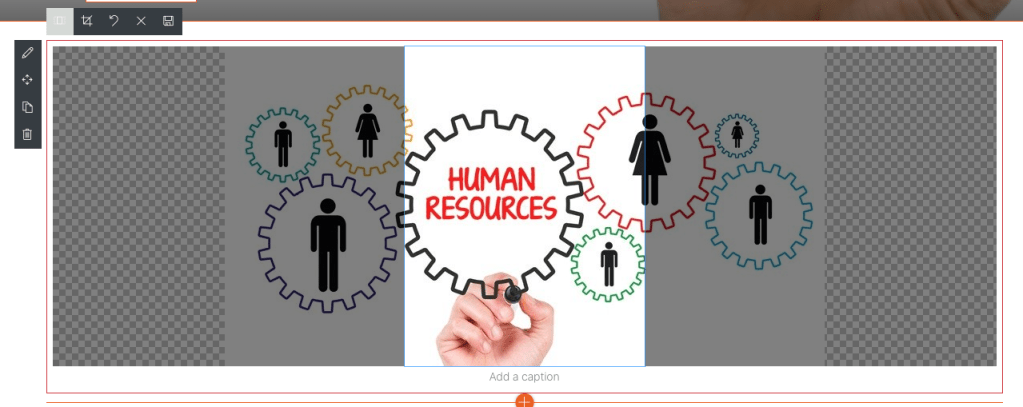
It’s not always perfect though, so now there is a new feature (MC198528) just now rolling out that lets you resize images in the image web part. It’s pretty easy to use too. Consider the following image in an Image web part.
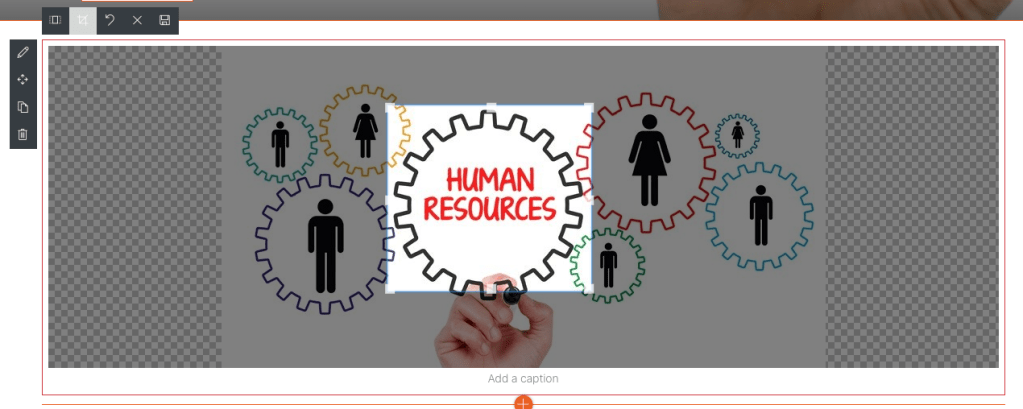
When the page is in Edit mode, click on the image until you see the new editing controls above the top of the image.
Click on the image in Edit mode to make the editing controls appear.
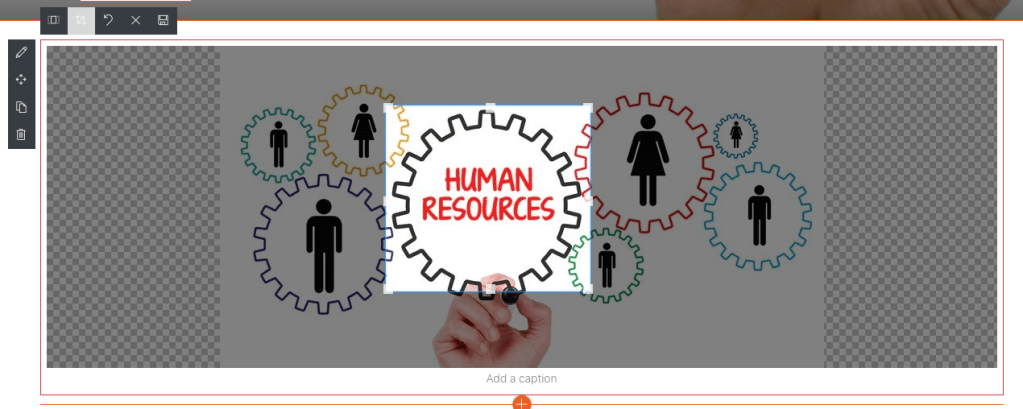
The first icon provides some pre-defined vertical and horizontal crop box sizes.
Pre-defined crop box sizes.
You can click one and it will adjust the crop box as desired.
Choose a pre-defined crop box size.
If you want more granular control of your crop box, click the second icon and then you can drag the crop box to the size and location desired. When you are done be sure and click the Save icon in the top right of the cropping tool bar.
Be sure and click the save button.
Now you can view your resized image when you save your page.
Your image is now resized.
What if you change your mind?
No problem! Just edit your page and your image web part will still have the entire image available. You can change your crop or reset it entirely.
Change your image crop box later.
Summary
It’s these niceties that keep coming to SharePoint that just make the experience better on both page authors and on users.
If you are in Targeted Release, you probably already have this feature. According to the message center, it should be available to all users by the end of March 2020 (unless something changes).
I’m a huge proponent of Microsoft Forms. In my organization, we’re starting to use them for everything. Here’s just a sample of some of my forms, they really are making life easier when it comes to collecting data.
Microsoft Forms
However one of the gaps when we started implementing them was the lack of attachments. This was a problem because I often needed to collect documents, images, or more. This was a significant enough gap that I had to move up to PowerApps to automate a lot of my business processes.
Creating the form
Now that gap has been removed and we have a new File upload question type in Microsoft Forms. Getting started is easy. In the example below, I started a new Form, and when I went to add my first question, it even recommended me include the file attachment question based on my history of questions from past forms I have created.
Microsoft Forms recommends questions based on your past Forms.
For today’s example, I won’t use the recommendations though. I’ll add the ability to upload an attachment by clicking the plus (+) and then the down arrow to choose File upload.
Choose File upload.
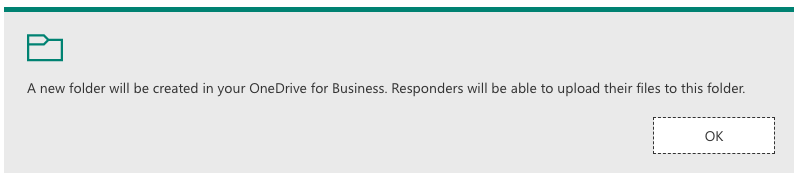
When you do that, you’ll get a notice that your files will be sent to a new folder in OneDrive for Business.
Your files will be sent to OneDrive for Business.
Click Ok and you will be given a few options such as a prompt on what type of file to upload, how many files to upload, and what file size limits you would like to enforce.
Specify how many files and how large.
You can allow up to 10 files to be uploaded and sizes can be 10 MB, 100 MB, or 1 GB. You’re now ready to try out file uploads on your form.
Trying it out
When you preview your form, you’ll see a button to Upload file. A message below indicates what file types are allowed. Notice that not all file types are allowed and it generally restricts you to Office documents, images, and other media files.
You are prompted to upload your files
Upload some files of your choice and you’ll see them starting to upload.
File upload progress.
At this point, your files are technically already in OneDrive but they are considered temporary until the form is submitted. They will have a prefix with tmp in them. We’ll talk about where the files are stored down below.
Viewing your responses (and files)
After you have collected some form responses, you can click on the Responses tab to view your files. When you select an individual response, you’ll see links to each file uploaded.
List of files upload.
Finding your files in OneDrive for Business
If you go to OneDrive you will find a new folder called Apps and in it a new folder called Microsoft Forms. You will see one folder for each Form that has a File upload in it. In there, you will find another folder called Question. I’m not really sure why it creates that folder, but it does. Finally, you’ll see your uploaded files. It will append the user’s name to each file.
Files from Microsoft Forms in OneDrive for Business.
You’ll notice some files have the number “1” appended to them. Those are files that I uploaded that have the same filename. This prevents duplicate filenames from being lost.
Summary
With new File upload support in Microsoft Forms, this tool is an even better option for creating quick light-weight forms to collect data from your users. Give it a try today and see what you can create.
If you are a consultant, you probably have a lot of Microsoft identities in Azure Active Directory that you use to access resources like Office 365. I, myself, have at least 10 that are active right now and an uncountable number that I’m not using any more. If you use a single browser to access resources in Office 365 or Azure, it can be absolutely painful. It doesn’t have to be any longer though.
The story for this started getting better when Google added Chrome profiles. These worked great. You could create a profile for each tenant you used and it kept everything separate. The problem with them was that it was difficult to use them across different computer. The reason for this is that the synchronization featured built into Chrome required a Google account. You needed a separate Google account for each identity and that just didn’t work well in this scenario.
How Edge built on Chromium makes this better
Let’s face it. People love to pick on Microsoft’s Edge browser. Some of the criticism was justified and some of it probably wasn’t. However, Microsoft made the right call and adopting Google’s Chromium engine to build their browser.
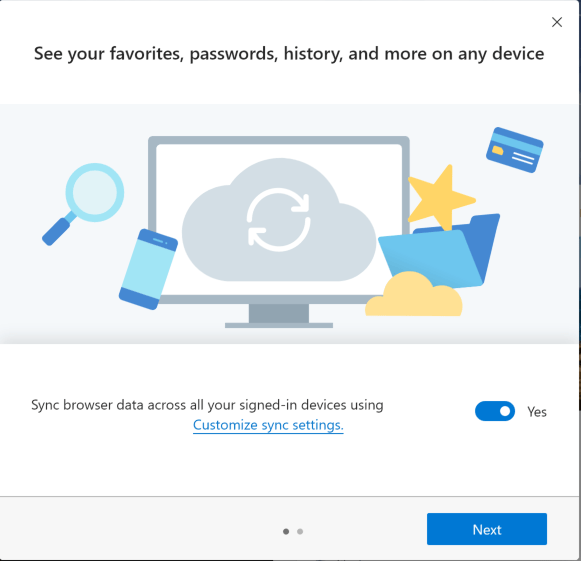
When Microsoft implemented Chredge / Edgium (meaning Edge built on the Chromium engine), they dropped the Google account synchronization and implemented their own using Microsoft identities. You can use your Work / School accounts as well as the consumer based Microsoft accounts. Now, we are getting somewhere. You can create a profile for all of your personal sites. You can then go and create a profile for each Office 365 identity and now we can start synchronizing favorites, settings, passwords, and more across computers.
When you sign in with an Azure Active Directory identity, you’ll also get prompted to login less when you visit sites throughout Office 365. That’s a good thing. What’s nice is that it even works on Mac where we’ve never had that luxury before.
When you visit the page, you’ll have three choices and they vary based on how often the builds are updated. If you are living on the edge (no pun intended), you can go with the Canary Channels which updates every day. If you like a little more stability in your life, go with the Dev Channel. I wouldn’t use the Beta Channel because it doesn’t update very frequently and some of the features you might want aren’t there yet. Personally, I use a combination of the Canary Channels and Dev Channels depending on the machine. In general, all of the builds have been quite stable. I have had a couple of issues with crashes on a small handful of days in the Canary Channel. In general it works surprisingly well.
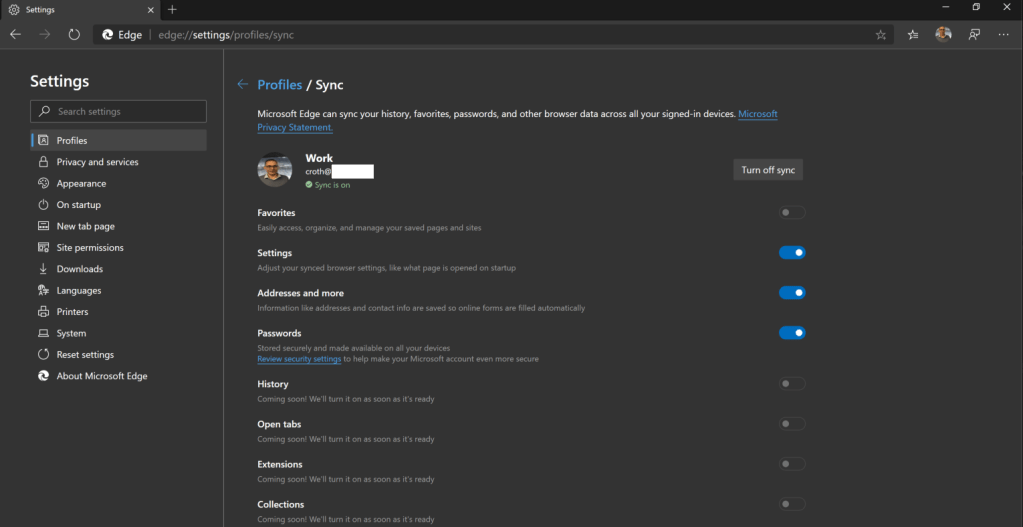
If you have a Microsoft account or Azure Active Directory account linked in Windows, it will prompt you to connect the browser with that account so that it can synchronize your settings.
Synchronize your favorites.
Once you have finished, setting up the browser, you might notice your picture in the top right. In this case, I signed in with my consumer Microsoft Account first and it pulled in those details. Notice that it indicated Sync is on.
Viewing your profiles in Edge
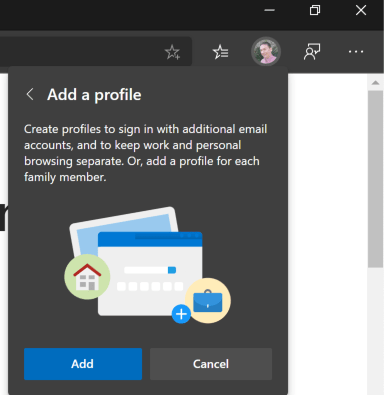
Adding your work accounts
Click on the Add a profile link to add an Office 365 identity. It will create a new profile and then you have to link it to your cloud account.
Click the Add button to proceed. It will then prompt you to sign in to sync your data.
Click Sign in to sync data
Click Sign in to sync data and then select Work or school account. After that be sure and make sure Sync data is selected and now your settings will be synchronized as well. You’ll notice that your organizational picture will show in the top right corner of the browser as well.
Using the Office 365 New Tab page
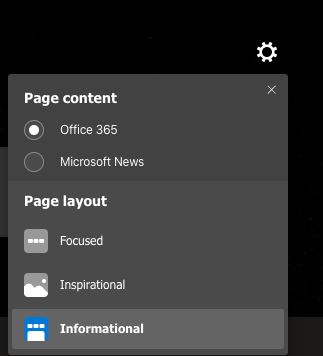
One of my favorite features is the Office 365 New Tab page. This gives you access to all of the things that you access frequently in Office 365 right in the browser. It has a lot of the features that you get on the Office or SharePoint home page such as recent documents, sites, and more. You can turn this on by opening a new tab and then look for the Settings cogwheel.
Choose Office 365 and Informational page layout.
Check the Office 365 Page content and the Informational Page lout. You’ll then see a new tab page like the one below.
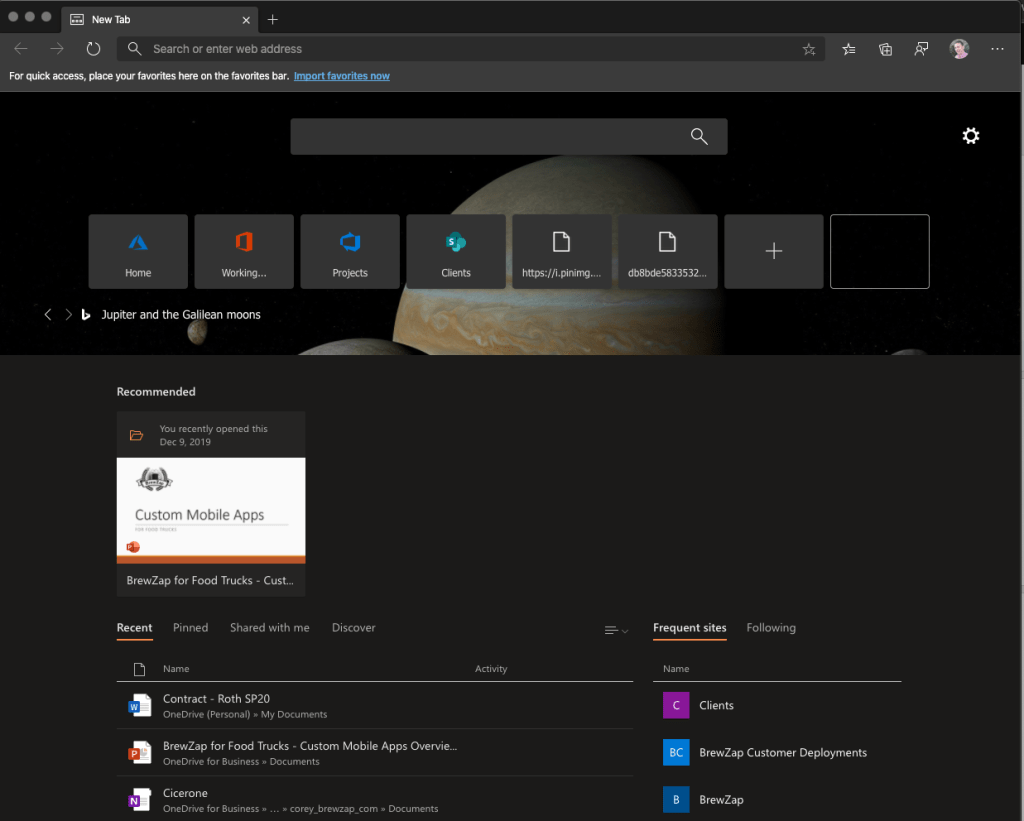
New Tab page in Edge
I seriously use this page all of the time and find it often has the exact links I am looking for.
Managing Multiple Identities
Now just repeat the process for all of your accounts. You can then easily switch between them by clicking on your profile picture. Depending on which channel you opted for, you might notice that Sync hasn’t been implemented for everything yet. For example, you can Sync collections in the Canary channel but not the Dev channel. This will become less of an issue this year as Microsoft moves Edge into General Availability.
Sync settings in Edge
It’s still Chrome
You’re probably still seeking a reason to hate this new version of Edge right now. It’s not warranted though. Give it a shot. It’s got most of the features you likely need including Extensions and Developer Tools. I’ve been doing SPFx development in Edge for well over 6 months now and it works great. If you have a ton of Microsoft identities to juggle, I really think Edge is going to be the way to go going forward.
Many don’t know about browser profiles
I write this today because I found that even some of the most seasoned veterans of the tech industry, simply don’t know about it. This feature has been around a while in Chrome and even fewer people know about it in Edge. This really can make your day-to-day life easier if you have multiple accounts to deal with.
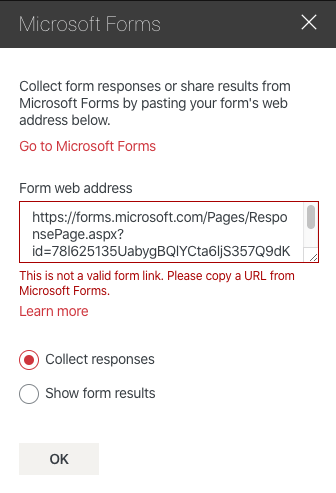
Last week, I was building some simple request forms using Microsoft Forms and I wanted to embed one on a modern SharePoint Page. I created, the form, added the Microsoft Forms web part, but when I pasted the link to the form, I got the following error:
This is not a valid form link. Please copy a URL from Microsoft Forms.
Error in Microsoft Forms Web Part
I thought that was odd, but I couldn’t get it to work. I tried creating a new form and still no luck. I gave up and tried it later with a new form and then I noticed it worked. After studying the URLs I noticed something very unique. One was from forms.microsoft.com and the other was from forms.office.com. They used different pages and parameters in the URL as well. While you can visit either URL and create a form, the Share link only provided a working URL if you use forms.office.com. Both of the links work and allow you to complete a form, but only the link from forms.office.com will work in the Microsoft Forms web part.
If you run into this error, be sure and check your URL.
For some reason on one of my tenants, the “Return to Modern” link simply doesn’t render any more and it hasn’t for months. I don’t go back to Classic Mode very often but it’s a necessity to remove an SPFx package still. Once I remove my package, I get stuck in Classic Mode. I’m not sure the cause but Tom Resing was nice enough to provide me with a hack to edit Classic Mode.
Open your developer console and simply past and execute the following:
javascript:document.cookie = "splnu = 1; path=/"
Refresh the page and you’ll be back in modern. I kept having to look this up in an old conversation in Teams so I decided to write a quick post. Sometimes, I blog simply so I can remember how to do something later.
It turns out opening a link to a new tab is now in your SPFx web part in SharePoint is not as simple as you would think. You would think that simply adding target=”_blank” or target=”_new” would do the trick. It does not. It works for external links but link to other SharePoint pages will not work without making a tweak. That’s because the SharePoint page router prevents it from happening.
To open a link in an new tab, you need to add the attribute data-interception=”off” to your link. Here’s what it looks like.
This is one of those tips I have to go back and look in past code every time I need to do it. I honestly can’t remember whose blog or forum post I found this on months ago. When I was trying to remember the trick again today, I did another Internet search but I really couldn’t find anything on it this time around. I finally had to go search all of my commits of an old project to find it. If it was your post that gave me the answer all of those months ago, then I thank you and I’d be happy to properly credit you.
If there is anything that is hard to work with in SharePoint, it’s lookup columns. While it’s so easy and simple to create them through the SharePoint user interface (well the classic interface), they are incredibly complex to provision programmatically. I remember struggles behind provisioning lookup columns going back as far as 2007 if not earlier. What’s worse is SharePoint will let you screw up hard when you do it wrong.
There’s a reason, you don’t find a lot of blog posts on the topic.
Lookup columns are hard. Projected fields are even worse.
That’s why PnP PowerShell doesn’t support them using simple parameters. That’s why, you still can’t create them in Modern.
That’s not to say there’s nothing out there on the topic, but I think this topic still deserves some attention since it’s still something people want to do.
Learning from SharePoint
There are two ways to create lookup columns with PnP Powershell. The first is with the CSOM context and the second is declaratively through XML. While I have been successful provisioning a lookup column with the CSOM context, I have utterly failed to figure out how to get the projected fields to work. Projected fields are those extra fields that you can select from your lookup list that will get included in the new list if you don’t remember. This post will show you how to create the lookup fields and projected fields using the CAML XML. It’s not really my preferred approach but it works. It’s easy to mess up though.
What’s the best way to determine the XML you need? Create your columns first in SharePoint using the user interface. Then use PnP PowerShell to get the schema. You’ll need to make a few tweaks to the schema but it’s a good start.
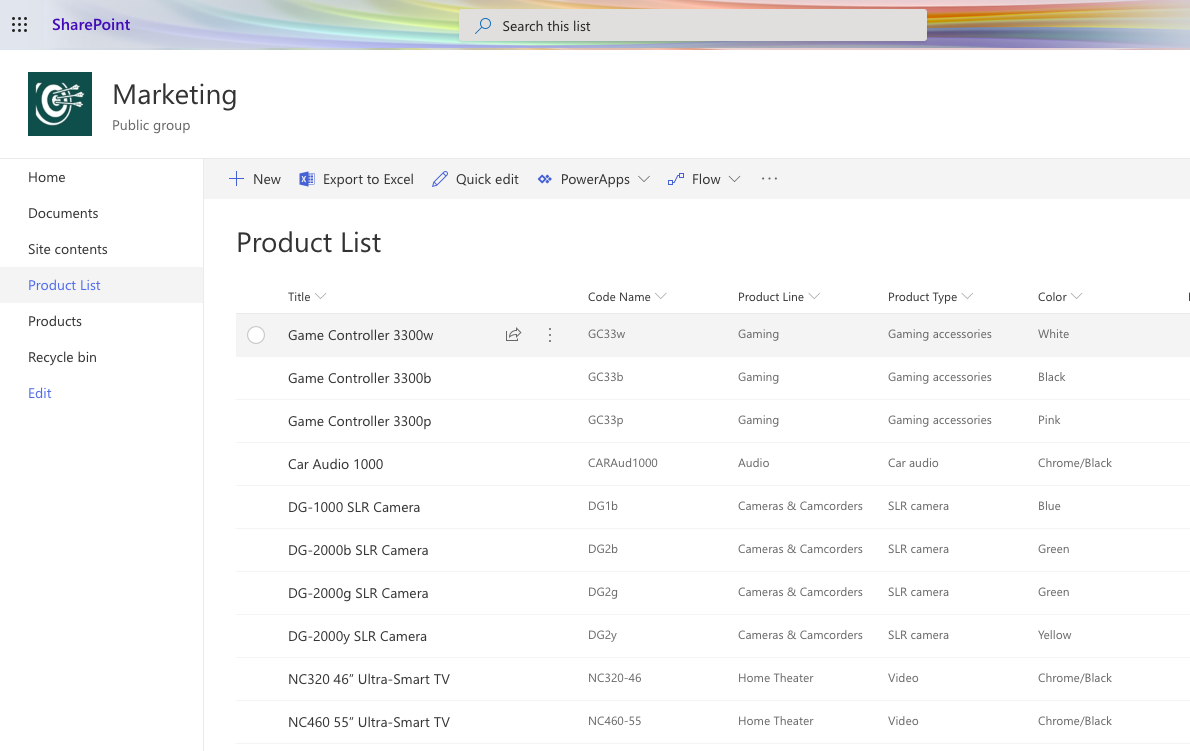
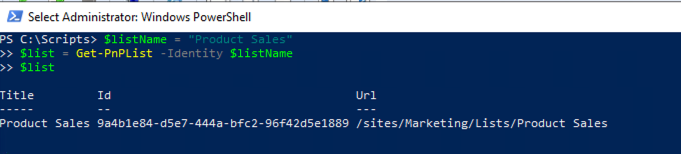
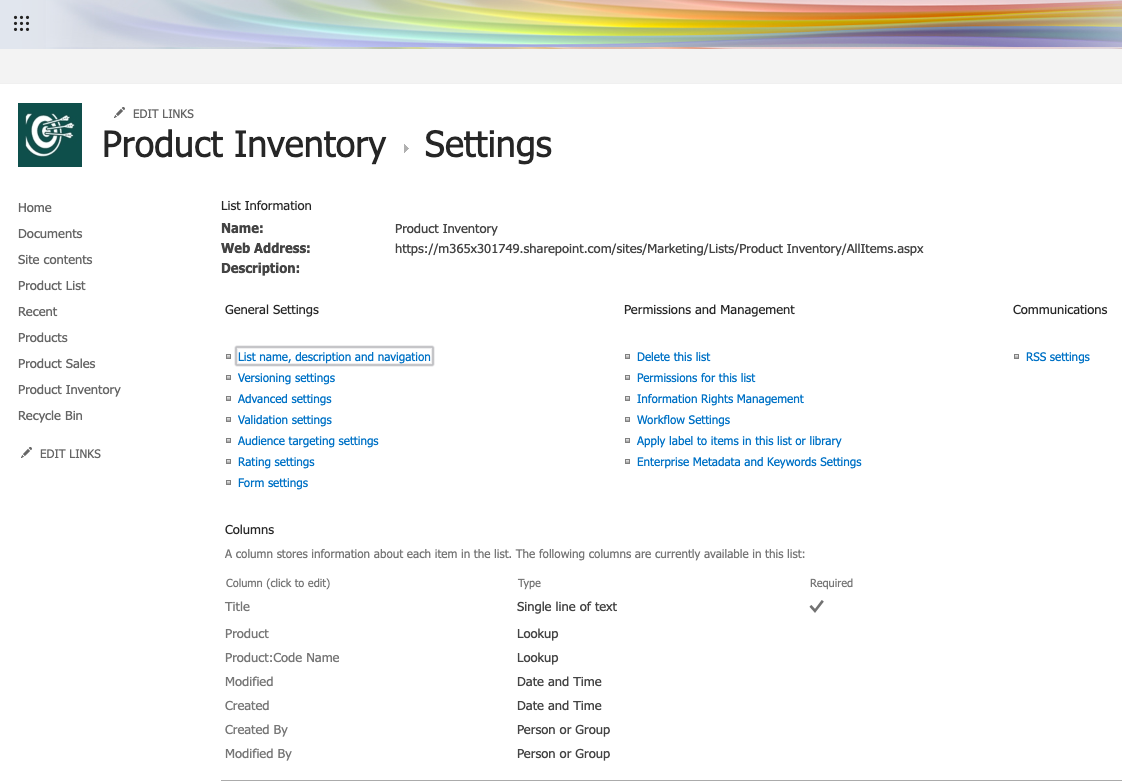
We’l start by taking a look at our target lookup list. In my case, I am using the Product List on the Marketing site of the Office 365 demo content.
Our lookup list.
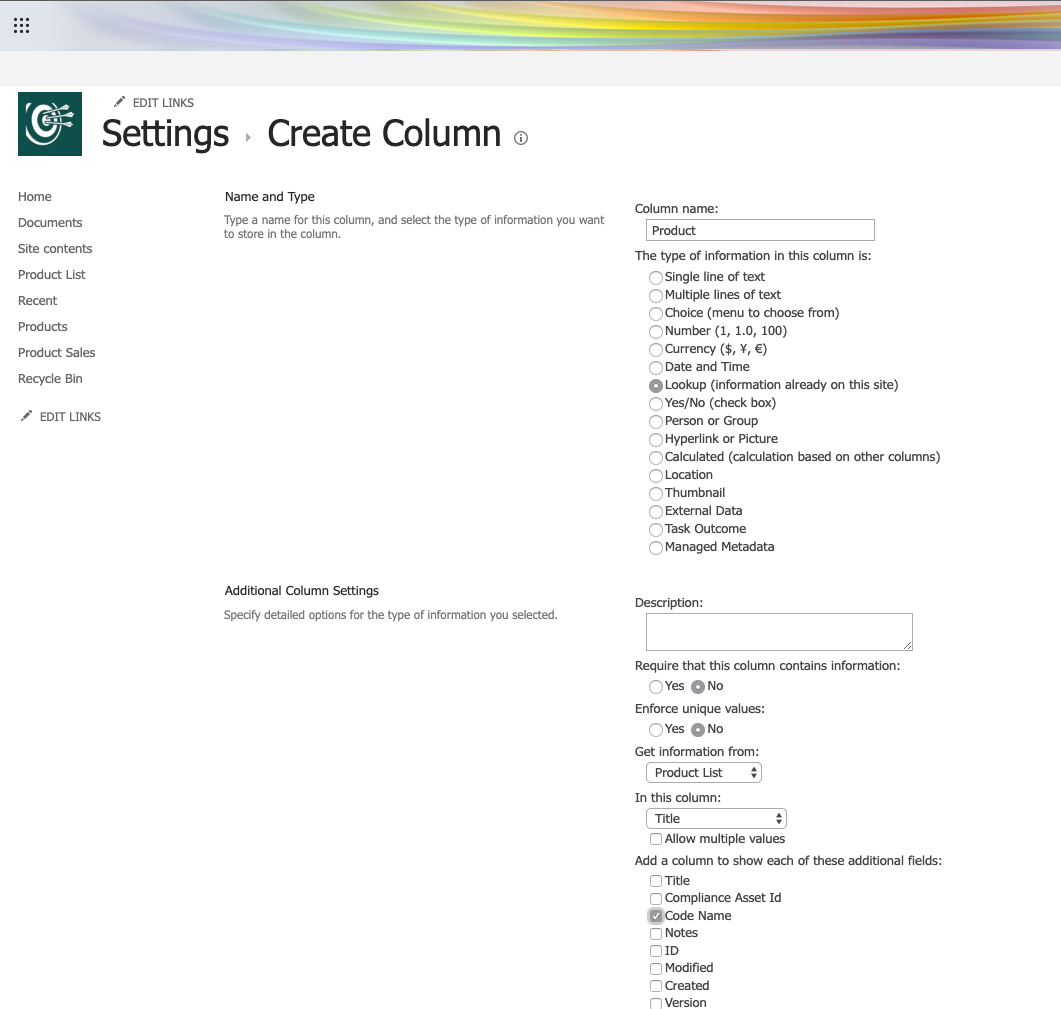
I’ve created a new list called Product Sales which will have a lookup column to my Product List. In that lookup column, we’ll also include the Code Name field as a projected column. This is what it looks like in the classic Create Column screen.
Creating the lookup column manually.
Now, we will examine the columns we created using PnP PowerShell. Start by connecting to your site in PowerShell. Now we’ll issue the following commands to get a reference to our list. We’ll need the Id of this list later to create our columns.
You should see the information on your list after execution.
Now we use Get-PnPField to get a reference to the field. If you were working with a Site Column instead of a List Column, you would omit the List parameter.
Some of the attributes we will keep when we create our own lookup column, others we need to remove. Let’s go through the attributes:
Type – value of Lookup
DisplayName – this is how the field is displayed to the user (spaces are ok)
Required – whether the field is required or not
EnforceUniqueValues – self explanatory
List – contains the ID of the lookup list. We’ll have to retrieve that later instead of hard coding it.
ShowField – the primary field of the lookup list to display. This was the value in the dropdown when we first created it (defaults to Title)
UnlimitedLengthInDocumentLibrary – I honestly don’t know what this one does so I usually omit it
RelationshipDeleteBehavior – this is the cascade delete setting when you create the column.
ID – unique id of the lookup field. We’ll have to create a new Guid for this
SourceId – not needed when creating the new column. Don’t include or you’ll have issues.
StaticName – refers to the field in the database. Omit it because the Name field is sufficient. You can cause yourself a lot of trouble with this column so avoid it.
Name – internal name of the column. Spaces and special characters must be encoded.
ColName – refers to the actual table column in the database. Omit this as well or you’ll really cause yourself problems.
RowOrdinal – omit
Get the schema for the Projected Field
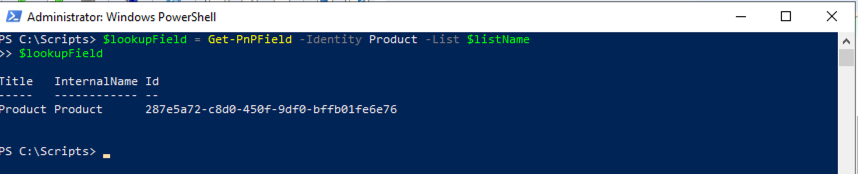
Now that we know the meanings behind some of the attributes, we can now take a look at our projected field with a title of Product:Code Name. However, the internal name is encoded, so it might be easier to look up the encoding by getting all of the fields in the list with Get-PnPField.
Note the highlighted InternalName for Product:Code Name.
That reveals our InternalName as Product_x003a_Code_x0020_Name. Issue the following commands to get the SchemaXml.
You’ll notice this is also a Lookup field. However, there are some slight differences:
List – This is the ID of the lookup list like before
WebId – This is the ID of the current site. We can actually leave it out.
FieldRef – This is the ID of the selectable Lookup column we just looked at. That’s how it creates the link.
ShowField – The name of the field in the lookup field to project (must be encoded)
ReadOnly – Must be set to true since you can’t edit the projected fields.
Creating the Lookup Field with PowerShell
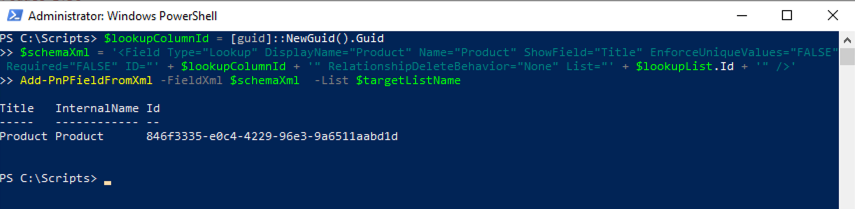
With that, we now have all the data we need to create our own lookup field. The first step is to assemble our CAML XML string to create the field. It’s a bit messy because we have to splice some values in, but it’s not too bad. Start by getting a reference to our lookup list (Product List in our case). We’ll need this to get the List Id. We’re going to create this column in a new list called Product Inventory.
Now we need to generate a Guid for our new lookup column. I am doing it the old school way because it’s easy to get the Guid as a string that way.
$lookupColumnId = [guid]::NewGuid().Guid
Next, we’ll assemble our CAML XML string specifying a few key values including DisplayName, Name, and Title. We copied those values over from the SchemaXml from earlier. For the ID, we use the value of the new GUID we just created. Finally, I need to provided the Id of the lookup list in the List attribute. All of the other values that we saw in SchemaXml we have omitted.
If all goes well, you’ll see that your new field was created.
Creating the Projected Field with PowerShell
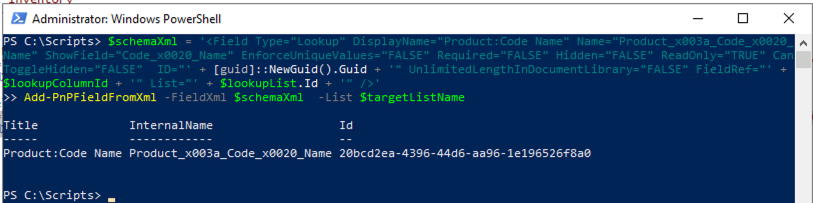
Once we have the lookup field, we can start adding projected fields. Each Projected Field is in fact a single field you create in a similar manner so you can add as many fields as you want from the other list (assuming the type is supported). We’ll create another schemaXml variable and this time we’ll add the ShowField value pointing to the InternalName of the projected field. Make sure it’s encoded. We also have to set the FieldRef id to the id of the lookup column we just created. Then we use the same PnP Powershell command.
I’ll warn you now, SharePoint won’t tell you if you messed up. You’ll just try to add a new item and chaos ensues. Some possible behaviors you might experience include, the drop downs not showing your items, the projected fields showing up as editable fields, or other unknown errors. After creating a lookup column you should validate in two ways.
Validate the Lookup Column in List Settings
First, take a look at your columns on the classic List Settings page. You should see both your lookup column and the projected field.
Validate that you see the lookup column and the projected field.
Now, click on the Lookup Column. Make sure the list name is correct where it says Get information from. Next, make sure it has the right column where it says In this column. Finally, make sure your projected field is checked in the list below. If the projected field isn’t checked, you messed something up. Go back and check your SchemaXml string and verify it has the right IDs in it.
Validate you can add a list item
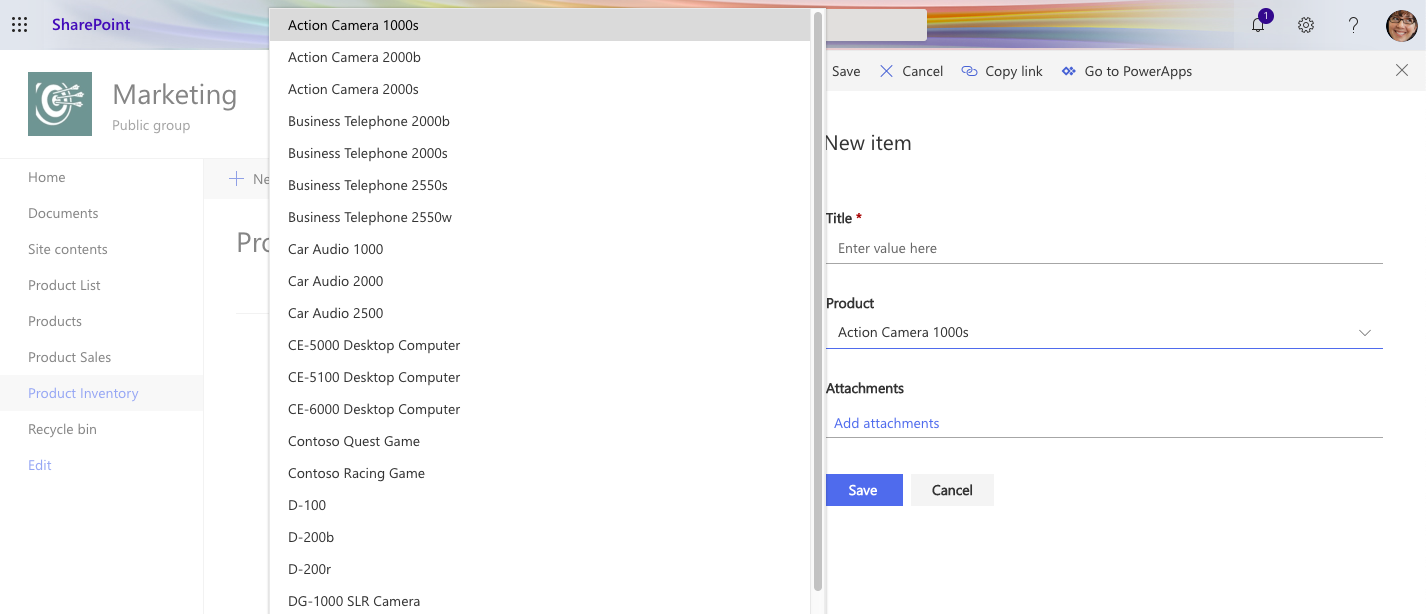
Add a new list item and make sure that your lookup column is present. Select one of the values and add the item and make sure the item saves.
Successfully using the Lookup Column.
Now, look at the view and verify that the projected column has data in it.
Lookup column with Projected Field.
Summary
Lookup columns take a little bit of work to deploy with PnP PowerShell, but once you’ve done it a few times, it’s pretty easy to create them quickly.
Updated: January 20th, 2020 – Refer to this post to use the latest version of PowerShell and certificate authentication. This post will be updated in the future to include those updates.
Updated:May 28th, 2019 to use SPFx 1.8 and node.js v10
Updated: May 8th, 2019 to include use of SecureString
There are a lot of posts out there on how to set up CI / CD with SPFx projects and Azure DevOps. The problem is Azure adds functions and makes changes to the interface all of the time, so things quickly can become out of date. When I was looking how to configure this recently, I found that I had to combine a number of pieces from the official documentation plus blog posts to really piece it all together.
When setting up CI / CD, there are two pieces to it. Think of Continuous Integration (CI) as performing the build and producing your SharePoint solution package file. Basically, you are just automating the process you would do manually to produce a package. Think of Continuous Delivery (CD) as the process of adding your solution package to the App Catalog.
Setting up Continuous Integration (CI)
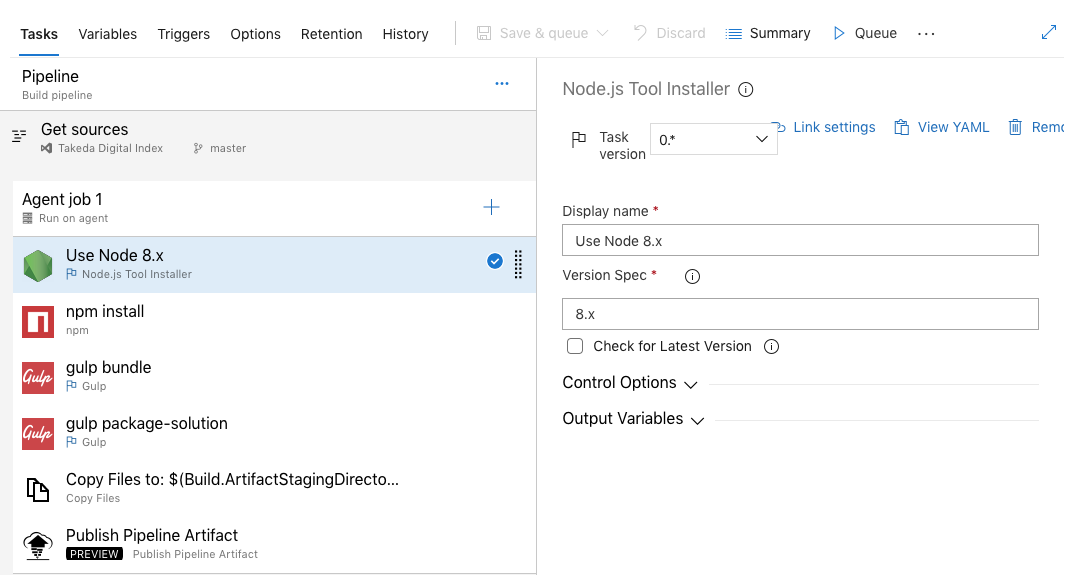
Let’s start with setting up Continuous Integration (CI) with Azure DevOps. You can do this in two ways: manual configuration or using a YAML file. Manual configuration is good if you want to understand the steps of how to set up the agent to build your SharePoint project. The YAML file is an Infrastructure as Code approach to creating the tasks for the build step. You need to know the syntax for the YAML but luckily, the PnP SPFx Generator creates a YAML file that you can use with any project. Either way the process effectively creates the following tasks to build your project:
Get Sources from source control
Specify that you will Use Node 10.x
Run npm install
Optionally run unit tests
Run gulp bundle –ship
Run gulp package-solution –ship
Copy your output files to a staging directory
Publish the Pipeline Artifact so that your CD release process can deploy it
I’m not going to go through the manual configuration because this is where the screenshots get quickly out of date and it’s rather tedious. I will show you a screenshot of what it looks like.
Manually configured Build Pipeline in Azure DevOps
Instead we’ll use what the PnP SPFx Generator provides us. When you start a new project or add a web part or application customizer to an existing project, the last option it gives you is whether you would like to add Azure DevOps integration. Select that option and it will produce the YAML file along with all of the other project assets.
Select Azure DevOps in the PnP SPFx Generator.
The only issue with this is that you really can’t select this option on an existing project unless you are adding a new web part or extension to it. The YAML file is the same for every project though so you can just as easily grab it from the GitHub repository for this blog post. Download this file and put it in the root of your project. Let’s take a look at what that file looks like.
What you see above is a task that corresponds to what I listed above in the list. This includes tasks for running npm install, gulp, and copying the files to where they need to be. Let’s highlight the last two tasks. CopyFiles takes the package output from the sharepoint/solution folder and copies it to a folder called drop inside a special folder for the build at the variable $(build.artifactstagingdirectory). It also copies our deployment PowerShell script that we will use in the release piepline. The PublishBuildArtifacts task makes it available to the Continuous Delivery Release pipeline later.
Configure your pipeline
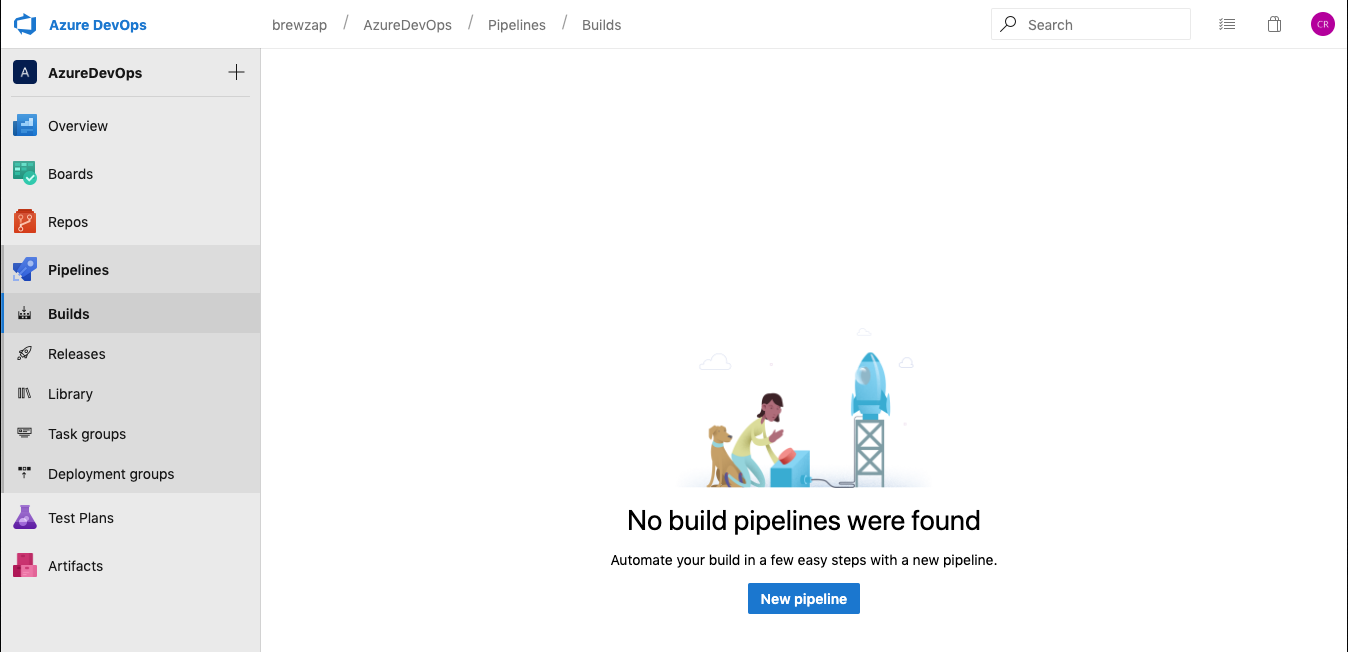
Now you have this file but what do you do with it? Now, we configure Azure DevOps to use the file and create our build. Login to Azure DevOps and select your project. Technically, your source code can be in any other source control provider, but for this example we’ll have a copy of our source code here. Now expand Pipelines and click on Builds. Click on the New pipeline button.
Click the New Pipeline button.
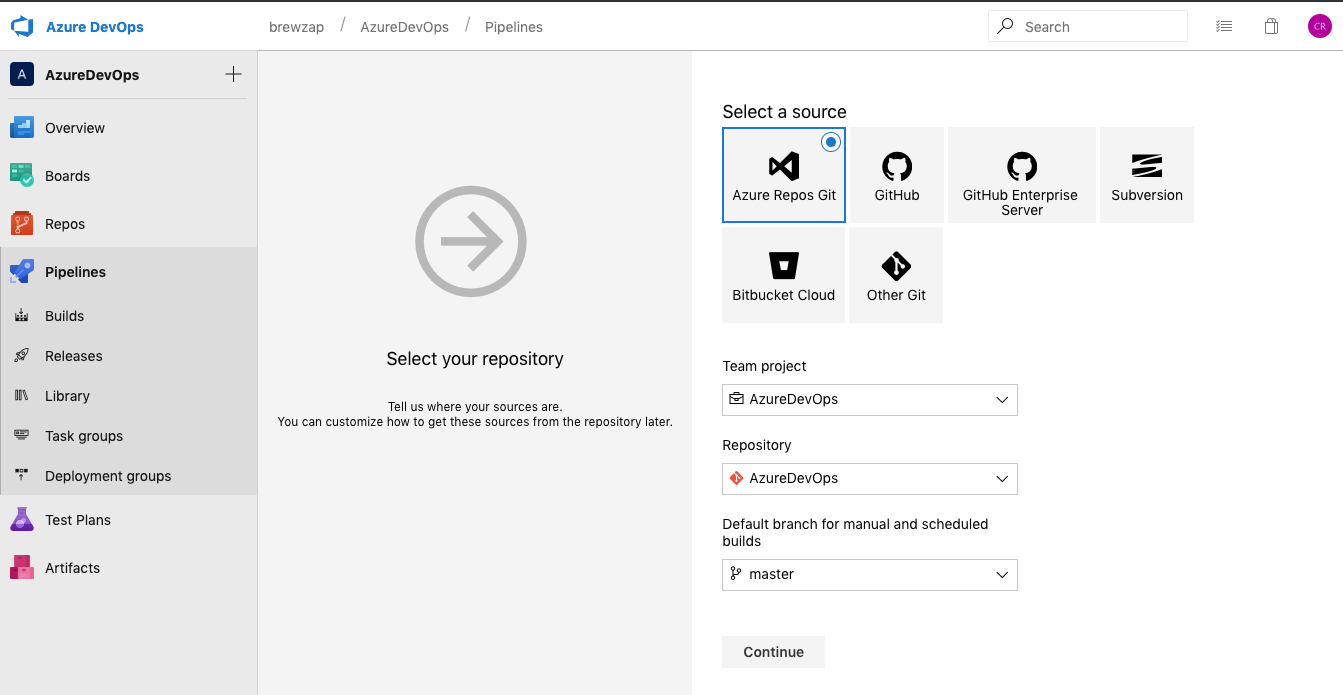
Now select the source repo type. This is where you can use other source control providers if you want. I will use Azure Repos Git and use the default settings for Team Project and Repository. You may want to configure the Default branch setting. In our case, anything that goes into master will be deployed. If you use a different branching structure for release, you can specify it here.
Select your source control repository and choose a branch.
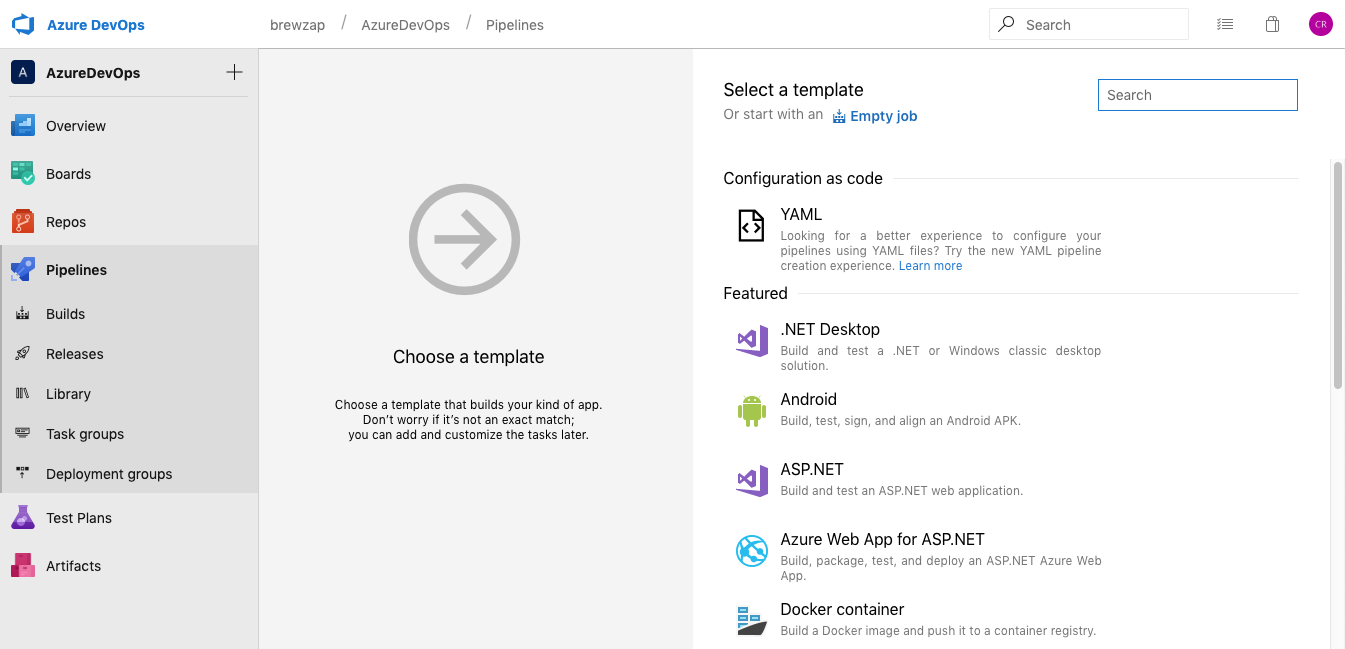
Now we need to start with a template. If you were doing manual configuration, you would start with an empty job. However, since we have a YAML file, we will choose Configuration as code / YAML.
Click on YAML to start.
The YAML experience is in the process of changing, so when it asks you if you want the new experience, click Apply.
Now we can start configuring our pipeline. You can optionally change the name of your pipeline here.
Configure your Build Pipeline here.
You can also select what type of Agent pool to use. I was unsuccessful the last time I tried with Ubuntu, but you may have better luck. This YAML file sets the default to Hosted VS2017. However, I also use Hosted macOS as well. Some have reported having faster build times with Ubuntu.
Choose a build agent.
Now you need to specify the path to your YAML file. This is the path in source control though not a local path. To select it, you will need to have pushed a copy of your code to the remote master.
Select the path to azure-pipelines.yml.
Once you select your YAML file path, we are done with the Pipeline. Click Save & queue to test it. On the dialog, just click Save & queue again to get your first build started. You’ll see a note that the build has started and you can click on the link to view the details.
Click on the link to view your build progress.
Now you will see the progress of the current build. Some tasks will take a while such as npm install. It usually takes a minute or two just for that task.
Monitoring the build progress.
After a while longer, the build will finish. If you don’t have any unit tests defined, you will get warnings from gulp test. You can actually remove these steps from your YAML file if you don’t intend to use test. I think we all intend to use test, but in reality, a lot of us don’t get the opportunity to write them.
A completed build pipeline.
If you click on the Artifacts menu and then click drop, you can actually navigate and see the folder structure that your package is in. This is important for when we set up the release.
Artifacts explorer.
Setting up Continuous Delivery (CD)
Now that we have a successful build, we need to get it to our app catalog. You have two options for that PowerShell or the Office 365 CLI. I tend to use PowerShell because I often work with site collection app catalogs and I am not a global administrator in those environments. Now we will set up our release pipeline. Click on the Releases link in the navigation and then click on New pipeline.
Click on New pipeline.
Now choose Empty job to start our new release pipeline.
Click on Empty job.
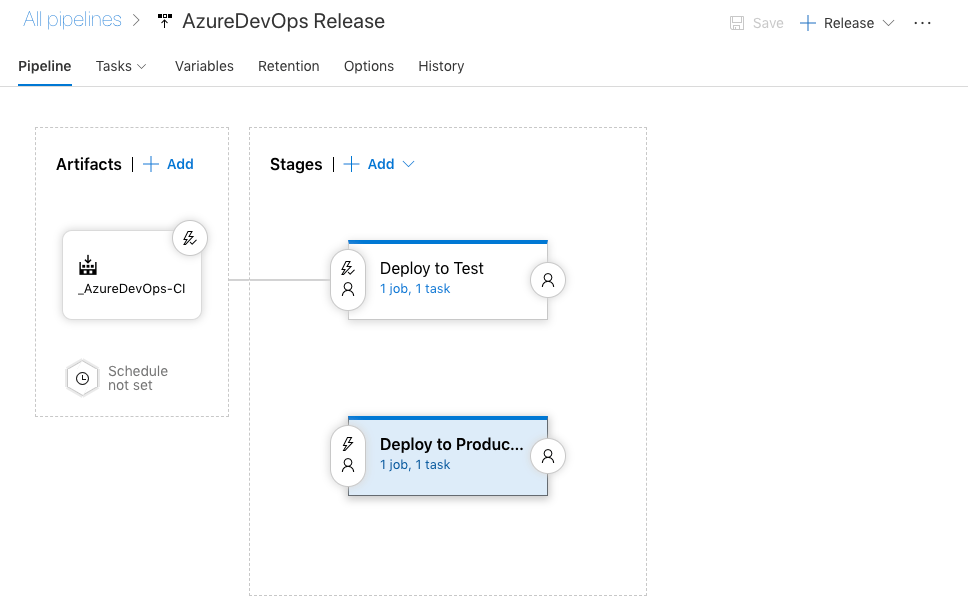
Now you are configuring a deployment stage. Usually you’ll create one or more of these for each of your environments. In my case, I rename my stage to Deploy to Test. Then click the close button on the stage.
Give your stage a name and then close the panel.
Now, click on Add an artifact. This takes the output from our build pipeline and connects it to our release.
Click on Add an artifact.
Now we will configure our artifact.
The Project field should default to the current project. You will need to choose your Source (build pipeline) next. There should only be one option to choose from. Leave the Default version as is. Lastly, the Source alias is important. It defaults to an awkward path with an underscore. You can change it if you like, just make sure you take note of it because you will need it in your PowerShell script. Your drop folder will end up being placed in here.
When you have completed your artifact, go to the Tasks menu, and select the name of your Stage (i.e.: Deploy to Test). Here is where we will configure our PowerShell script to deploy our package to Office 365. The most complex piece of the script is authentication. What choice you make here depends on what level of access you have. If you have access to AAD, or you get a GA to take care of you, creating a self-signed certificate is probably the most secure choice. However, you may not have the permissions to do that so you may opt to specify a set of credentials in a library. Also keep in mind that if two-factor authentication is enabled, specifying credentials isn’t an option. You’ll need to look at the certificate approach above.
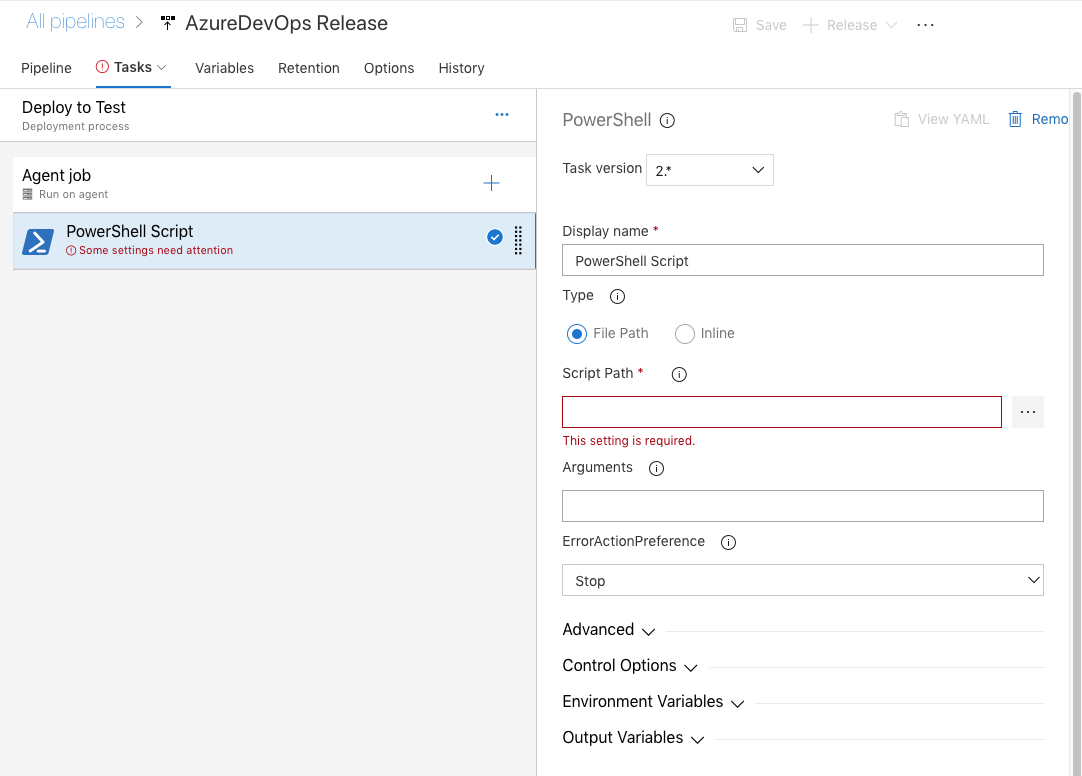
Click on the + sign next to Agent job and then search for PowerShell and click Add.
Now we need to configure our PowerShell task.
Configuring the PowerShell task.
Let’s take a look at our PowerShell script. It does three things. It installs the PnP Powershell module; Connects to SharePoint Online; and then installs the solution package.
Update 1/20/2021 – refer to this post to get the updates PowerShell script to use certificate authentication.
The script relies on a number of variables that we’ll need to configure. With the exception of password, in the script they are prefixed with env but you’ll leave that part out when you configure them in Azure DevOps.
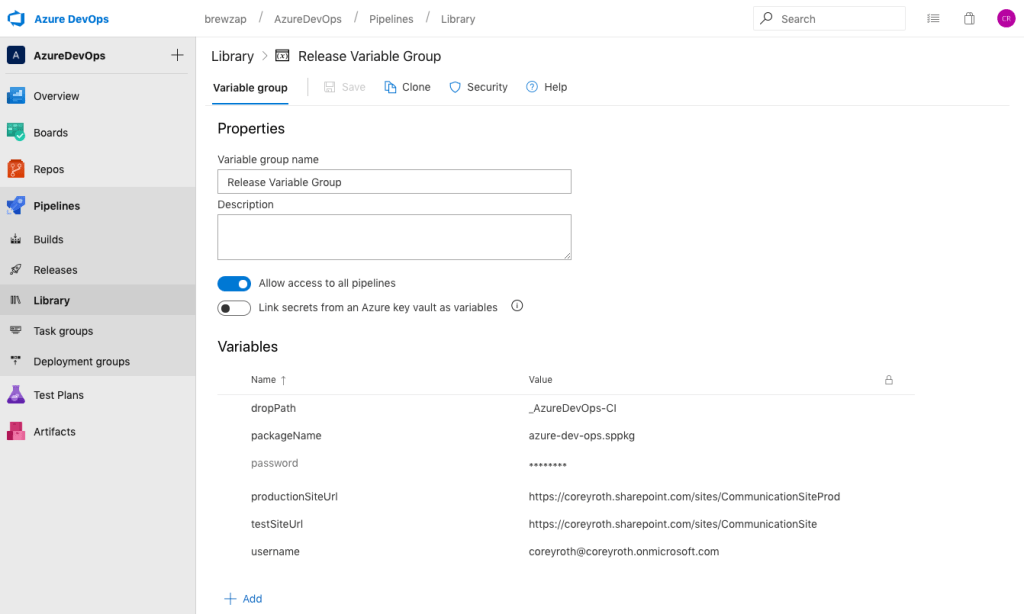
username – Office 365 username
password – Office 365 password
testSiteUrl – URL of the site collection for deployment (our test site in this case)
productionSiteUrl – URL of our production site
dropPath – The path where the artifact was dropped (refer to the source path when you added the artifact to the release i.e.: _AzureDevOps-CI)
packageName – name of your .sppkg file (i.e.: azure-dev-ops.sppkg)
We need to configure these variables in a library so that we can put the password in a secret variable. Click on the Library button in the navigation. Then click on New Variable Group.
Click on New variable group.
You can specify the name of the variable group at the top. In this case, I named mine Release Variable Group. Then we are going to add variables for each variable of our PowerShell script.
After creating your password variable, click the lock icon to convert it to a secret variable. Be sure and save your changes when you are done.
Click the lock icon to convert the value to a secret variable.
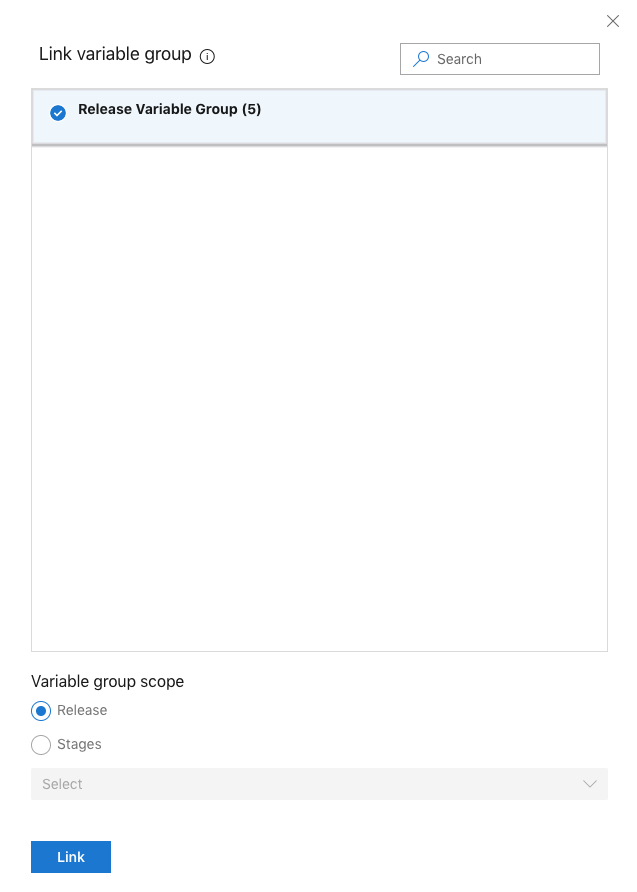
Now go back to your release pipeline and edit it. Click on the Variables link and then choose Variable groups. Now click on Link variable group.
Click on Link variable group.
Select the name of your new variable group. Set scope to Release and click Link. This lets your Release Pipeline use the variables you created in your library.
Select your Library and click the Link button.
Configuring the PowerShell Task
Back to configuring our PowerShell task. For Type specify File Path. We have to get this file from the published artifacts. That’s why we added a Copy Files task to our YAML for it.
Specify the Script Path by clicking the … icon and choosing the file in your drop folder.
Click the … button and select your PowerShell script from the drop folder.
Since we are using a secret variable for the password, we have to pass that as an argument to the script. That’s the only way to pass secret variables in. You do this by adding an argument specifying the name of the parameter and then the name of the variable be sure to include it in quotes like below.
-password "$(password)"
It will look like this in the Arguments field of the PowerShell task.
Add your password secret variable as an argument.
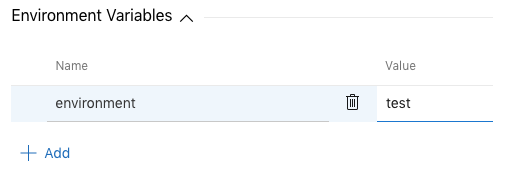
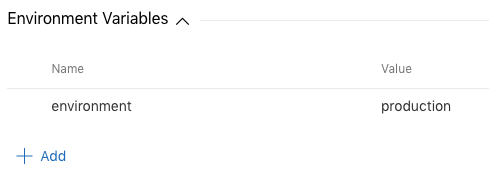
Now you need to configure a variable which controls whether we are deploying to test or production. We’ll add this in the Environment Variables section of the PowerShell task. Create a new variable named environment and give it a value of test.
Add a variable named environment to control where the deployment goes.
That’s the only task we need to configure. Now, click on the Save button. Now click on the Release button and select Create Release. Choose the Stage we just created and you’ll see the list of artifacts. This will only work if you had a successful build earlier.
Triggering a manual release.
Just like before, you’ll get a notification that a release has started. Click on the link.
Click on the link to view your release.
Since this is a manually triggered release, we’ll have to click the Deploy button to make the deployment happen. Normally this would execute automatically when the release is automatically triggered when we enable Continuous Deployment. We’ll cover that in the end.
Click the Deploy button and click Deploy on the next page.
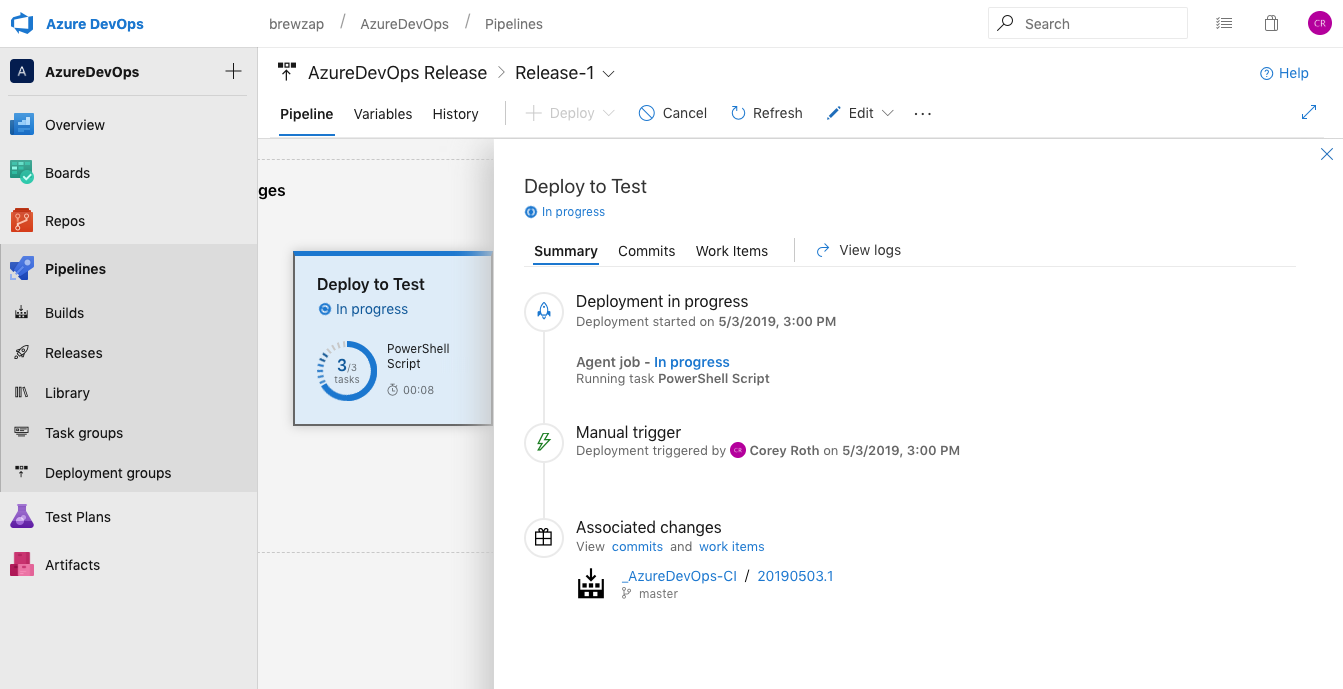
When you click on the stage, you’ll see a progress indicator.
Click on the in progress link to see the actual PowerShell output.
Here we can see the job running in progress.
PowerShell task in progress.
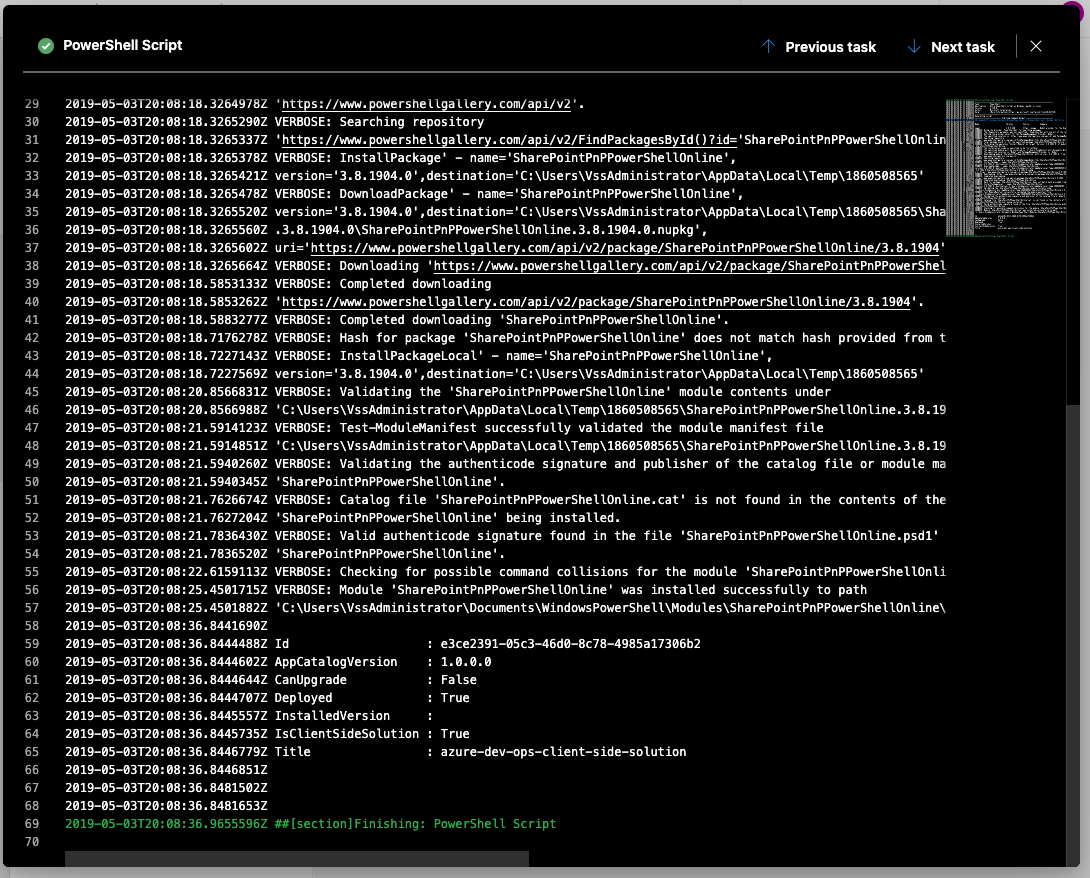
If all goes well, you won’t get any errors in your script. Here is the output from mine after deployment.
Successful PowerShell script execution.
Here is the rest of the status of the agent job.
Successfully completed job.
Looking in my App Catalog, I can now see that the solution package was deployed.
Deployed solution in the App Catalog.
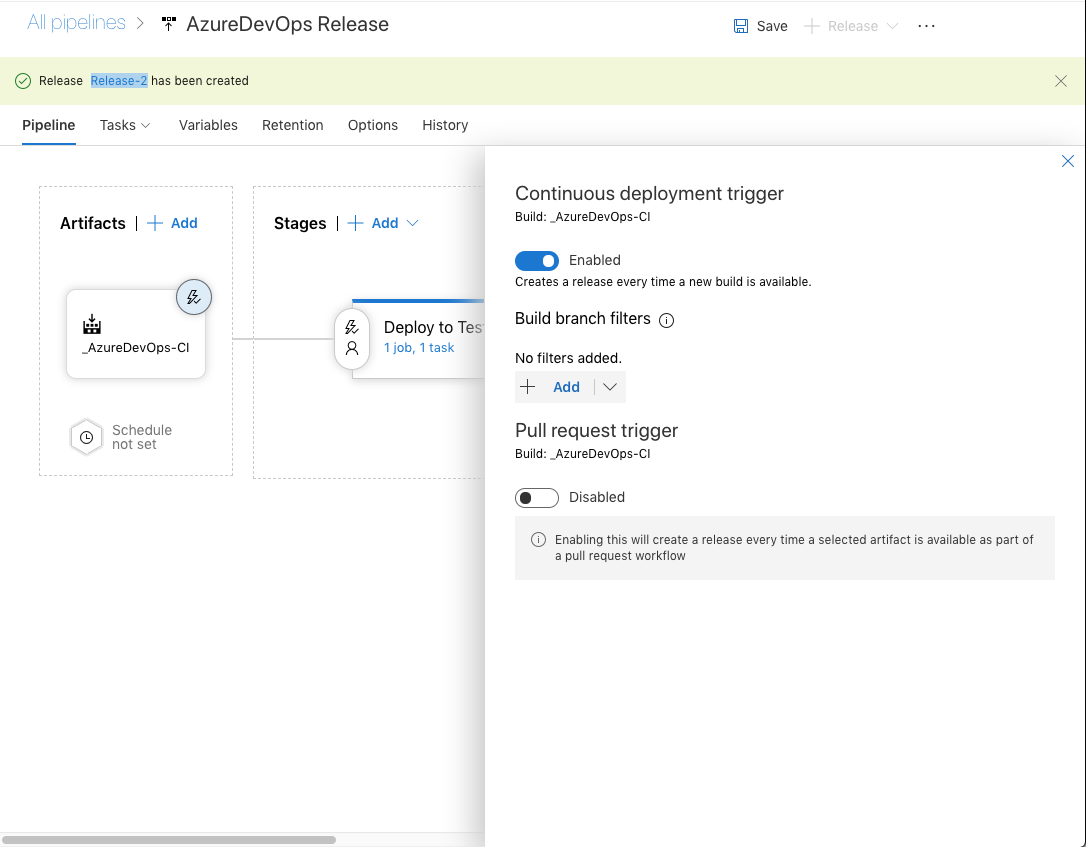
Now that you have a working release pipeline, the next step is to turn on Continuous Deployment. To do that, go to the Pipeline page. You may need to close the instance of your release you just ran. Click the lighting bolt icon wand it will highlight Continuous Deployment Trigger. Click on that.
Click the lightning bolt icon on the artifact
Now toggle the Continuous deployment trigger to Enabled. You may optionally add branch filters.
Enable Continuous deployment
That’s it. You’re now ready to go with Continuous Deployment! Be sure you save when you are done. You can optionally add approvals and other steps that you would like along the way.
Setting up a production stage
You might want to set up another stage for another environment like production. This can be manually triggered but eventually you could tie it to testing criteria and approval if you wanted. However over your Stage and select Clone.
Clone your existing stage.
I like to start with manual triggering for production. To do that, edit the pre-deployment condition.
Click the lightning bolt button on the stage.
Now select Manual only.
Configure the Production Stage for Manual Only
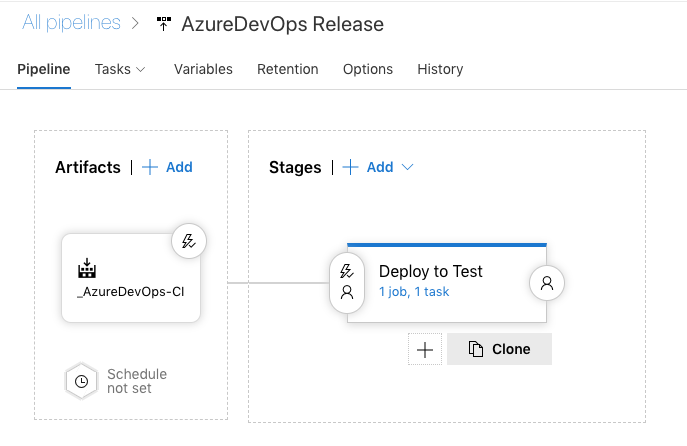
Here is what my pipeline looks like it is done.
Final release pipeline.
The last step is to set our production environment variable. Click on Tasks -> Deploy to Production and then PowerShell Script. Change the environment variable named environment to a value of production. My PowerShell script has the value as lower case so you’ll need to match that.
Give the environment variable a new value of production.
Conclusion
This was a lot of steps and screenshots but hopefully it’s not too bad. The PnP SPFx Generator definitely saves a lot of steps with the build. Now you can experiment with the release and see what works for you.
You can also check out my GitHub repository for all of the code I used today.
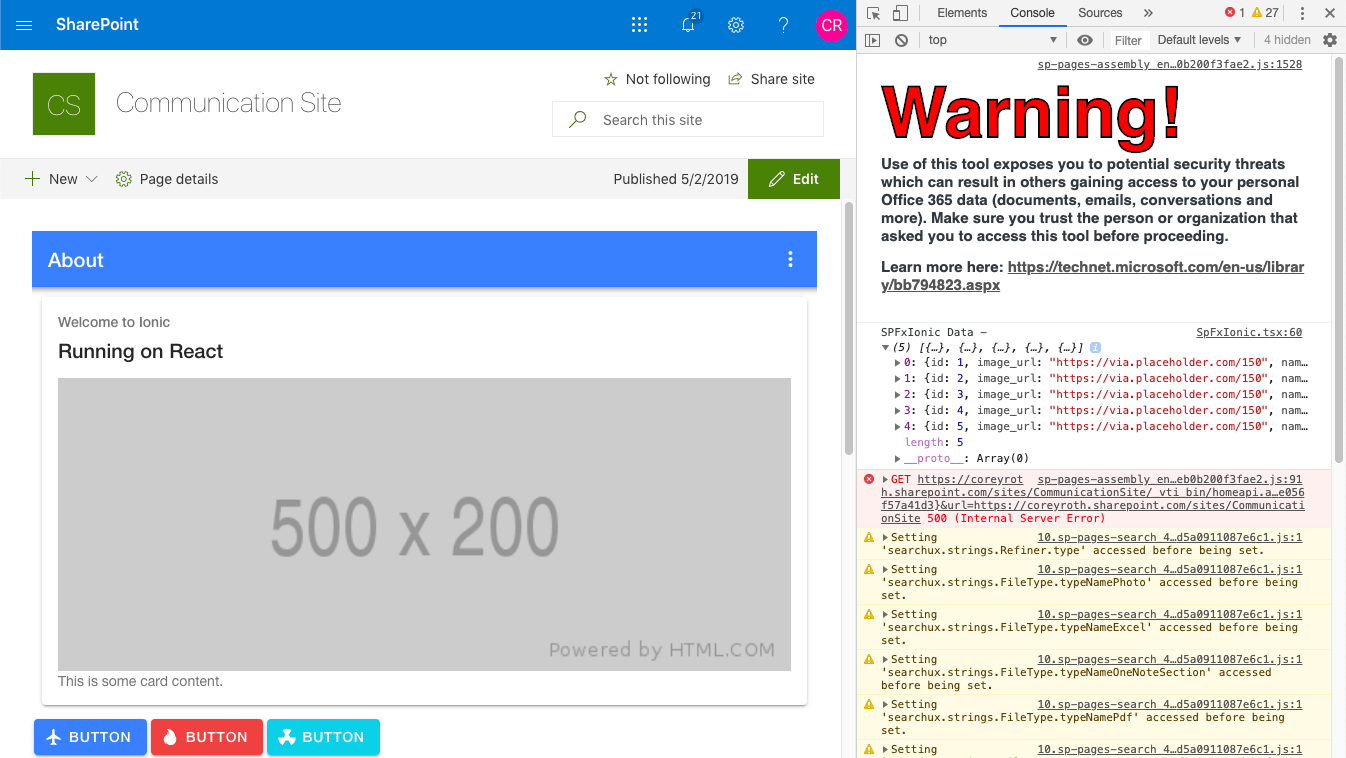
Many experienced SPFx developers know you don’t have to debug your web part in the workbench in SharePoint Online. While the workbench is great, there are certain things that you just can’t test there such as application customizers and full-width web part zones. In the past six months or so, I’ve mentored a number of new SPFx developers and this gets them hung up every time.
To debug your web part on an existing SharePoint page, start by running gulp serve just like your normally would. Now, navigate to that page and then append the following to the query string:
When the page loads, you will be prompted to allow debug scripts. Click the Load debug scripts and your web part will be loaded just like it would in the workbench.
Click Load debug scripts to start debugging.
If you haven’t added this web part to the page before, you can now add it.
Add the web part you are debugging.
Then when you view the developer console, you can see that the files are being served locally. You can set breakpoints from the source tab (or in VS Code if you have it set up) just like you could with the workbench.
Notice the .tsx file shows up from the console.log statement.
You can set breakpoints from the source tab (or in VS Code if you have it set up) just like you could with the workbench.
Stopping at a breakpoint in Chrome.
The only real difference here is that you have to refresh the page manually after your code builds.
Again, I know a lot of SPFx developers already know about this but I keep finding that new developers don’t realize this so I wanted to put something quick together on it.